Kapitola 16. Nabídky

Obsah

1. Introduction to Menus
1.1. The Image Menu Bar
1.2. Context Menus
1.3. Tear-off menus
1.4. Tab menus
2. Soubor
2.1. Overview
2.2. New…
2.3. Vytvořit
2.4. File Open…
2.5. Open as Layers…
2.6. Open Location…
2.7. Otevřít nedávný
2.8. Uložit
2.9. Save as…
2.10. Save a Copy…
2.11. Revert
2.12. Export… and Overwrite…
2.13. Export As…
2.14. Create Template…
2.15. Vytisknout
2.16. Send by Email
2.17. Copy Image Location
2.18. Show in File Manager
2.19. Zavřít
2.20. Zavřít
2.21. Ukončit
3. Upravit
3.1. Soubor
3.2. Undo
3.3. Znovu
3.4. Historie vracení
3.5. Vyjmout
3.6. Kopírovat
3.7. Kopírovat viditelné
3.8. Vložit
3.9. Paste Into Selection
3.10. Paste In Place
3.11. Paste Into Selection In Place
3.12. Paste as
3.13. Buffer
3.14. Vymazat
3.15. Vyplnit barvou popředí
3.16. Vyplnit barvou pozadí
3.17. Vyplnit vzorkem
3.18. Fill Selection Outline
3.19. Fill Path
3.20. Vykreslit výběr
3.21. Vykreslit cestu
3.22. Preferences
3.23. Input Devices
3.24. Klávesové zkratky
3.25. Moduly
3.26. Units
4. Výběr
4.1. Selection
4.2. Vše
4.3. None
4.4. Invertovat
4.5. Float
4.6. Podle barvy
4.7. Z cesty
4.8. Editor výběru
4.9. Prolnutí
4.10. Sharpen
4.11. Zmenšit
4.12. Zvětšit...
4.13. Obvod
4.14. Remove Holes
4.15. Distort
4.16. Zaoblený obdélník
4.17. Přepnout rychlou masku
4.18. Uložit do kanálu
4.19. Do cesty
5. Zobrazení
5.1. Zobrazení
5.2. Nový pohled
5.3. Show All
5.4. Bod na bod
5.5. Zoom
5.6. Flip & Rotate (0°)
5.7. Center Image in Window
5.8. Okno dle obrázku
5.9. Přes celou obrazovku
5.10. Navigační okno
5.11. Display Filters
5.12. Relative colorimetric
5.13. Show Selection
5.14. Zobrazovat hranici vrstvy
5.15. Show Canvas Boundary
5.16. Zobrazovat vodítka
5.17. Zobrazovat mřížku
5.18. Show Sample Points
5.19. Chytat na vodítka
5.20. Chytat ke mřížce
5.21. Snap to Canvas
5.22. Snap to Active Path
5.23. Padding Color
5.24. Zobrazovat lištu nabídky
5.25. Zobrazovat pravítka
5.26. Zobrazovat rolovací lišty
5.27. Zobrazovat stavovou lištu
6. Obrázek
6.1. Overview
6.2. Duplicate
6.3. Mode
6.4. RGB
6.5. Odstíny šedi
6.6. Indexovaný režim
6.7. Precision
6.8. Color Management
6.9. Enable Color Management
6.10. Assign Color Profile
6.11. Convert to Color Profile
6.12. Discard Color Profile
6.13. Save Color Profile to File
6.14. Transformovat
6.15. Překlápění
6.16. Rotace
6.17. Velikost plátna
6.18. Fit Canvas to Layers
6.19. Fit Canvas to Selection
6.20. Velikost tisku
6.21. Velikost obrázku
6.22. Crop Image
6.23. Slice Using Guides
6.24. Horlivé ořezávání
6.25. Sloučit viditelné vrstvy
6.26. Zploštit obrázek
6.27. Align Visible Layers…
6.28. Guides
6.29. New Guide
6.30. New Guide (by Percent)
6.31. New Guides from Selection
6.32. Remove all guides
6.33. Configure Grid…
6.34. Informační okno
6.35. Metadata
6.36. Metadata Viewer
6.37. Metadata Editor
7. The Layer Menu
7.1. Vrstvy
7.2. Nová vrstva
7.3. New From Visible
7.4. New Layer Group
7.5. Duplikovat vrstvu
7.6. Ukotvit vrstvu
7.7. Merge Down
7.8. Merge Layer Group
7.9. Delete Layer
7.10. The Text Commands of the Layer Menu
7.11. Zahodit informace o textu
7.12. Stack Submenu
7.13. Select Previous Layer
7.14. Select Next Layer
7.15. Select Top Layer
7.16. Select Bottom Layer
7.17. Raise Layer
7.18. Lower Layer
7.19. Layer to Top
7.20. Layer to Bottom
7.21. The Reverse Layer Order command
7.22. Maska
7.23. Přidat masku vrstvy
7.24. Apply Layer Mask
7.25. Delete Layer Mask
7.26. Show Layer Mask
7.27. Edit Layer Mask
7.28. Disable Layer Mask
7.29. Mask to Selection
7.30. Add Layer Mask to Selection
7.31. Subtract Layer Mask from Selection
7.32. Intersect Layer Mask with Selection
7.33. The Transparency Submenu of the Layer menu
7.34. Přidat alfa kanál
7.35. Remove Alpha Channel
7.36. Barva do alfy
7.37. Částečně zploštit
7.38. Práh alfy
7.39. Alfa do výběru
7.40. Přidat k výběru
7.41. Ubrat z výběru
7.42. Průnik s výběrem
7.43. The Transform Submenu
7.44. Flip Horizontally
7.45. Flip Vertically
7.46. Rotate 90° clockwise
7.47. Rotate 90° counter-clockwise
7.48. Rotate 180°
7.49. Arbitrary Rotation
7.50. Offset
7.51. Layer Boundary Size
7.52. Layer to Image Size
7.53. Velikost vrstvy
7.54. Ořezat vrstvu
8. The Colors Menu
8.1. Introduction to the Colors Menu
8.2. Color Balance
8.3. Color Temperature
8.4. Hue Chroma
8.5. Hue-Saturation
8.6. Saturation
8.7. Exposure
8.8. Shadows-Highlights
8.9. Brightness-Contrast
8.10. Levels
8.11. Curves
8.12. Invertovat
8.13. Linear Invert
8.14. Inverze hodnoty
8.15. The Auto Submenu
8.16. Ekvalizovat
8.17. White Balance
8.18. Roztáhnout kontrast
8.19. Stretch Contrast HSV
8.20. Vylepšit barvy
8.21. Color Enhance (legacy)
8.22. The Components Submenu
8.23. Filtry
8.24. Extract Component
8.25. Mono Mixer
8.26. Komponovat
8.27. Dekomponovat
8.28. TODO
8.29. The Desaturate Submenu
8.30. Color to Gray
8.31. Desaturate
8.32. Mono Mixer
8.33. Sepia
8.34. The Map Submenu
8.35. Přerovnat barevnou mapu.
8.36. Set Colormap
8.37. Filtry
8.38. Záměna barev
8.39. Rotace barevné mapy
8.40. Mapování z přechodu
8.41. Mapování z palety
8.42. Vzor vybarvení
8.43. The Tone Mapping Submenu
8.44. Fattal et al. 2002
8.45. Mantiuk 2006
8.46. Reinhard 2005
8.47. Stress
8.48. Retinex
8.49. TODO
8.50. HSV
8.51. Průměr okraje
8.52. Analýza barevné krychle
8.53. Export Histogram
8.54. Plynulá paleta
8.55. Threshold
8.56. Colorize
8.57. Posterize
8.58. Color to Alpha…
8.59. Dither
8.60. RGB Clip
8.61. Hot…
9. Nástroje
9.1. Nástroje
10. Filtry
10.1. Filtry
10.2. Zopakovat
10.3. Znovu zobrazit poslední
10.4. Přenastavit všechny filtry
10.5. The Python-Fu Submenu
10.6. Script-Fu
11. Windows Menu
12. Nápověda
12.1. Introduction to the Help Menu
12.2. Help
12.3. Kontextová nápověda
12.4. Tip dne
12.5. O aplikaci
12.6. Search and Run a Command
12.7. Prohlížeč zásuvných modulů
12.8. Prohlížeč procedur
12.9. Bug Reports and Feature Requests
12.10. GIMP online
12.11. User Manual

1. Introduction to Menus

There are many places in GIMP where you can find menus. The aim of this chapter is to explain all the commands that are accessible from the image menu bar and the image menu you can get by right clicking in the canvas. All the context menus and the menu entries for the other dialogs are described elsewhere in the chapters that describe the dialogs themselves.

1.1. The Image Menu Bar

This menu bar may contain other entries if you have added script-fus, python-fus or videos to your GIMP.

1.2. Context Menus

If you right-click on certain parts of the GIMP interface, a context menu opens, which leads to a variety of functions. Some places where you can access context menus are:

  • Clicking on an image window displays the Image menu. This is useful when you are working in full-screen mode, without a menubar.

  • Clicking on a layer in the Layers Dialog or on a channel in the Channels Dialog displays functions for the selected layer or channel.

  • Right-clicking on the image menubar has the same effect as left-clicking.

  • Right-clicking on the title bar displays functions which do not belong to GIMP, but to the window manager program on your computer.

1.3. Tear-off menus

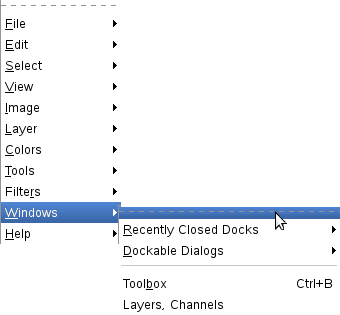
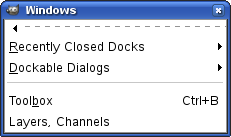
There is an interesting property associated with some of the menus in GIMP. These are any of the menus from the Image context menu you get by right-clicking on the canvas and any of its submenus. (You can tell that a menu item leads to a submenu because there is an icon next to it.) When you bring up any of these menus, there is a dotted line at the top of it (tear-off line). By clicking on this dotted line, you detach the menu under it and it becomes a separate window.

Obrázek 16.1. The windows submenu and its tear-off submenu

The „windows“ submenu and its tear-off submenu

Tear-off menus are actually independent. They are always visible, their functions always apply to the current image, and they persist when all of the images are closed. You can close a tear-off submenu by clicking on the dotted line again or closing the window from the window manager on your computer (often by clicking on an X icon in the upper right corner of the window).

These tear-off submenus are also created in single-window mode, but are of less interest since they are masked by the window as soon as you click on it.

1.4. Tab menus

The following type of menus is not related to the image menu bar, but for the sake of completeness:

Every dockable dialog contains a Tab Menu button, as highlighted below. Pressing this Tab Menu button opens a special menu of tab-related operations, with an entry at the top that opens into the dialog's context menu.

Obrázek 16.2. A dockable dialog.

A dockable dialog.

A dialog window with the Tab menu button highlighted.

A dockable dialog.

The Tab menu.


See 2.3.2 – „Nabídka karty“ to learn more about Tab menus.