| 2.2. New… | ||
|---|---|---|

|
2. Soubor |  |
| 2.2. New… | ||
|---|---|---|
|
|
2. Soubor | |
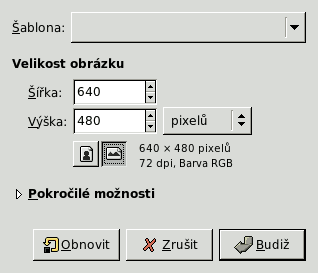
Using the „Create a New Image“ dialog, you can create a new empty image and set its properties. The image is shown in a new image window. You may have more than one image on your screen at the same time.
You can access the command in the image menu through: → ,
Dialog můžete také vyvolat klávesovou zkratkou Ctrl+N.
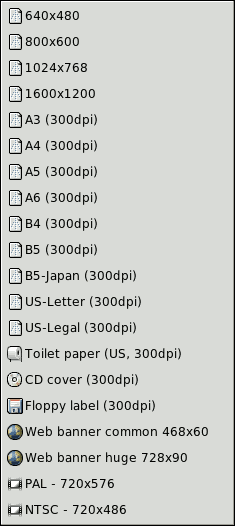
Rather than entering all the values by hand, you can select some predefined values for your image from a menu of templates, which represent image types that are somewhat commonly useful. The templates set values for the size, resolution, comments, etc. If there is a particular image shape that you use often and it does not appear on the list, you can create a new template, using the Templates dialog.
Zde lze nastavit šířku a výšku nového obrázku. Výchozí jednotkou jsou pixely, ale s pomocí rozbalovací nabídky vpravo lze zvolit i jiné jednotky. Pokud tak učiníte, uvědomte si, že výsledná velikost v pixelech je závislá na rozlišení X a Y, které lze nastavit v části Pokročilé možnosti tohoto dialogu. Důležité je také nastavení volby Bod na bod v nabídce .
If no image is open, the „New“ image is opened in the empty image window, with the default size you have determined. If you open the „New“image when another is open (or has been), then it is opened in another window, with the same size as the first image.
![[Poznámka]](images/note.png)
|
Poznámka |
|---|---|
|
Mějte na paměti, že je v paměti uložen každý jednotlivý pixel obrázku. Pokud vytvoříte obrázek s velkým počtem pixelů, spotřebuje GIMP velké množství paměti a operace budou trvat dlouhou dobu. |
Tato tlačítka slouží k přepínání orientace obrázku, jinými slovy prohazují šířku a výšku obrázku. Pokud se X a Y rozlišení navzájem liší (Pokročilé možnosti), jsou také prohozena.
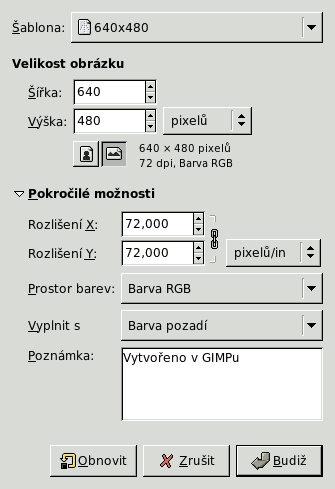
Volby v této části jsou užitečné zejména pro pokročilé uživatele. (GIMP 2.0 nerozlišuje mezi základními a pokročilými volbami, všechny jsou zobrazeny současně.)
Tyto hodnoty jsou důležité zejména při tisku, neovlivňují velikost obrázku v pixelech, ale jeho rozměry na papíře po vytištění. Mohou také ovlivnit jeho zobrazení na monitoru: pokud je vypnuta volba Boda na bod v nabídce , tak se při 100% přiblížení snaží GIMP obrázek zobrazit ve správných fyzických rozměrech (vypočtených z velikosti v pixelech a rozlišení). Pokud však není monitor zkalibrován, nemusí být rozměry přesné. Kalibraci lze provést buď při instalaci Gimpu, nebo v části Zobrazení dialogu Předvolby.
![[Tip]](images/tip.png)
|
Tip |
|---|---|
|
If you want to display the image on the screen at the correct dimensions, select → Set the zoom factor to 100% to see the image at its true screen size. The calibration of the screen size is normally done when GIMP is installed, but if the image does not display at the correct size, you may have to adjust the screen parameters in the GIMP. You can do this in the Preferences dialog. |
You can create the new image in different color modes, as either an RGB image or a grayscale image.
The image is created in the Red, Green, Blue color system, which is the one used by your monitor or your television screen.
The image is created in black and white, with various shades of gray. Aside from your artistic interests, this type of image may be necessary for some plug-ins. Nevertheless, the GIMP allows you to change an RGB image into grayscale, if you would like.
You cannot create an indexed image directly with this menu, but of course you can always convert the image to indexed mode after it has been created. To do that, use the → → command.
A huge step for GIMP: 16-32 bits per channel support is at last available. You are now able to work with a lot more color information and detail in your pictures. This support basically gives you the ability to create super-smooth color transitions on your picture. Next improvement will be to have RAW files edited with GIMP directly since there is enough color space to bring back all the details that are stored inside a RAW file – however this is not implemented yet.
Five options are available:
8-bit integer
16-bit integer
32-bit integer
16-bit floating point
32-bit floating point
If you wonder what the difference is between integer and floating point (in the graphics area): If you have an image with 16-bit integer precision per channel, then you have 65.536 shades of different red, green and blue color tones – all of them equally stepped to each other (equal color distance). If you have it in floating point, then there are no equal-wide steps – so you can distribute the possible color values over selected ranges. For example: if you know that you have a very dark image with many shades of dark red color tones then you would benefit from floating point because you can decrease the importance of the brighter color tones and get most color detail out of only the darker reds.
Obrázek 16.7. Precision example
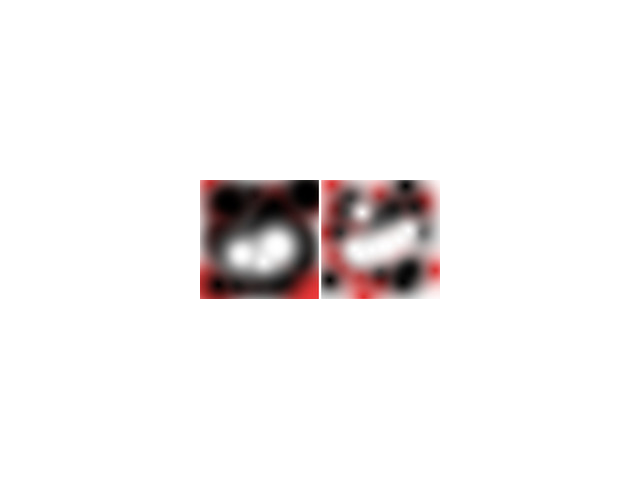
Left image is 8-bit, right is 32-bit. You can see that there are much more available colors between color transitions on the right image.
Here you can choose the channel encoding for your image. Choices are Perceptual gamma (sRGB) and Linear light. For 8-bit integer precision the default is Perceptual gamma, and for 32-bit floating point precision it is Linear light. For more information see which precision options should you choose.
When enabled (this is the default and should usually be left alone unless you know what you are doing), the image is color managed. This means that everything you do in GIMP will base their operations on the chosen color profile (see below) of your image. See for more information also Enable Color Management.
Here you can choose a color profile to be used for your image. The default is GIMP's standard color profile based on Color space, Precision, and Gamma. If you prefer to use a different color profile you can select an ICC color profile file from a location on your computer by choosing Select color profile from disk....
Existují čtyři barvy, kterými je možné vyplnit pozadí nového obrázku:
There are several choices:
Barva popředí z Panelu nástrojů.
Note that you can change the foreground color while the „New Image“ dialog window is open.
Fill the image with the current Background color, shown in the Toolbox. (You can change the background color too, while the dialog window is open.)
Bílá
Fill the image with Transparency. If you choose this option, the image is created with an alpha channel and the background is transparent. The transparent parts of the image are then displayed with a checkered pattern, to indicate the transparency.
Fill the image with a Pattern. If you choose this option, the image is filled with the currently active pattern (which you can change while this dialog is open).
You can write a descriptive comment here. The text is attached to the image as a parasite, and is saved with the image by some file formats (PNG, JPEG, GIF).
|
|
Poznámka |
|---|---|
|
Ne všechny formáty obrázku umí poznámky uložit. |