JPEG files usually have the extension .jpg or .jpeg. It is a very widely used format, because it compresses images very efficiently, while minimizing the loss of image quality. It does not, however, support transparency, animation or multiple layers.
In the past, the jpeg format was considered the best choice when the file size was a concern due to its good compression. However, nowadays there are several other formats that surpass jpeg in reducing file size. Some examples supported by GIMP are HEIF, JPEG xl and WebP.
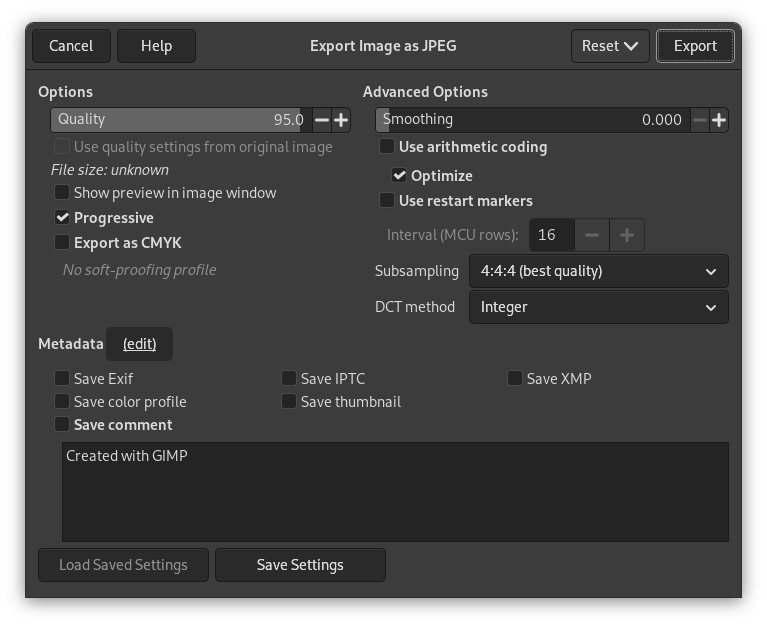
The JPEG algorithm is quite complex, which is reflected in its options. Most JPEG specific settings, except Quality, are usually left alone unless you understand what the effects of the setting are.
- 品質
-
The Quality level ranges from 0 to 100 and is an indication of the amount of expected artifacts. Because jpeg is a lossy format, there will always be a certain amount of loss of quality. For this reason, it is generally not a good idea to save jpeg images after altering them again and again, because each time you will loose a little more detail.
Values above 95, or even 90, are rarely useful and high values significantly increase the size of your jpeg images. The default quality of 85 usually produces excellent results, but in many cases it is possible to set the quality substantially lower without noticeably degrading the image. You can test the effect of different quality settings by checking Show Preview in image window in the JPEG dialog.
![[注記]](images/note.png)
注記 JPEG の品質レベルの数値は GIMP 独自のもので、 他のアプリケーションにとっては意味がありません。 仮に GIMP で 80 のレベルで保存したとして、 別のアプリケーションで 80 のレベルで保存したとしてもそこに必然的な共通性はありません。
- 原画の品位設定を使用
-
所定の品位設定 (つまり「量子化表」) を付加した画像が読み込まれているときは、 標準的な設定ではなしにこのオプションを使用することもできます。
もし作成された画像が元の画像を僅かに加工しただけのものである場合、 この設定を再利用すれば元の画像とほぼ同じ品質かつほぼ同じファイル容量で保存できます。 この方法はまた量子化ステップに起因する損失を、 別の品位設定を用いて行なうよりも小さくする効果があります。
元の画像の品位設定よりもあなたの規定の品位設定のほうが優れている場合にも 原画の品位設定を使用 オプションは利用可能ですが、 いっそ無効にしましょう。 この利用法はあなたの既定の設定で最低限度の品質が保たれていることが前提になります。 原画に大きな変更を加えていないので原画と同じ品質のまま保存したい—このような場合にこのオプションを使ってください。
- Show preview in image window
-
この項目を有効にすると、 品質 (やその他の JPEG のパラメーター) の変更を画像ウィンドウの表示で即座に反映します。 (しかし画像そのものを変化させているのではありません。 JPEG のダイアログを閉じれば画像の元来の状態に戻ります。)
Enabling this setting allows you to see an estimate of the file size of the jpeg image. Note this estimate does not include the metadata. If you enabled some or all of the metadata settings, the size will be more than shown, depending on the amount of metadata that was added to your image.
- 詳細設定
-
幾つかの詳細な設定情報
- スムージング
-
JPEG 圧縮は加工痕を残すことがあります。 このオプションを用いるとその発生が抑えられ、 画像が滑らかになります。 しかし画像はいくぶんぼやけます。
- プログレッシブ
-
このオプションが有効なときは、 ファイル内部で画像が分割され、 低速なネット回線でも画像が漸進的に表示できる順序に並べ替えられます。 JPEG のプログレッシブオプションは GIF 形式のインターレースオプションと同じ用途に使われます。 このオプションの弱点は、 プログレッシブオプションなしと比べてファイルの容量が若干大きくなることです。
注記 Beware that certain older TVs and photo frames (and maybe other devices) may not be able to show jpeg images that have been exported with the progressive setting enabled (which is the default).
- Export as CMYK
-
If you have a CMYK profile assigned to your image as soft-proofing profile, this setting can be checked to have your image exported using that CMYK profile. This is sometimes required when you have your image professionally printed. Your printing company will tell you if this is needed.
If this setting is disabled, you don't have a soft-proofing profile set for this image yet. See assigning a Soft-Proof Profile.
The name of the CMYK profile that is assigned to this image will be shown below this setting.
- Use arithmetic coding
-
Arithmetic encoding is a form of entropy encoding (a lossless data compression scheme) that can be used in exporting as JPEG. Images using arithmetic encoding can be 5 - 10 % smaller. But older software may have trouble opening these images.
- 最適化
-
このオプションを有効にすると、 エントロピー符号化による最適化が行なわれます。 その結果は容量が小さくなるのが特徴ですが、 生成にはもっと時間がかかります。
- Use restart markers
-
このオプションを有効にすると画像ファイル内部に分割読み込みを可能にするマーカーを挿入できます。 ウェブページの画像を読み込んでいる最中に接続が中断しても、 あとで途中のマーカーを起点にして読み込みを再開できます。
- Interval (MCU rows)
-
JPEG images are stored as a series of compressed square tiles named MCU (Minimum Coding Unit). You can set the size of these tiles (in pixels).
- サブサンプリング
-
The human eye is not sensitive in the same way over the entire color spectrum. The compression can use this to treat slightly different colors that the eye perceives as very close, as identical colors. The following methods are available:
- 4:4:4 (best quality)
-
This produces the best quality, preserving borders and contrasting colors, at the cost of not compressing as well as the other methods.
- 4:2:2 (chroma halved horizontally)
-
This is the standard subsampling, which usually provides a good ratio between image quality and file size. There are situations, however, in which using no subsampling (4:4:4) provides a noticeable increase in the image quality; for example, when the image contains fine details such as text over a uniform background, or images with almost-flat colors.
- 4:4:0 (chroma halved vertically)
-
This is similar to 4:2:2, but chroma is reduced in the vertical direction.
- 4:2:0 (chroma quartered)
-
This produces the smallest files. This suits images with weak borders but tends to denature colors.
- DCT 変換方法
-
DCT is 「discrete cosine transform」, and it is the first step in the JPEG algorithm going from the spatial to the frequency domain. The choices are:
- Fast Integer
-
This method is much less accurate than the other methods, but faster.
- Integer
-
This method is faster than Floating-Point, but not as accurate. This is the default.
- Floating-Point
-
This is slightly more accurate than the integer method, but is much slower unless your machine has very fast floating-point hardware. Also note that the results of the floating-point method may vary slightly across machines, while the integer methods should give the same results everywhere.
- Metadata (edit)
-
You can click the 「(edit)」 link to open the metadata editor to change or add any metadata that you want to be included in the image. Note: you will also still need to enable the relevant metadata saving options listed below.
The metadata settings in the export dialog override the default values set in your Metadata Export Preferences.
- Save Exif data
-
When this option is enabled, EXIF metadata will be saved in the exported image.
- Save IPTC data
-
When this option is enabled, IPTC metadata will be saved in the exported image.
- XMP データの保存
-
When this option is enabled, XMP metadata will be saved in the exported image.
- Save color profile
-
When this option is enabled, the color profile will be saved in the exported image.
- Save thumbnail
-
When this option is enabled a thumbnail will be saved in the exported image as part of the EXIF metadata. This will also cause certain EXIF tags to be saved, even if you have disabled saving EXIF metadata.
- Save comment
-
You can read this comment in the Image Properties.


