JPEG files usually have the extension .jpg or .jpeg. It is a very widely used format, because it compresses images very efficiently, while minimizing the loss of image quality. It does not, however, support transparency, animation or multiple layers.
In the past, the jpeg format was considered the best choice when the file size was a concern due to its good compression. However, nowadays there are several other formats that surpass jpeg in reducing file size. Some examples supported by GIMP are HEIF, JPEG xl and WebP.
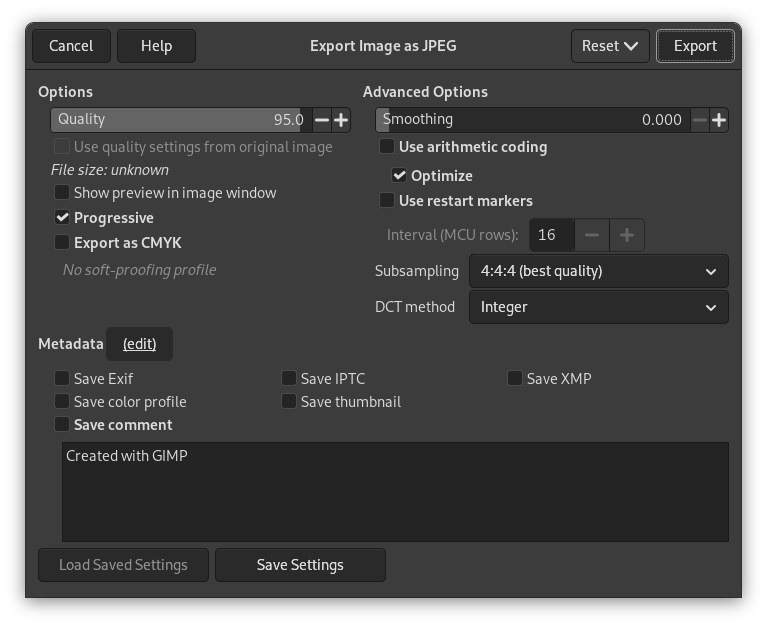
The JPEG algorithm is quite complex, which is reflected in its options. Most JPEG specific settings, except Quality, are usually left alone unless you understand what the effects of the setting are.
- Qualitat
-
The Quality level ranges from 0 to 100 and is an indication of the amount of expected artifacts. Because jpeg is a lossy format, there will always be a certain amount of loss of quality. For this reason, it is generally not a good idea to save jpeg images after altering them again and again, because each time you will loose a little more detail.
Values above 95, or even 90, are rarely useful and high values significantly increase the size of your jpeg images. The default quality of 85 usually produces excellent results, but in many cases it is possible to set the quality substantially lower without noticeably degrading the image. You can test the effect of different quality settings by checking Show Preview in image window in the JPEG dialog.
![[Nota]](images/note.png)
Nota Recordeu que el nivell de qualitat JPEG té un significat diferent depenent de l'aplicació. Desar amb un nivell de qualitat de 80 en el GIMP no és necessàriament comparable amb desar-ho amb un nivell de qualitat de 80 en una altra aplicació.
- Utilitza els paràmetres de qualitat de la imatge original
-
Si una «taula de quantificació» (informació de qualitat especial) es va adjuntar a la imatge en carregar-la, aquesta opció us permet utilitzar-la en lloc dels valors estàndards.
Si heu fet alguns canvis a la imatge, tornar a utilitzar el mateix paràmetre de qualitat donarà gairebé la mateixa qualitat i mida de fitxer que la imatge original. Això reduirà les pèrdues causades per l'algoritme de quantificació, comparat amb el que hauria estat si s'ajustés amb diferents valors.
Si els paràmetres de qualitat que es troben en el fitxer original no són millors que els paràmetres de qualitat per defecte, l'opció «Utilitza els paràmetres de qualitat de la imatge original» estarà disponible però no activada. Això assegura que sempre s'obtindrà la qualitat mínima especificada en la configuració per defecte. Si no feu grans canvis en la imatge i voleu desar-la amb la mateixa qualitat que l'original, es pot activar aquesta opció.
- Mostra la previsualització en la finestra d'imatge
-
En marcar aquesta opció cada canvi en la qualitat (o en un altre paràmetre JPEG) es mostrarà en la pantalla de la imatge. Això no altera la imatge: la imatge tornarà al seu estat inicial quan es tanqui el diàleg JPEG.
Enabling this setting allows you to see an estimate of the file size of the jpeg image. Note this estimate does not include the metadata. If you enabled some or all of the metadata settings, the size will be more than shown, depending on the amount of metadata that was added to your image.
- Opcions avançades
-
Una mica d'informació sobre la configuració avançada:
- Suavitzat
-
La compressió JPEG crea alteracions a la imatge. Utilitzant el lliscador, es pot suavitzar la imatge fent-la més o menys difuminada. Només s'ha de triar.
- Progressiu
-
Amb aquesta opció activada, si la imatge prové d'una web de connexió lenta, baixarà a trossos de manera progressiva. L'opció progressiva per JPEG té el mateix propòsit que l'opció entrellaça del GIF, però, malauradament produeix fitxers JPEG una mica més grans.
Nota Tingueu en compte que alguns televisors i marcs de fotos antics (i potser altres dispositius) poden no ser capaços de mostrar imatges jpeg que s'han exportat amb la configuració progressiva habilitada (que és el valor per defecte).
- Exporta com a CMYK
-
If you have a CMYK profile assigned to your image as soft-proofing profile, this setting can be checked to have your image exported using that CMYK profile. This is sometimes required when you have your image professionally printed. Your printing company will tell you if this is needed.
If this setting is disabled, you don't have a soft-proofing profile set for this image yet. See assigning a Soft-Proof Profile.
The name of the CMYK profile that is assigned to this image will be shown below this setting.
- Utilitzeu la codificació aritmètica
-
La Codificació aritmètica és una forma de codificació d'entropia (un esquema de compressió de dades sense pèrdues), que es pot utilitzar per a exportar com a JPEG. Les imatges amb codificació aritmètica poden ser d'un 5 - 10% més petites. Però els programes antics poden tenir problemes per a obrir aquestes imatges.
- Optimitza
-
Si s'activa aquesta opció, s'utilitzarà l'optimització dels paràmetres de codificació de l'entropia. Necessitarà més temps per a generar-se. Aquesta opció redueix la mida del fitxer mitjançant la reducció raonable del nombre de colors.
- Feu servir els marcadors de reinici
-
Els fitxers de la imatge poden incloure marcadors que permeten carregar la imatge en segments. Si una connexió s'interromp mentre es carrega la imatge en una pàgina web, la càrrega es pot reprendre des del marcador següent.
- Interval (files MCU)
-
Les imatges JPEG s'emmagatzemen com una sèrie de tessel·les comprimides anomenades MCU (Minimum Coding Unit = Unitats de codificació mínima). Podeu definir la mida d'aquestes tessel·les (en píxels).
- Sub mostreig
-
The human eye is not sensitive in the same way over the entire color spectrum. The compression can use this to treat slightly different colors that the eye perceives as very close, as identical colors. The following methods are available:
- 4:4:4 (best quality)
-
This produces the best quality, preserving borders and contrasting colors, at the cost of not compressing as well as the other methods.
- 4:2:2 (chroma halved horizontally)
-
This is the standard subsampling, which usually provides a good ratio between image quality and file size. There are situations, however, in which using no subsampling (4:4:4) provides a noticeable increase in the image quality; for example, when the image contains fine details such as text over a uniform background, or images with almost-flat colors.
- 4:4:0 (chroma halved vertically)
-
This is similar to 4:2:2, but chroma is reduced in the vertical direction.
- 4:2:0 (chroma quartered)
-
This produces the smallest files. This suits images with weak borders but tends to denature colors.
- Mètode DCT
-
DCT is «discrete cosine transform», and it is the first step in the JPEG algorithm going from the spatial to the frequency domain. The choices are:
- Fast Integer
-
This method is much less accurate than the other methods, but faster.
- Integer
-
This method is faster than Floating-Point, but not as accurate. This is the default.
- Floating-Point
-
This is slightly more accurate than the integer method, but is much slower unless your machine has very fast floating-point hardware. Also note that the results of the floating-point method may vary slightly across machines, while the integer methods should give the same results everywhere.
- Metadades (edició)
-
You can click the «(edit)» link to open the metadata editor to change or add any metadata that you want to be included in the image. Note: you will also still need to enable the relevant metadata saving options listed below.
The metadata settings in the export dialog override the default values set in your Metadata Export Preferences.
- Desa les dades EXIF
-
When this option is enabled, EXIF metadata will be saved in the exported image.
- Desa les dades IPTC
-
When this option is enabled, IPTC metadata will be saved in the exported image.
- Desa les dades XMP
-
When this option is enabled, XMP metadata will be saved in the exported image.
- Desa el perfil del color
-
When this option is enabled, the color profile will be saved in the exported image.
- Desa la miniatura
-
When this option is enabled a thumbnail will be saved in the exported image as part of the EXIF metadata. This will also cause certain EXIF tags to be saved, even if you have disabled saving EXIF metadata.
- Desa el comentari
-
Podeu llegir aquest comentari en les Propietats d'imatge.


