JPEG files usually have the extension .jpg or .jpeg. It is a very widely used format, because it compresses images very efficiently, while minimizing the loss of image quality. It does not, however, support transparency, animation or multiple layers.
In the past, the jpeg format was considered the best choice when the file size was a concern due to its good compression. However, nowadays there are several other formats that surpass jpeg in reducing file size. Some examples supported by GIMP are HEIF, JPEG xl and WebP.
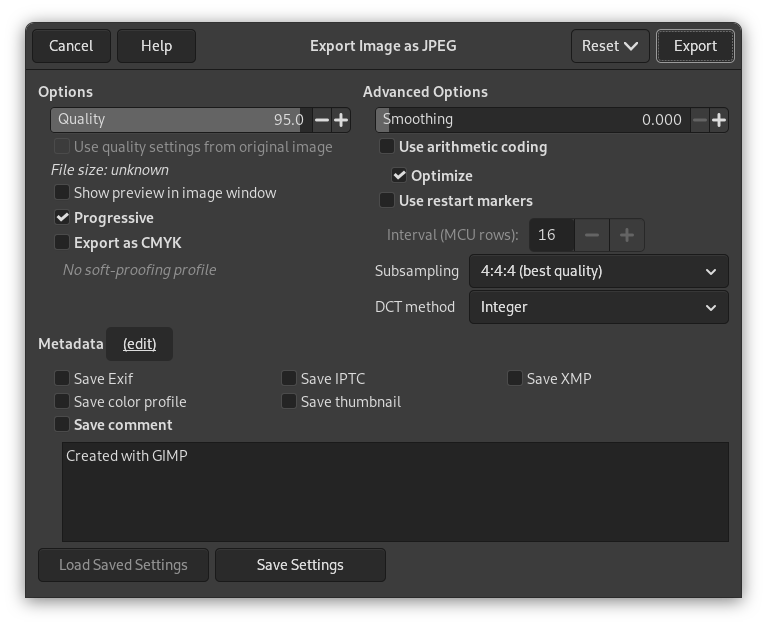
The JPEG algorithm is quite complex, which is reflected in its options. Most JPEG specific settings, except Quality, are usually left alone unless you understand what the effects of the setting are.
- Kvalitet
-
The Quality level ranges from 0 to 100 and is an indication of the amount of expected artifacts. Because jpeg is a lossy format, there will always be a certain amount of loss of quality. For this reason, it is generally not a good idea to save jpeg images after altering them again and again, because each time you will loose a little more detail.
Values above 95, or even 90, are rarely useful and high values significantly increase the size of your jpeg images. The default quality of 85 usually produces excellent results, but in many cases it is possible to set the quality substantially lower without noticeably degrading the image. You can test the effect of different quality settings by checking Show Preview in image window in the JPEG dialog.
![[Bemærk]](images/note.png)
Bemærk Bemærk, at tallet for JPEG-kvalitetsniveauet betyder noget forskelligt i forskellige programmer. Gemmes et billede i GIMP med et kvalitetsniveau på 80, kan det ikke nødvendigvis sammenlignes med et billede gemt med samme kvalitetsniveau i et andet program.
- Brug kvalitetsindstillingerne fra det oprindelige billede
-
Hvis en særlig kvalitetsindstilling (eller “kvantiseringstabel”) blev tilføjet til billedet, da det blev indlæst, så lader denne indstilling dig bruge den i stedet for standardindstillingen.
Har du kun foretaget nogle få ændringer i billedet, så vil genbrug af den samme kvalitetsindstilling give næsten samme kvalitet og filstørrelse som det oprindelige billede. Dette vil minimere tabene forårsaget af kvantiseringstrinnet sammenlignet med, hvad der vil ske med brug af andre kvalitetsindstillinger.
Er kvalitetsindstillingen i den oprindelige fil ikke bedre end dine standardkvalitetsindstillinger, så vil indstillingen “Brug kvalitetsindstillingerne fra det oprindelige billede” være tilgængelig, men ikke aktiveret. Det sikrer, at du som minimum får kvaliteten angivet i din standardindstilling. Foretog du ikke større ændringer i billedet og vil gemme det i samme kvalitet som det oprindelige, kan du gøre det ved at aktivere denne indstilling.
- Forhåndsvis i billedvindue
-
Afkrydses denne indstilling, vises enhver ændring af kvaliteten (eller enhver anden JPEG-parameter) direkte i billedet (Dette ændrer ikke billedet: Billedet vender tilbage til sin oprindelige tilstand, når JPEG-dialogen lukkes).
Enabling this setting allows you to see an estimate of the file size of the jpeg image. Note this estimate does not include the metadata. If you enabled some or all of the metadata settings, the size will be more than shown, depending on the amount of metadata that was added to your image.
- Avancerede indstillinger
-
Lidt information om de avancerede indstillinger:
- Udglatning
-
JPEG-komprimering medfører artefakter. Ved at bruge denne indstilling kan billedet udglattes, når det gemmes, hvorved artefakterne formindskes. Billedet vil dog blive lidt sløret.
- Progressiv
-
Aktiveres denne indstilling, vil billeddelene blive gemt i en rækkefølge, som tillader progressiv forbedring over en langsom internetforbindelse. Indstillingen progressiv for JPEG har samme formål som indstillingen indlæs gradvist for GIF. Desværre medfører aktivering af indstillingen progressiv lidt større filer end uden.
Bemærk Vær opmærksom på, at visse ældre fjernsyn og fotorammer (og måske andre enheder) måske ikke kan vise jpeg-billeder, der er eksporteret med den progressive indstilling aktiveret (som er standard).
- Eksportér som CMYK
-
If you have a CMYK profile assigned to your image as soft-proofing profile, this setting can be checked to have your image exported using that CMYK profile. This is sometimes required when you have your image professionally printed. Your printing company will tell you if this is needed.
If this setting is disabled, you don't have a soft-proofing profile set for this image yet. See assigning a Soft-Proof Profile.
The name of the CMYK profile that is assigned to this image will be shown below this setting.
- Brug aritmetisk kodning
-
Aritmetisk kodning er en form for entropikodning (en måde at komprimere tabsfrit på), som kan bruges ved eksport til JPEG. Billeder med aritmetisk kodning kan være 5–10 % mindre. Ældre programmer kan dog have problemer med at åbne dem.
- Optimér
-
Aktiveres denne indstilling, vil der ske en optimering af entropikodningsparametrene. Resultatet er typisk en mindre fil, som tager længere tid at generere.
- Anvend genstartsmarkeringer
-
Billedfilen kan indeholde markeringer, som tillader indlæsning af billedet i segmenter. Afbrydes forbindelsen, mens billedet på en webside indlæses, kan indlæsningen genoptages fra den næste markering.
- Interval (MCU-rækker)
-
JPEG-billeder gemmes som en række komprimerede, kvadratiske fliser kaldet MCU (Minimum Coding Unit). Du kan angive størrelsen af disse fliser (i pixels).
- Undersampling
-
The human eye is not sensitive in the same way over the entire color spectrum. The compression can use this to treat slightly different colors that the eye perceives as very close, as identical colors. The following methods are available:
- 4:4:4 (best quality)
-
This produces the best quality, preserving borders and contrasting colors, at the cost of not compressing as well as the other methods.
- 4:2:2 (chroma halved horizontally)
-
This is the standard subsampling, which usually provides a good ratio between image quality and file size. There are situations, however, in which using no subsampling (4:4:4) provides a noticeable increase in the image quality; for example, when the image contains fine details such as text over a uniform background, or images with almost-flat colors.
- 4:4:0 (chroma halved vertically)
-
This is similar to 4:2:2, but chroma is reduced in the vertical direction.
- 4:2:0 (chroma quartered)
-
This produces the smallest files. This suits images with weak borders but tends to denature colors.
- DCT-metode
-
DCT is “discrete cosine transform”, and it is the first step in the JPEG algorithm going from the spatial to the frequency domain. The choices are:
- Fast Integer
-
This method is much less accurate than the other methods, but faster.
- Integer
-
This method is faster than Floating-Point, but not as accurate. This is the default.
- Floating-Point
-
This is slightly more accurate than the integer method, but is much slower unless your machine has very fast floating-point hardware. Also note that the results of the floating-point method may vary slightly across machines, while the integer methods should give the same results everywhere.
- Metadata (redigér)
-
You can click the “(edit)” link to open the metadata editor to change or add any metadata that you want to be included in the image. Note: you will also still need to enable the relevant metadata saving options listed below.
The metadata settings in the export dialog override the default values set in your Metadata Export Preferences.
- Gem Exif-data
-
When this option is enabled, EXIF metadata will be saved in the exported image.
- Gem IPTC-data
-
When this option is enabled, IPTC metadata will be saved in the exported image.
- Gem XMP-data
-
When this option is enabled, XMP metadata will be saved in the exported image.
- Gem farveprofil
-
When this option is enabled, the color profile will be saved in the exported image.
- Gem miniature
-
When this option is enabled a thumbnail will be saved in the exported image as part of the EXIF metadata. This will also cause certain EXIF tags to be saved, even if you have disabled saving EXIF metadata.
- Gem kommentar
-
Du kan læse kommentaren i Billedegenskaber.


