JPEG files usually have the extension .jpg or .jpeg. It is a very widely used format, because it compresses images very efficiently, while minimizing the loss of image quality. It does not, however, support transparency, animation or multiple layers.
In the past, the jpeg format was considered the best choice when the file size was a concern due to its good compression. However, nowadays there are several other formats that surpass jpeg in reducing file size. Some examples supported by GIMP are HEIF, JPEG xl and WebP.
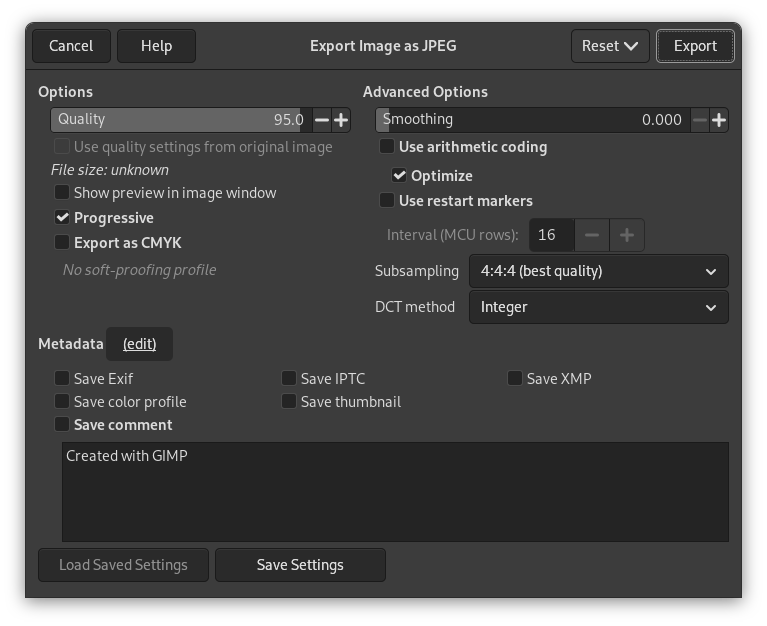
The JPEG algorithm is quite complex, which is reflected in its options. Most JPEG specific settings, except Quality, are usually left alone unless you understand what the effects of the setting are.
- Calidad
-
The Quality level ranges from 0 to 100 and is an indication of the amount of expected artifacts. Because jpeg is a lossy format, there will always be a certain amount of loss of quality. For this reason, it is generally not a good idea to save jpeg images after altering them again and again, because each time you will loose a little more detail.
Values above 95, or even 90, are rarely useful and high values significantly increase the size of your jpeg images. The default quality of 85 usually produces excellent results, but in many cases it is possible to set the quality substantially lower without noticeably degrading the image. You can test the effect of different quality settings by checking Show Preview in image window in the JPEG dialog.
![[Nota]](images/note.png)
Nota Tenga en cuenta que los números para el nivel de calidad JPEG tienen un significado diferente en aplicaciones diferentes. Guardar con un nivel de calidad de 80 en GIMP no es necesariamente comparable con guardar con un nivel de calidad de 80 en una aplicación diferente.
- Usar los ajustes de calidad de la imagen original
-
Si un ajuste particular de calidad (o una “cuantificación de cuadro”) se adjuntó a la imagen al cargarla, esta opción le permite usarlos en lugar de los estándares.
Si sólo ha hecho unos pocos cambios a la imagen, volver a usar el mismo ajuste de calidad le dará caso la misma calidad y tamaño de archivo que la imagen original. Esto reducirá las perdidas por el paso de la cuantificación, comparado con los que sucedería si usara un ajuste diferente de calidad.
Si los ajustes de calidad que se encuentran en el archivo original no son mejores que los ajustes de calidad predeterminados, la opción “Usar los ajustes de calidad de la imagen original” estará disponible pero no activada. Esto asegura que siempre obtendrá al menos la calidad especificada en sus ajustes predeterminados. Si no hace cambios mayores en la imagen y quiere guardarla usando la misma calidad que el original, puede hacer esto activando esta opción.
- Mostrar vista previa en la ventana de imagen
-
Al marcar esta opción cada cambio en la calidad (o en otro parámetro JPEG) se muestra en la pantalla de la imagen. (Esto no altera la imagen: la imagen vuelve a su estado original cuando se cierra el diálogo JPEG.)
Enabling this setting allows you to see an estimate of the file size of the jpeg image. Note this estimate does not include the metadata. If you enabled some or all of the metadata settings, the size will be more than shown, depending on the amount of metadata that was added to your image.
- Opciones avanzadas
-
Algo de información sobre la configuración avanzada:
- Suavizado
-
La compresión JPEG crea artefactos. Usando esta opción, puede suavizar la imagen al guardar, reduciéndolos. Pero su imagen se vuelve algo desenfocada.
- Progresivo
-
Con esta opción activada, los fragmentos de la imagen se guardan en el archivo de manera que permita un refinamiento progresivo de la imagen durante la descarga web en una conexión lenta. La opción progresivo para JPEG tiene el mismo propósito que la opción entrelazar de GIF. Desafortunadamente, la opción progresivo produce archivos JPEG más grandes (que sin la opción progresivo).
Nota Tenga en cuenta que es posible que ciertos televisores y marcos de fotos antiguos (y quizás otros dispositivos) no puedan mostrar imágenes jpeg que se hayan exportado con la configuración progresiva activada (que es la predeterminada).
- Export as CMYK
-
If you have a CMYK profile assigned to your image as soft-proofing profile, this setting can be checked to have your image exported using that CMYK profile. This is sometimes required when you have your image professionally printed. Your printing company will tell you if this is needed.
If this setting is disabled, you don't have a soft-proofing profile set for this image yet. See assigning a Soft-Proof Profile.
The name of the CMYK profile that is assigned to this image will be shown below this setting.
- Usar codificación aritmética
-
Arithmetic encoding is a form of entropy encoding (a lossless data compression scheme) that can be used in exporting as JPEG. Images using arithmetic encoding can be 5 - 10 % smaller. But older software may have trouble opening these images.
- Optimizar
-
Si activa esta opción, se usará la optimización de los parámetros de codificación de la entropía. El resultado generalmente es un archivo más pequeño, pero necesita más tiempo para generarse.
- Usar reiniciar marcadores
-
Los archivos de la imagen pueden incluir marcadores que permiten que la imagen se cargue como segmentos. Si una conexión se rompe mientras se carga la imagen en una página web, la carga se puede reiniciar desde el marcador siguiente.
- Intervalo (filas MCU)
-
Las imágenes JPEG se almacenan como una serie de mosaicos cuadrados comprimidos llamados MCU (unidad mínima de codificación). Puede establecer el tamaño de estos mosaicos (en píxeles).
- Submuestreo
-
The human eye is not sensitive in the same way over the entire color spectrum. The compression can use this to treat slightly different colors that the eye perceives as very close, as identical colors. The following methods are available:
- 4:4:4 (best quality)
-
This produces the best quality, preserving borders and contrasting colors, at the cost of not compressing as well as the other methods.
- 4:2:2 (chroma halved horizontally)
-
This is the standard subsampling, which usually provides a good ratio between image quality and file size. There are situations, however, in which using no subsampling (4:4:4) provides a noticeable increase in the image quality; for example, when the image contains fine details such as text over a uniform background, or images with almost-flat colors.
- 4:4:0 (chroma halved vertically)
-
This is similar to 4:2:2, but chroma is reduced in the vertical direction.
- 4:2:0 (chroma quartered)
-
This produces the smallest files. This suits images with weak borders but tends to denature colors.
- Método DCT
-
DCT is “discrete cosine transform”, and it is the first step in the JPEG algorithm going from the spatial to the frequency domain. The choices are:
- Fast Integer
-
This method is much less accurate than the other methods, but faster.
- Integer
-
This method is faster than Floating-Point, but not as accurate. This is the default.
- Floating-Point
-
This is slightly more accurate than the integer method, but is much slower unless your machine has very fast floating-point hardware. Also note that the results of the floating-point method may vary slightly across machines, while the integer methods should give the same results everywhere.
- Metadatos (editar)
-
You can click the “(edit)” link to open the metadata editor to change or add any metadata that you want to be included in the image. Note: you will also still need to enable the relevant metadata saving options listed below.
The metadata settings in the export dialog override the default values set in your Metadata Export Preferences.
- Guardar los datos Exif
-
When this option is enabled, EXIF metadata will be saved in the exported image.
- Guardar los datos IPTC
-
When this option is enabled, IPTC metadata will be saved in the exported image.
- Guardar los datos XMP
-
When this option is enabled, XMP metadata will be saved in the exported image.
- Save color profile
-
When this option is enabled, the color profile will be saved in the exported image.
- Save thumbnail
-
When this option is enabled a thumbnail will be saved in the exported image as part of the EXIF metadata. This will also cause certain EXIF tags to be saved, even if you have disabled saving EXIF metadata.
- Save comment
-
You can read this comment in the Image Properties.


