JPEG files usually have the extension .jpg or .jpeg. It is a very widely used format, because it compresses images very efficiently, while minimizing the loss of image quality. It does not, however, support transparency, animation or multiple layers.
In the past, the jpeg format was considered the best choice when the file size was a concern due to its good compression. However, nowadays there are several other formats that surpass jpeg in reducing file size. Some examples supported by GIMP are HEIF, JPEG xl and WebP.
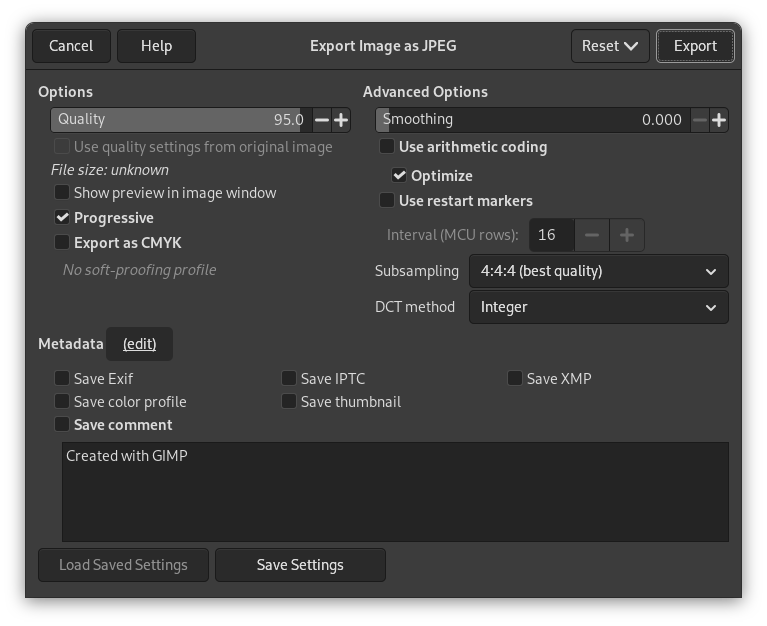
The JPEG algorithm is quite complex, which is reflected in its options. Most JPEG specific settings, except Quality, are usually left alone unless you understand what the effects of the setting are.
- Qualität
-
The Quality level ranges from 0 to 100 and is an indication of the amount of expected artifacts. Because jpeg is a lossy format, there will always be a certain amount of loss of quality. For this reason, it is generally not a good idea to save jpeg images after altering them again and again, because each time you will loose a little more detail.
Values above 95, or even 90, are rarely useful and high values significantly increase the size of your jpeg images. The default quality of 85 usually produces excellent results, but in many cases it is possible to set the quality substantially lower without noticeably degrading the image. You can test the effect of different quality settings by checking Show Preview in image window in the JPEG dialog.
![[Anmerkung]](images/note.png)
Anmerkung Bitte beachten Sie, dass die Werte in verschieden Anwendungen zu verschiedenen Qualitäten führen. Ein Wert von 80 in GIMP führt sehr wahrscheinlich zu anderen Ergebnissen als ein Qualitätswert von 80 in einer anderen Anwendung.
- Qualitätseinstellungen des Originalbildes verwenden
-
Falls das Bild bereits eine bestimmte Qualitätseinstellung („Quantisierungstabellen“) enthielt, als es geladen wurde, können Sie diese anstelle der Standardtabellen verwenden.
Haben Sie nur wenige Änderungen am Bild vorgenommen, dann erhalten Sie etwa dieselbe Qualität und Dateigröße wie beim ursprünglichen Bild, wenn Sie dieselbe Qualitätseinstellung wieder verwenden. Dies minimiert die Verluste durch den Quantisierungsschritt, verglichen mit dem Ergebnis bei der Verwendung ganz anderer Tabellen.
Falls die Qualitätseinstellungen im Originalbild nicht besser als Ihre Standard-Qualitätseinstellungen sind, dann ist die Eigenschaft „Qualitätseinstellungen des Originalbildes verwenden“ benutzbar, aber nicht aktiviert. Damit wird sichergestellt, dass Sie immer mindestens Ihre voreingestellte Qualität erhalten. Wenn Sie keine großen Änderungen am Bild vorgenommen haben und das Bild in derselben Qualität wie das Original exportieren wollen, können Sie das, indem Sie diese Eigenschaft aktivieren.
- Vorschau im Bildfenster anzeigen
-
Wenn Sie diese Eigenschaft einschalten, wird das Bild so dargestellt, als wäre die exportierte Datei wieder geladen worden. Sie können auf diese Weise sehr genau sehen, ab welchem Qualitätswert die Komprimierungsartefakte sichtbar werden. Dabei handelt es sich aber lediglich um eine Vorschau auf das Ergebnis des Exports. Sobald Sie das Dialogfenster verlassen haben, wird das Bild wieder in voller Qualität angezeigt.
Enabling this setting allows you to see an estimate of the file size of the jpeg image. Note this estimate does not include the metadata. If you enabled some or all of the metadata settings, the size will be more than shown, depending on the amount of metadata that was added to your image.
- Erweiterte Einstellungen
-
Einige Erläuterungen zu den »erweiterten Einstellungen«:
- Glättung
-
JPG -Komprimierung erzeugt Artefakte. Mit dieser Eigenschaft können Sie das Bild beim Exportieren weichzeichnen lassen. Allerdings wird das Bild dann ein wenig verschwommen.
- Progressiv
-
Wenn Sie diese Eigenschaft aktivieren, werden die Bereiche des Bildes nicht fortlaufend von links oben nach rechts unten in die Datei exportiert, sondern in einer bestimmten Reihenfolge. Dies hat den Vorteil, dass bereits nach dem Laden eines kleinen Teils der Bilddatei eine grobe Ansicht dargestellt werden kann. Diese wird dann im weiteren Verlauf des Ladens immer weiter verfeinert. Dieses Vorgehen ist besonders bei großen Dateien sinnvoll, wenn diese im Internet bereitgestellt werden sollen. Es soll jedoch nicht verschwiegen werden, dass sich die Gesamtgröße der Datei durch das Einschalten dieser Eigenschaft geringfügig erhöht.
Anmerkung Beachten Sie, dass einige ältere Fernseher und Fotorahmen (sowie eventuell weitere Geräte) vielleicht nicht in der Lage sind, JPEG-Bilder anzuzeigen, die im progressiven Format gespeichert wurden. Das progressive Format ist standardmäßig aktiv.
- Export as CMYK
-
If you have a CMYK profile assigned to your image as soft-proofing profile, this setting can be checked to have your image exported using that CMYK profile. This is sometimes required when you have your image professionally printed. Your printing company will tell you if this is needed.
If this setting is disabled, you don't have a soft-proofing profile set for this image yet. See assigning a Soft-Proof Profile.
The name of the CMYK profile that is assigned to this image will be shown below this setting.
- Arithmetische Kodierung verwenden
-
Arithmetic encoding is a form of entropy encoding (a lossless data compression scheme) that can be used in exporting as JPEG. Images using arithmetic encoding can be 5 - 10 % smaller. But older software may have trouble opening these images.
- Optimieren
-
Wenn Sie diese Eigenschaft aktivieren, wird die Optimierung der Parameter zur Kodierung der Entropie eingeschaltet. Das Ergebnis ist meistens eine kleinere Datei, dafür dauert es etwas länger.
- Startmarkierungen verwenden
-
Wenn Sie diese Eigenschaft aktivieren, werden in die Bilddatei spezielle Markierungen eingefügt. Diese bewirken, dass im Fall einer Unterbrechung des Ladens dieser Bilddatei aus dem Internet der Download an der Stelle des Abbruchs fortgesetzt werden kann und nicht die gesamte Bilddatei erneut übertragen werden muss.
- Intervall (MCU-Reihen)
-
JPEG-Bilder werden als Serie von komprimierten quadratischen Zellen gespeichert, die MCU (»Minimum Coding Unit«, deutsch »Kleinste Kodierungseinheit«) genannt werden. Sie können die Größe dieser Zellen (in Pixeln) bestimmen.
- Zwischenschritte
-
The human eye is not sensitive in the same way over the entire color spectrum. The compression can use this to treat slightly different colors that the eye perceives as very close, as identical colors. The following methods are available:
- 4:4:4 (best quality)
-
This produces the best quality, preserving borders and contrasting colors, at the cost of not compressing as well as the other methods.
- 4:2:2 (chroma halved horizontally)
-
This is the standard subsampling, which usually provides a good ratio between image quality and file size. There are situations, however, in which using no subsampling (4:4:4) provides a noticeable increase in the image quality; for example, when the image contains fine details such as text over a uniform background, or images with almost-flat colors.
- 4:4:0 (chroma halved vertically)
-
This is similar to 4:2:2, but chroma is reduced in the vertical direction.
- 4:2:0 (chroma quartered)
-
This produces the smallest files. This suits images with weak borders but tends to denature colors.
- DCT-Methode
-
DCT is „discrete cosine transform“, and it is the first step in the JPEG algorithm going from the spatial to the frequency domain. The choices are:
- Fast Integer
-
This method is much less accurate than the other methods, but faster.
- Integer
-
This method is faster than Floating-Point, but not as accurate. This is the default.
- Floating-Point
-
This is slightly more accurate than the integer method, but is much slower unless your machine has very fast floating-point hardware. Also note that the results of the floating-point method may vary slightly across machines, while the integer methods should give the same results everywhere.
- Metadaten (bearbeiten)
-
You can click the „(edit)“ link to open the metadata editor to change or add any metadata that you want to be included in the image. Note: you will also still need to enable the relevant metadata saving options listed below.
The metadata settings in the export dialog override the default values set in your Metadata Export Preferences.
- Exif-Daten speichern
-
When this option is enabled, EXIF metadata will be saved in the exported image.
- IPTC-Daten speichern
-
When this option is enabled, IPTC metadata will be saved in the exported image.
- XMP-Daten speichern
-
When this option is enabled, XMP metadata will be saved in the exported image.
- Farbprofil speichern
-
When this option is enabled, the color profile will be saved in the exported image.
- Vorschaubild speichern
-
When this option is enabled a thumbnail will be saved in the exported image as part of the EXIF metadata. This will also cause certain EXIF tags to be saved, even if you have disabled saving EXIF metadata.
- Save comment
-
You can read this comment in the Image Properties.


