Índice
Eventualmente pode acontecer de você estar trabalhando numa imagem, e querer que apenas uma parte da imagem seja afetada. No GIMP, você pode fazer isso acontecer selecionando a região desejada. Cada imagem tem uma seleção associada a ela. A maioria, mas não todas, as operações do GIMP funcionam apenas em partes selecionadas da imagem.
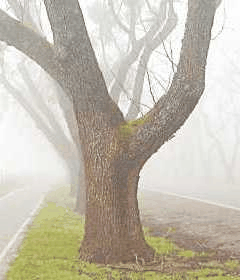
There are many, many situations where creating just the right selection is the key to getting the result you want, and often it is not easy to do. For example, in the above image, suppose you want to cut the tree out from its background, and paste it into a different image. To do this, you need to create a selection that contains the tree and nothing but the tree. It is difficult because the tree has a complex shape, and in several spots is hard to distinguish from the objects behind it.
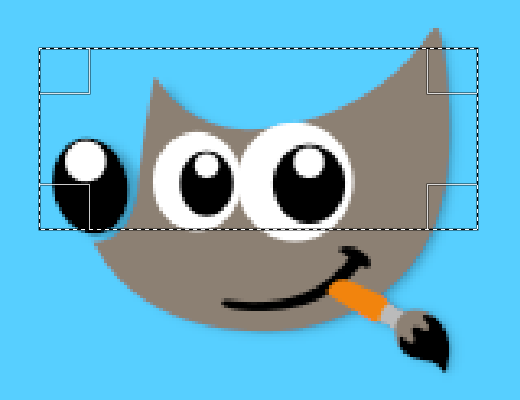
Agora aqui está um ponto muito importante, e é crucial entender isso. Normalmente, quando você cria uma seleção, você a vê como uma linha tracejada contendo uma parte da imagem. Uma ideia comum, mas não muito correta, mas que serve como ideia inicial, é que a seleção é uma espécie de recipiente, com as partes selecionadas da imagem dentro, e as partes não selecionadas fora. Embora este conceito de seleção seja bom para muitos propósitos, não é inteiramente correto.
Na verdade, a seleção é implementada como um canal. Em termos da sua estrutura interna, ela é idêntica aos canais vermelho, verde, azul, e alfa de uma imagem. Assim, a seleção tem um valor definido em cada pixel da imagem, variando entre 0 (não selecionado) e 255 (totalmente selecionado). A vantagem desta abordagem é que ela permite que alguns pixels sejam selecionados parcialmente, dando-lhes valores intermediários entre 0 e 255. Como você poderá ver, há muitas situações onde é desejável ter transições suaves entre as regiões selecionadas e não selecionadas.
O que, então, é a linha tracejada que aparece quando você cria uma seleção?
A linha tracejada é uma linha de contorno, dividindo as áreas que são selecionadas com mais da metade do valor (128) de áreas que são menos selecionadas.
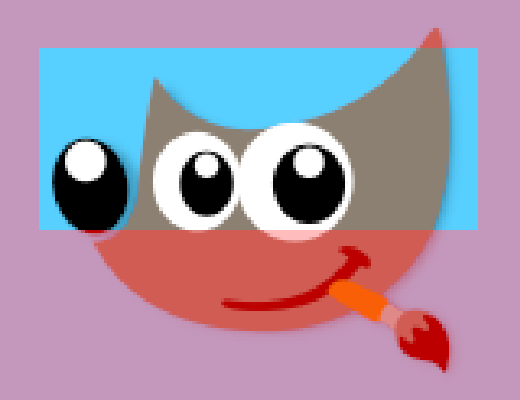
While looking at the dashed line that represents the selection, always remember that the line only tells part of the story. If you want to see the selection in full detail, the easiest way is to click the Quick Mask button in the lower left corner of the image window. This causes the selection to be shown as a translucent overlay atop the image. Selected areas are unaffected; unselected areas are reddened. The more completely selected an area is, the less red it appears.
Many operations work differently in Quick Mask mode, as mentioned in the Quick Mask overview. Use the Quick Mask button in the lower left corner of the image window to toggle Quick Mask mode on and off.
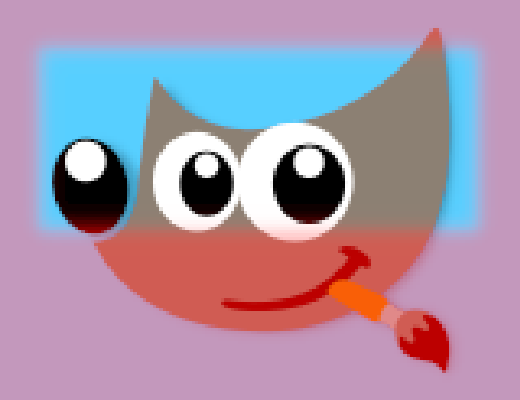
With the default settings, the basic selection tools, such as the Rectangle Select tool, create sharp selections. Pixels inside the dashed line are fully selected, and pixels outside completely unselected. You can verify this by toggling Quick Mask: you see a clear rectangle with sharp edges, surrounded by uniform red. Use the “Feather edges” checkbox in the Tool Options to toggle between graduated selections and sharp selections. The feather radius, which you can adjust, determines the distance over which the transition occurs.
If you are following along, try this with the Rectangle Select tool, and then toggle Quick Mask. You will see that the clear rectangle has a fuzzy edge.
Enevoar é muito útil quando você precisa cortar e colar, pois o objeto colado se combina suavemente com o entorno.
It is possible to feather a selection at any time, even if it was originally created as a sharp selection. Use → from the main menu to open the Feather Selection dialog. Set the feather radius and click . Use → to do the opposite—sharpen a graduated selection into an all-or-nothing selection.
![[Nota]](images/note.png)
|
Nota |
|---|---|
|
Explicando para os leitores mais técnicos: enevoar aplica uma desfocagem gaussiana no canal da seleção, com o nível de desfocagem igual ao raio selecionado. Você pode obter o mesmo efeito usando o filtro de desfocagem gaussiana com a Máscara Rápida ativa. |
Você pode escolher a opacidade da camada, mas não pode fazer o mesmo para uma seleção diretamente. Isso é muito útil para tornar a imagem de um vidro transparente ou translúcida. Use os métodos a seguir para alterar a opacidade da camada:
-
Para seleções simples, use a ferramenta “Borracha” com a opacidade desejada.
-
For complex selections: go to → and choose one of or . Either of these creates a new layer with the selection called “Floating Layer” (Secção 4.5, “Float”). Set the opacity slider in the Layers dialog to the desired opacity. Then anchor the selection: outside the selection, the mouse pointer includes an anchor. When you click while the mouse pointer includes the anchor, the floating selection disappears from the Layers dialog and the selection is at the right place and partially transparent (anchoring works this way only if a selection tool is activated: you can also use the Anchor Layer command in the context menu by right clicking on the selected layer in the Layers dialog).
And, if you use this function frequently: Ctrl-C to copy the selection, and Ctrl-V to paste the clipboard as a new layer. You can now adjust the opacity of the new layer.
-
Another way: use → → to add a layer mask to the layer with the selection, initializing it with the selection. Then use a brush with the desired opacity to paint the selection with black, i.e. paint it with transparency. Then → → . See Secção 2.1.4, “Layer masks”.
-
To make the solid background of an image transparent, add an Alpha channel, and use Fuzzy Select to select the background. Then, use the Color Picker tool to select the background color, which becomes the foreground color in Toolbox. Use the Bucket Fill tool with the selected color. Set the Bucket Fill mode to “Color Erase”, which erases pixels with the selected color; other pixels are partially erased and their color is changed.
Outro método simples está em → , o que deixará a seleção completamente transparente, se a camada tiver um canal alfa.


