Tabla de contenidos
Puede pensar en las capas como una pila de diapositivas. Usando capas, puede construir una imagen de varias partes conceptuales, cada una de las cuales puede ser manipulada sin afectar ninguna otra parte de la imagen. Las capas se apilan unas encima de otras. La capa inferior es el fondo de la imagen, y los componentes en el primer plano de la imagen aparecen sobre ella.
No hay límite para el número de capas que puede tener una imagen, solo la cantidad de memoria disponible en el sistema. No es raro que los usuarios avanzados trabajen con imágenes que contienen docenas de capas. Puede agrupar capas para facilitar su trabajo y hay muchos comandos para manejar capas.
The organization of layers in an image is shown in the Layers dialog. How it works is described in detail in the Layers Dialog section, but we will touch some aspects of it here, in relation to the layer properties that they display.
Each open image can have one or more active drawables. A “drawable” is a GIMP concept that includes layers, but also several other items, such as channels, layer masks, and the selection mask.
Basically, a “drawable” is anything that can be drawn on with painting tools. If a layer is currently active (i.e. it is selected), it is shown highlighted in the Layers dialog. If only one layer is selected, its name is shown in the status area of the image window.
To activate a layer click it. To select multiple layers, use the common key modifiers Shift for selecting a range, and Ctrl for adding or removing one layer from the selection. If none of the layers are highlighted, it means the active drawable is something else than a layer.
The main menu has a Layer submenu containing commands that affect the active layer or layers of the image. The context menu of the Layers Dialog has even more commands. This menu can be accessed by right-clicking on a layer.
There are several types of layers. The most common is the raster layer, which is the default. Other layer types are text layers, vector layers and link layers. Each of these have extra properties and commands specific to their purpose.
Cada capa de una imagen tiene una cantidad importante de atributos:
- Nombre
-
Cada capa tiene un nombre. Éste se asigna automáticamente cuando se crea la capa, pero lo puede cambiar. Para cambiarlo, puede pulsar dos veces sobre él en el diálogo de capas, o pulsar con el derecho y seleccionar la primera entrada del menú que aparece, .
- Presencia o ausencia de un canal alfa
-
An alpha channel encodes information about how transparent a layer is at each pixel. It is visible in the Channels dialog: white is complete opacity, black is complete transparency and gray levels are partial transparencies.
La capa de fondo es especial. Si crea una imagen nueva, sólo tiene una capa, que es la capa de fondo. Si la imagen se creó con un tipo de relleno opaco, esta capa no tiene canal alfa. Para obtener una capa de fondo con transparencia, se debe crear la imagen nueva con un tipo de relleno transparente o puede usar el comando Añadir un canal alfa.
Si agrega una capa nueva, incluso con un tipo de relleno opaco, se agrega automáticamente un canal alfa a la capa.
Todas las capas de una imagen, excepto la del fondo, tienen un canal alfa automáticamente, pero no puede ver una representación en escala de grises de los valores alfa. Consulte alfa en el glosario para más información.
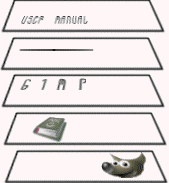
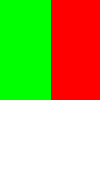
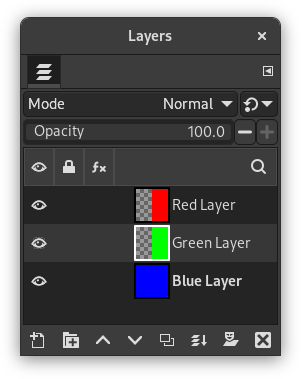
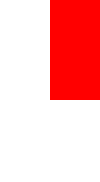
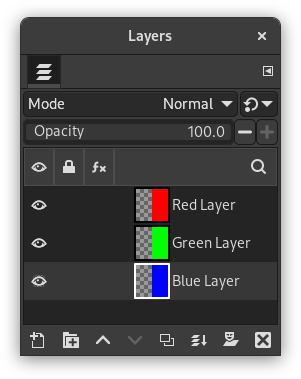
Figura 8.2. Ejemplo de canal alfa: imagen básica

Original image.
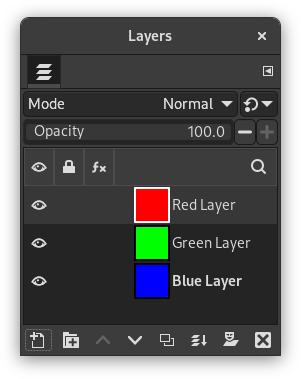
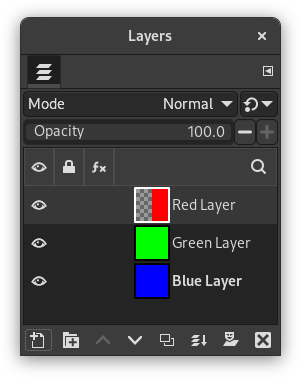
The image has three layers painted with pure 100% opaque Red, Green, and Blue. The current layer is the red one.
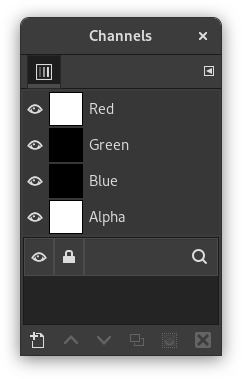
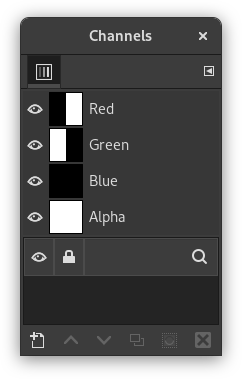
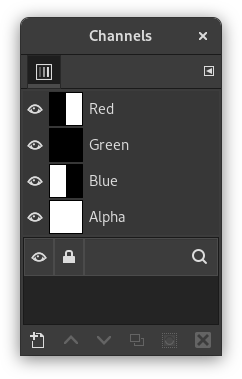
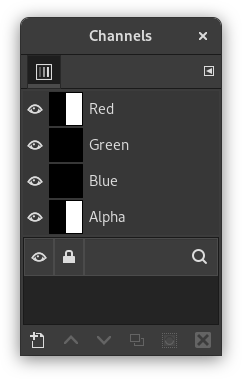
In the Channels dialog, the added Alpha channel is white because the image is not transparent since there is a 100% opaque (red) layer. As the current (red) layer is 100% opaque, there is no green and no blue so their corresponding channels are black.
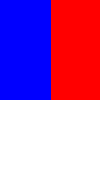
Figura 8.3. Ejemplo de canal alfa: una capa transparente
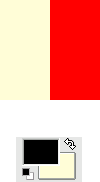
The left part of the first layer has been made transparent (via Sección 2.2, “Selección rectangular”, then → ).
The second layer, green, is visible.
The Alpha channel is still white, since there is an opaque layer in this part of the image.
Figura 8.4. Ejemplo de canal alfa: dos capas transparentes
The left part of the second layer has been made transparent.
The third layer, blue, is visible through the first and second layers.
The Alpha channel is still white, since there is an opaque layer in this part of the image.
Figura 8.5. Ejemplo de canal alfa: tres capas transparentes
The left part of the third layer has been cleared. In this case, the Clear command works like the Eraser and uses the Background color of Toolbox.
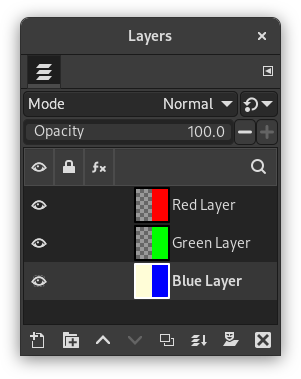
The left part of the third layer is opaque, because the background layer has no Alpha channel.

The Alpha channel is still white.
Figura 8.6. Ejemplo de canal alfa: canal alfa añadido al fondo
We used the → → command on the (blue) background layer. The left part of the image has become fully transparent and has the color of the page on which the image is shown.
The left part of the blue layer has become transparent.
The left part of the Alpha Channel thumbnail is black (transparent) in the Channels dialog.
- Layer mode
-
The layer mode is determined by the image mode (see previous section), and the presence or absence of an alpha channel. GIMP currently supports RGB, RGBA, Gray, GrayA, Indexed, and IndexedA.
The main reason this matters is that some filters (in the menu) only accept a subset of layer modes, and appear disabled in the menu if the active layer does not have a supported mode. Often you can rectify this either by changing the mode of the image, or by adding or removing an alpha channel.
-
 Visibilidad
-
You can hide a layer from affecting the end result of your image by clicking on the eye symbol in the Layers dialog. This is called “toggling the visibility” of the layer. Most operations on an image treat toggled-off layers as if they do not exist.
When you work with images containing many layers, with varying opacities, you often can get a better picture of the contents of the layer you want to work on by hiding some of the other layers.
![[Sugerencia]](images/tip.png)
Sugerencia Si pulsa Mayús y el icono del ojo, se ocultan todas las capas excepto sobre la que pulsó para ocultar.
- Capa activa
-
Por lo general, activa una capa, para trabajar en ella, pulsando sobre ella en la lista de capas. Cuando tiene muchas capas, no es fácil encontrar a qué capa pertenece un elemento de la imagen: luego, presione Alt y pulse con la rueda del ratón en este elemento para activar su capa. Las capas disponibles se recorrerán (comenzando desde la superior) mientras se mantiene presionada la tecla Alt y la capa seleccionada se mostrará temporalmente en la barra de estado.
-
 Layer Lock Settings
-
If you click to the right of the eye icon, you can select the lock settings for the layer.
-
 Layer Effects
-
Directly to the left of the image thumbnail, you will see the Layer Effects icon if that layer has effects added to it.
See Using Layer Effects for more details.
- Tamaño y límites
-
In GIMP, the boundaries of a layer do not necessarily match the boundaries of the image that contains it. When you create text, for example, each text item belongs to its own separate layer, and the layer size is automatically adjusted to contain the text and nothing more.
Also, when you create a new layer using cut-and-paste, the new layer is sized just large enough to contain the pasted item. In the image window, the boundaries of the currently active layer are shown outlined with a black-and-yellow dashed line. When more than one layer is selected, it will show an outline of the square that encloses all the selected layers.
The main reason why this matters is that you cannot do anything to a layer outside of its boundaries, unless you enabled Expand Layers in the Paint Tool Options. If this causes you problems, you can alter the dimensions of the layer using any of several commands that you can find near the bottom of the menu.
![[Nota]](images/note.png)
Nota La cantidad de memoria que consume una capa se determina por sus dimensiones, no por su contenido. Así que, si trabaja con imágenes grandes o que contienen muchas capas, puede resultar conveniente recortar las capas al tamaño mínimo necesario.
- Opacidad
-
La opacidad de una capa determina cuánto deja pasar los colores de las capas que se encuentran por debajo en la pila. El rango de opacidad va de 0 a 100, siendo 0 completamente transparente, y 100 completamente opaco.
- Modo
-
El modo de una capa determina la forma en que sus colores se combinan con los colores de las capas que tiene por debajo, para producir el resultado visible. Este concepto es suficientemente complejo, y suficientemente importante, como para dedicarle una sección completa, que es la que sigue. Consulte la Sección 2, “Modos de capa”.
- Máscara de capa
-
Además del canal alfa, hay otra manera de controlar la transparencia de una capa: añadiendo una máscara de capa, que es un dibujable extra en escala de grises asociado a la capa. Una capa no tiene máscara de manera predeterminada: se debe añadir específicamente. Las máscaras de capa, y su empleo, se describen en detalle en la sección máscara de capa.


