Inhaltsverzeichnis
- 1. Einführung in Ebenen
- 2. Ebenenmodi
- 3. Veraltete Ebenenmodi
- 4. Neue Ebenen erstellen
- 5. Ebenenguppen
- 6. Ebeneneffekte
-
- 6.1. Einführung
- 6.2. Fachvokabular
- 6.3. Einen Ebeneneffekt zu einer Ebene hinzufügen
- 6.4. Die Reihenfolge ist entscheidend
- 6.5. The Layer Effects Dialog
- 6.6. Merging
- 6.7. Merging and Auxiliary Other Images
- 6.8. Ebeneneffekte rückgängig machen
- 6.9. Copying Layer Effects
- 6.10. Persistence of Layer Effects
- 7. Layer Types
Stellen Sie sich Ebenen wie einen Stapel Folien vor. Mit Ebenen können Sie ein Bild aus mehreren Teilen zusammenstellen, und jedes dieser Teile kann unabhängig voneinander verändert werden. Dabei werden Ebenen übereinander gestapelt. Die unterste Ebene beschreibt den Hintergrund eines Bildes, während die oberen Ebenen den Bild-Vordergrund darstellen.

Es gibt keine Einschränkung, wie viele Ebenen ein Bild besitzen darf. Nur der verfügbare Arbeitsspeicher begrenzt die Anzahl. Es ist nicht unüblich, dass fortgeschrittene Nutzer mit Dutzenden Ebenen in einem Bild arbeiten. Ebenen können zur einfacheren Arbeit gruppiert werden, und es steht eine Vielzahl an Befehlen zur Ebenenbearbeitung zur Verfügung.
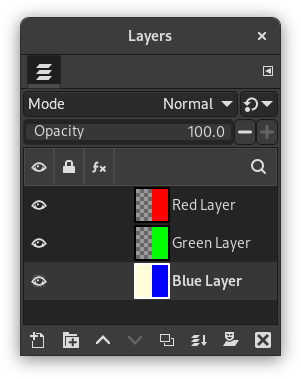
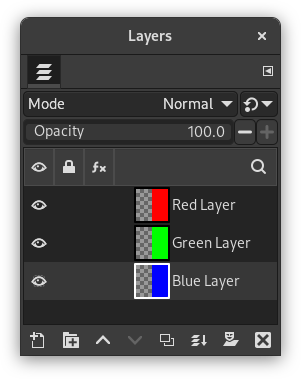
The organization of layers in an image is shown in the Layers dialog. How it works is described in detail in the Layers Dialog section, but we will touch some aspects of it here, in relation to the layer properties that they display.
Each open image can have one or more active drawables. A „drawable“ is a GIMP concept that includes layers, but also several other items, such as channels, layer masks, and the selection mask.
Basically, a „drawable“ is anything that can be drawn on with painting tools. If a layer is currently active (i.e. it is selected), it is shown highlighted in the Layers dialog. If only one layer is selected, its name is shown in the status area of the image window.
To activate a layer click it. To select multiple layers, use the common key modifiers Shift for selecting a range, and Ctrl for adding or removing one layer from the selection. If none of the layers are highlighted, it means the active drawable is something else than a layer.
The main menu has a Layer submenu containing commands that affect the active layer or layers of the image. The context menu of the Layers Dialog has even more commands. This menu can be accessed by right-clicking on a layer.
There are several types of layers. The most common is the raster layer, which is the default. Other layer types are text layers, vector layers and link layers. Each of these have extra properties and commands specific to their purpose.
Jede Ebene verfügt über eine Reihe von Eigenschaften, welche Ihnen im Folgenden kurz vorgestellt werden sollen:
- Ebenenname
-
Jede Ebene in GIMP hat einen eindeutigen Namen. Dieser wird automatisch vergeben, sobald eine Ebene erzeugt wird. Sie können den Namen der Ebene jedoch in einen beliebigen Namen ändern, solange der Name noch nicht für eine andere Ebene verwendet wird. Um den Namen zu ändern, können Sie entweder mit einem Doppelklick auf den Eintrag der Ebene im Ebenendialog ein Texteingabefeld aktivieren oder den Befehl im Kontextmenü des Ebenendialogs aufrufen.
- Vorhandensein eines Alphakanals
-
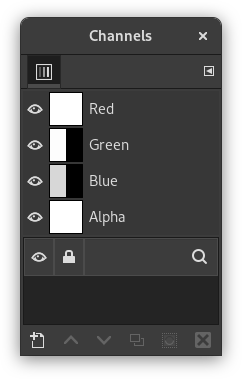
An alpha channel encodes information about how transparent a layer is at each pixel. It is visible in the Channels dialog: white is complete opacity, black is complete transparency and gray levels are partial transparencies.
Die Hintergrundebene ist etwas Besonderes. Wenn Sie ein neues Bild erstellen, hat es nur eine Ebene - die Hintergrundebene. Falls bei der Erstellung eine intransparente Füllung gewählt wurde, besitzt diese eine Ebene keinen Alphakanal. Um eine Hintergrundebene mit Transparenz zu erhalten, müssen Sie entweder beim Erstellen des Bildes als Füllung wählen oder einen Alphakanal hinzufügen.
Wenn Sie nun eine neue Ebene hinzufügen, wird automatisch, auch bei intransparenter Füllung, ein Alphakanal erstellt.
Jede Ebene außer der Hintergrundebene eines Bildes verfügt automatisch über einen Alphakanal. Sie können allerdings keine Graustufen-Darstellung der Alphawerte sehen. Weitere Informationen finden Sie unter Alpha.
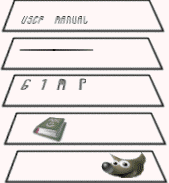
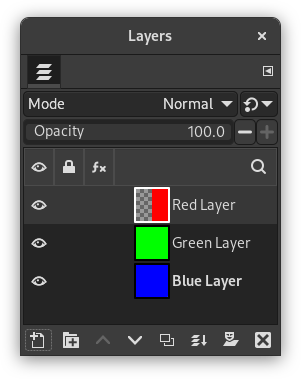
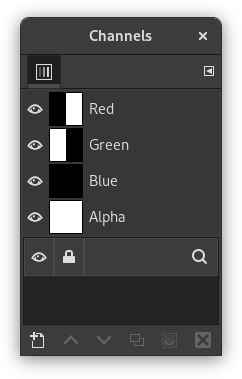
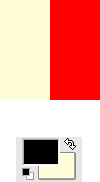
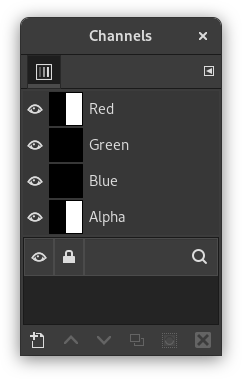
Abbildung 8.2. Alphakanal-Beispiel: Ausgangsbild

Originalbild,
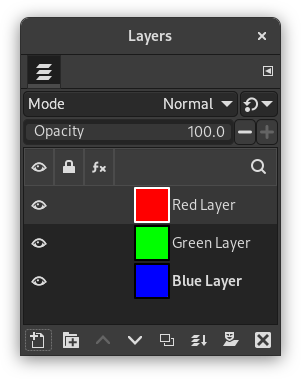
The image has three layers painted with pure 100% opaque Red, Green, and Blue. The current layer is the red one.
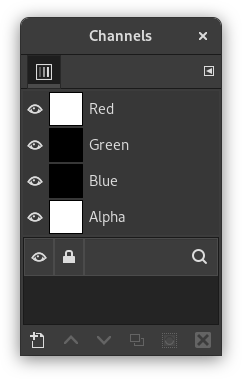
In the Channels dialog, the added Alpha channel is white because the image is not transparent since there is a 100% opaque (red) layer. As the current (red) layer is 100% opaque, there is no green and no blue so their corresponding channels are black.
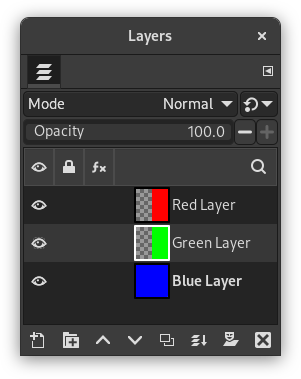
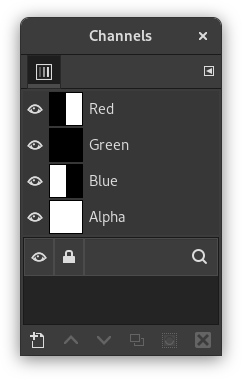
Abbildung 8.3. Alphakanal-Beispiel: Eine transparente Ebene
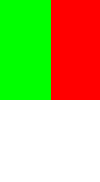
The left part of the first layer has been made transparent (via Abschnitt 2.2, „Rechteckige Auswahl“, then → ).
The second layer, green, is visible.
The Alpha channel is still white, since there is an opaque layer in this part of the image.
Abbildung 8.4. Alphakanal-Beispiel: Zwei transparente Ebenen

The left part of the second layer has been made transparent.
The third layer, blue, is visible through the first and second layers.
The Alpha channel is still white, since there is an opaque layer in this part of the image.
Abbildung 8.5. Alphakanal-Beispiel: Drei transparente Ebenen
The left part of the third layer has been cleared. In this case, the Clear command works like the Eraser and uses the Background color of Toolbox.
The left part of the third layer is opaque, because the background layer has no Alpha channel.
Der Alphakanal ist immer noch weiß.
Abbildung 8.6. Alphakanal-Beispiel: Alphakanal zur Hintergrundebene hinzugefügt

We used the → → command on the (blue) background layer. The left part of the image has become fully transparent and has the color of the page on which the image is shown.
The left part of the blue layer has become transparent.
The left part of the Alpha Channel thumbnail is black (transparent) in the Channels dialog.
- Layer mode
-
The layer mode is determined by the image mode (see previous section), and the presence or absence of an alpha channel. GIMP currently supports RGB, RGBA, Gray, GrayA, Indexed, and IndexedA.
The main reason this matters is that some filters (in the menu) only accept a subset of layer modes, and appear disabled in the menu if the active layer does not have a supported mode. Often you can rectify this either by changing the mode of the image, or by adding or removing an alpha channel.
-
 Sichtbarkeit
-
You can hide a layer from affecting the end result of your image by clicking on the eye symbol in the Layers dialog. This is called „toggling the visibility“ of the layer. Most operations on an image treat toggled-off layers as if they do not exist.
When you work with images containing many layers, with varying opacities, you often can get a better picture of the contents of the layer you want to work on by hiding some of the other layers.
![[Tipp]](images/tip.png)
Tipp Wenn Sie auf den Knopf zum Ein- und Ausblenden von Ebenen klicken, während Sie die Umschalt-Taste gedrückt halten, können Sie die Sichtbarkeit aller Ebenen außer der, auf deren Symbol Sie geklickt haben, gleichzeitig ändern. Dies ist ist insbesondere dann sehr hilfreich, wenn Sie alle Ebenen außer einer ausblenden möchten.
- Aktive Ebene
-
Für gewöhnlich aktivieren Sie eine Ebene, indem Sie in der Ebenenliste darauf klicken. Haben Sie jedoch sehr viele Ebenen, kann es schwierig werden, genau herauszufinden, zu welcher Ebene ein bestimmter Bildbereich gehört. In diesem Fall können Sie bei gedrückter Alt-Taste mit dem Mausrad auf den Bildbereich klicken. GIMP wird dann, solange die Alt-Taste gedrückt ist, durch die Ebenen wechseln, die zu diesem Bildbereich gehören (beginnend bei der obersten Ebene) und den Ebenennamen in der Statusleiste anzeigen.
-
 Layer Lock Settings
-
If you click to the right of the eye icon, you can select the lock settings for the layer.
-
 Layer Effects
-
Directly to the left of the image thumbnail, you will see the Layer Effects icon if that layer has effects added to it.
See Using Layer Effects for more details.
- Ebenengröße
-
In GIMP, the boundaries of a layer do not necessarily match the boundaries of the image that contains it. When you create text, for example, each text item belongs to its own separate layer, and the layer size is automatically adjusted to contain the text and nothing more.
Also, when you create a new layer using cut-and-paste, the new layer is sized just large enough to contain the pasted item. In the image window, the boundaries of the currently active layer are shown outlined with a black-and-yellow dashed line. When more than one layer is selected, it will show an outline of the square that encloses all the selected layers.
The main reason why this matters is that you cannot do anything to a layer outside of its boundaries, unless you enabled Expand Layers in the Paint Tool Options. If this causes you problems, you can alter the dimensions of the layer using any of several commands that you can find near the bottom of the menu.
![[Anmerkung]](images/note.png)
Anmerkung Der Speicherbedarf einer Ebene hängt von der Ebenengröße, nicht vom Inhalt der Ebene ab. Wenn Sie also mit sehr großen Bildern arbeiten, welche noch dazu viele Ebenen enthalten, ist es empfehlenswert, die Ebenen auf die jeweils benötigte Mindestgröße zu beschränken.
- Deckkraft
-
Die Deckkraft einer Ebene bestimmt, wie stark die im Ebenenstapel darunter befindlichen Ebenen überdeckt werden. Die Deckkraft können Sie für jede Ebene im Bereich von 0 (volle Transparenz) bis 100 (volle Deckkraft) einstellen.
- Modus
-
Der Modus einer Ebene bestimmt, wie die Farben oder Helligkeitswerte der Ebene mit den Farben oder Helligkeitswerten der darunterliegenden Ebenen verknüpft wird. Da es sich hierbei um eine sehr komplexe und mächtige Eigenschaft handelt, ist der Arbeit mit den Ebenenmodi ein eigenes Kapitel gewidmet. Weitere Informationen finden Sie daher unter Abschnitt 2, „Ebenenmodi“.
- Ebenenmaske
-
Neben dem Alphakanal gibt es noch eine weitere Methode, um die Transparenz einer Ebene zu kontrollieren: die Ebenenmaske. Dabei handelt es sich um eine Zeichenfläche, die mit der Ebene verknüpft ist. Sie können die Ebenenmaske über einen Befehl im Kontextmenü des Ebenendialogs zu einer Ebene hinzufügen. Wie die Ebenenmaske wirkt und was Sie damit anstellen können, wird im Abschnitt Ebenenmaske ausführlicher erläutert.


