The Paths tool allows you to create complex geometric shapes called «Bézier Curves», a bit like the Free Selection tool, but with all the adaptability of vectorial curves.
You can edit your curve, you can paint with your curve, or even save, import, and export the curve. You can also use paths to create geometrical figures. Paths have their own dialog box: the Paths Dialog.
See also the Paths concept.
Paths can be turned into Vector layers. A Vector layer is a special kind of layer that displays a path, possibly consisting of several parts, including their selected fill and stroke attributes.
Hi ha diferents possibilitats d'activar l'eina:
-
Des del menú de la imatge → .
-
En fer clic a la icona eina
 de la caixa d'eines,
 -
Prement la drecera de teclat B.
![[Nota]](images/note.png)
|
Nota |
|---|---|
|
The status bar at the bottom of the image window will show relevant tips about the possible modifiers you can use when working with paths. |
- Maj
-
Aquesta clau té diverses funcions depenent del context. Vegeu Opcions per a més detalls.
- Ctrl ; Alt
-
Hi ha tres modes disponibles per treballar amb l'eina Camins: Dissenya,Edita i Mou. La tecla Ctrl commuta entre el disseny i l'edició. La tecla Alt (o Ctrl+Alt) commuta entre el disseny i el moviment.
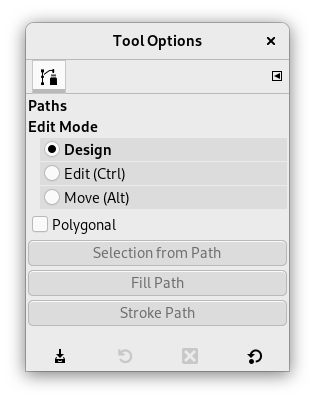
Normalment, les opcions de l'eina es mostren en una finestra adjunta sota la caixa d'eines tan aviat com activeu una eina. Si no ho són, podeu accedir-hi des del menú principal a través de → → que obre la finestra d'opcions de l'eina seleccionada.
- Edita el mode
-
- Disseny
-
Per defecte, aquesta eina està en mode Design. Dibuixeu el camí fent clic successivament. Podeu moure els punts de control fent-hi clic i arrossegant-los. Entre els punts de control hi ha segments.

Els nombres són passos per a dibuixar un camí recte de dos segments.
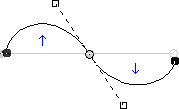
Els segments corbats es construeixen fàcilment arrossegant un segment o un nou node. Les fletxes blaves indiquen corba. Apareixen dues nanses petites que podeu arrossegar per doblegar la corba.
![[Suggeriment]](images/tip.png)
Suggeriment Per tancar ràpidament la corba, feu clic al punt de control inicial. Si voleu reposicionar el node d'inici, manteniu premuda la tecla Maj i feu clic per a desseleccionar el node final i, a continuació, moveu el node d'inici.
Podeu fer servir el botó o el botó
 Camí a la selecció del diàleg Camins per convertir el camí en una selecció.
Suggeriment Quan teniu dues nanses, funcionen de manera simètrica per defecte. Deixeu anar la pressió sobre el botó del ratolí per moure les nanses individualment. La tecla Maj forçarà que les nanses tornin a ser simètriques.
Hi ha diverses funcions disponibles en mode Disseny:
Inserir un nou node: quan premeu Ctrl i passeu el punter del ratolí sobre el camí existent, el punter del ratolí canvia al signe «+». En fer clic es crearà un nou node de camí en el punt en passar per sobre del camí.
Moure un o diversos nodes: en un node, el punter del ratolí es converteix en una creu de 4 fletxes. Pots fer clic i arrossegar-lo. Podeu seleccionar diversos nodes Maj i fer clic i moure'ls fent clic i arrossegant. Prement Ctrl+Alt permet moure tot el camí, com una selecció.
Modificació de les nanses: primer heu d'editar un node. Apareix una nansa. Arrossegueu-lo per doblegar la corba. En prémer Maj s'alternaran les nanses simètriques.
Modifica el segment: quan el punter del ratolí es mou sobre un segment, es converteix en una creu de 4 fletxes. Feu clic i arrossegueu-lo per doblegar el segment. Tan aviat com el mous, les nanses apareixen als dos extrems del segment. En prémer la tecla Maj es commuta a nanses simètriques.
Afegir un nou subcamí: quan premeu Maj i passeu el punter del ratolí fora del camí existent, el punter del ratolí comença a mostrar un quadrat. En fer clic s'iniciarà un subcamí que no està connectat a altres corbes, però es considera una part del camí.
- Edita (Ctrl)
-
Edita realitza funcions que no estan disponibles en mode Disseny. Amb aquest mode, només podreu treballar en el camí existent. Quan el punter del ratolí no està al camí, el punter canvia a un petit cercle creuat i no podeu fer cap edició del camí.
Afegeix un segment entre dos nodes: feu clic en un node en un extrem del camí per activar-lo. El punter és com un símbol d'unió. Feu clic en un altre node per enllaçar ambdós nodes. Això és útil quan heu d'enllaçar components no tancats.
Elimina un segment d'un camí: mentre premeu la combinació de tecles Maj+Ctrl, apunteu a un segment. El punter del ratolí es converteix en un signe «-». Feu clic per a suprimir el segment.
Afegeix un node a un camí: apunta a un segment. El punter es converteix en «+». Feu clic a on voleu col·locar el nou punt de control.
Elimina un node: Mentre premeu la combinació de tecles Maj+Ctrl, apunteu a un node. El punter es converteix en «-». Feu clic per a suprimir el node.
Afegeix una nansa a un node: apunta a un node. El punter es converteix en una mà petita. Arrossegueu el node: apareix el gestor. En prémer Maj s'alternen les nanses simètriques.
Elimina una nansa d'un node: mentre premeu la combinació de tecles Maj+Ctrl, apunteu a una nansa. El punter no es torna a l'esperat "-" i encara és una mà. Feu clic per a suprimir la nansa.
![[Atenció]](images/caution.png)
Atenció No hi ha cap avís abans d'eliminar un node, un segment o una nansa.
- Mou (Alt)
-
Mou el mode permet moure un o tots els components d'un camí. Simplement feu clic al camí i arrossegueu-lo.
Si teniu diversos components, només es mourà el seleccionat. Si feu clic i arrossegueu fora del camí, es mouran tots els components. En prémer la tecla Maj, alternarà entre moure tots els components i només els components seleccionats.
- Poligonal
-
Amb aquesta opció, els segments són només lineals. Les nanses no estan disponibles i els segments no es dobleguen en moure-les.
- Selecció des del camí
-
Aquest botó permet crear una selecció basada en el camí en el seu estat actual. Aquesta selecció està marcada amb el «caminet de formiguetes ». Tingueu en compte que el camí encara està present: l'eina actual encara és l'eina camí i podeu modificar aquest camí sense modificar la selecció que s'ha fet independent. Si canvieu d'eines, el camí es torna invisible, però persisteix en el diàleg Camins i el podeu reactivar.
Si el camí no està tancat, el GIMP el tancarà amb una línia recta.
Com indica l'ajuda emergent, prement Maj en fer clic al botó s'afegirà la nova selecció a una ja existent. En prémer Ctrl es restarà la selecció de la selecció preexistent, i la combinació de tecles Maj+Ctrl intersecarà les dues seleccions.
- Create New Vector Layer
-
This command creates a Vector Layer from the current path. A vector layer remembers its stroke and fill settings and can have Layer Effects applied to it.
- Enable Fill
-
When checked the current path will be filled based on the settings below.
This setting only takes effect if the path being edited is attached to a vector layer. For filling paths not connected to a layer use Fill Paths.
- Color sòlid
-
If this is selected, you can choose what color is used to fill the path by pressing the color button.
- Patró
-
If this is selected, a pattern will be used to fill the path. You choose another pattern by clicking the resource button or by typing the name of the pattern.
- Suavitzador
-
Enabling this setting allows you to remove or reduce the aliasing effect that can show up on borders.
For more information, see Anti-aliasing in the Glossary.
- Enable Stroke
-
When checked the current path will be stroked based on the settings below.
This setting only takes effect if the path being edited is attached to a vector layer. For stroking paths not connected to a layer use Stroke Paths.
- Color sòlid
-
If this is selected, you can choose what color is used to stroke the path by pressing the color button.
- Patró
-
If this is selected, a pattern will be used to stroke the path. You choose another pattern by clicking the resource button or by typing the name of the pattern.
This is distinct from the Dash pattern. If you select one of the two color options with no dash pattern, an unbroken line is drawn in the color set in the Toolbox. If you select Pattern with no dash pattern, an unbroken line is drawn with the pattern set in the Toolbox. If you select a line with a dash pattern, the color or pattern is still determined by the color or pattern set in the Toolbox. That is, if you have a marbled pattern set in the Toolbox, and select Pattern and dashed lines as Dash pattern, the dashes are drawn in the marbled pattern.
- Suavitzador
-
Enabling this setting allows you to remove or reduce the aliasing effect that can show up on borders.
Curved strokes or strokes drawn at an angle may look jagged or stair-stepped. The anti-aliasing option smooths them out.
For more information, see Anti-aliasing in the Glossary.
- Amplada de la línia
-
You can set the width of the stroke using the text box. The default unit is pixels, but you can choose another unit with the drop-down list button.
- Estil de majúscules
-
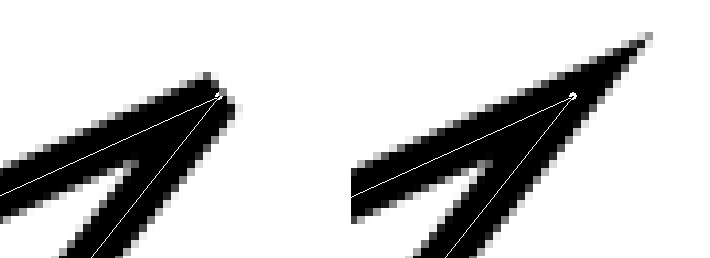
Choose the shape of the ends of an unclosed path, which can be Butt, Round or Square.
- Estil d'unió
-
You can choose the shape of the path corners by clicking on Miter, Round or Bevel.
- Límit del biaix
-
When two segments of a path come together, the mitering of the corner is determined by the Miter Limit. If the strokes were wide, and no mitering were done, there would be pointed ends sticking out at the corner. The Miter Limit setting determines how the gap, formed when the outer edges of the two lines are extended, will be filled. You can set it to a value between 0.0 and 100.0, by using the slider or the associated text box and its arrows.
- Patró del traç
-
On the pixel level, a dashed line is drawn as a series of tiny boxes. You can modify the pattern of these boxes. The black area with thin vertical lines represents the pixels of the dash. If you click on a black pixel, you remove it from the dash. If you click on a white pixel, you add it to the dash. The gray areas indicate how the pattern will be repeated when a dashed line is drawn.
- Traça predefinida
-
Instead of making your own dash pattern, you can choose one from the drop-down box. This pattern will then be displayed in the Dash pattern area, so you can get an idea of how it will look.
Quan feu clic-dret sobre els elements del camí, com ara les àncores o els segments, apareixerà un menú contextual, el contingut del qual depèn de l'element on hàgiu fet clic. Les ordres següents es poden mostrar al menú contextual.
- Suprimeix l'àncora
-
Aquesta ordre elimina l'àncora seleccionada i connecta els segments anteriors i posteriors.
- Inici de Maj
-
Aquesta ordre desplaça l'àncora d'inici a l'àncora seleccionada. L'àncora inicial és on comença el traç, i també té un costat puntegut que indica la direcció del traç. Això pot ser útil per quan vulgueu ajustar el Text al llarg del camí.
Si es desplaça l'àncora inicial en traços oberts, es pot inserir un segment nou que connecti els extrems anteriors i elimini el segment que condueix en la nova àncora d'inici.
- Insereix una àncora
-
Aquesta ordre afegeix una nova àncora al punt seleccionat del segment.
- Suprimeix el segment
-
Aquesta ordre suprimeix el segment seleccionat. Això crearà una obertura en el vostre camí.
- Traç invers
-
Això inverteix la direcció del traç. La forma de l'àncora inicial reflectirà la direcció del traç. El costat puntegut és la direcció on anirà quan es traci.


