| Rozdział 13. Tools | ||
|---|---|---|
 |
Część III. Function Reference |  |
| Rozdział 13. Tools | ||
|---|---|---|
| |
Część III. Function Reference | |
Spis treści
GIMP provides a comprehensive toolbox in order to quickly perform basic tasks such as making selections or drawing paths. The many tools contained within GIMP's toolbox are discussed in detail here.
(In case you're curious, in GIMP lingo a "tool" is a way of acting on an image that requires access to its display, either to let you indicate what you want to do by moving the pointer around inside the display, or to show you interactively the results of changes that you have made. But if you want to think of a tool as a saw, and an image as a piece of wood, it probably won't do you a great deal of harm.)
![[Uwaga]](images/note.png)
|
Uwaga |
|---|---|
|
See Main Windows: The Toolbox for an overview of the toolbox and its components. |
GIMP has a diverse assortment of tools that let you perform a large variety of tasks. The tools can be thought of as falling into five categories:
Selection tools, which specify or modify the portion of the image that will be affected by subsequent actions;
Paint tools, which alter the colors in some part of the image;
Transform tools, which alter the geometry of the image;
Color tools, which alter the distribution of colors across the entire image;
Other tools, which don't fall into the other four categories.
Most tools can be activated by clicking on an icon in the Toolbox. By default, some tools are accessible only via the menus (namely the Color tools are accessible only either as or as → ). Every tool, in fact, can be activated from the Tools menu; also, every tool can be activated from the keyboard using an accelerator key.
In the default setup, created when GIMP is first installed, not all tools show icons in the Toolbox: the Color tools are omitted. You can customize the set of tools that are shown in the Toolbox using the Tools dialog. There are two reasons you might want to do this: first, if you only rarely use a tool, it might be easier to find the tools you want if the distracting icon is removed; second, if you use the Color tools a lot, you might find it convenient to have icons for them easily available. In any case, regardless of the Toolbox, you can always access any tool at any time using the menu from an image menubar.
The shape of the cursor changes when it is inside an image, to one that indicates which tool is active (if in you have set → → → ).
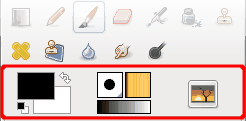
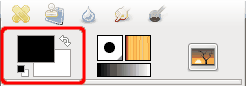
Obszar ten pokazuje podstawową paletę programu GIMP, składającą się z dwóch kolorów - pierwszoplanowego i tła. Kolory te są używane podczas rysowania, wypełniania i wielu innych operacji. Kliknięcie na dowolny z nich spowoduje otworzenie okna wyboru koloru.
Kliknięcie na niewielki symbol w lewym dolnym rogu powoduje przywrócenie pierwotnych kolorów pierwszoplanowego i tła.
Kliknięcie ikony strzałki lub wciśnięcie klawisza X spowoduje zamianę miejscami kolorów pierwszoplanowego i tła.
![[Podpowiedź]](images/tip.png)
|
Podpowiedź |
|---|---|
|
Możliwe jest przeciągnięcie jednego z kolorów bezpośrednio na warstwę - zostanie ona w całości wypełniona wybranym kolorem. |
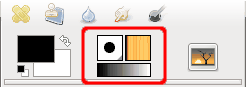
Ten obszar paska narzędzi pokazuje aktywny pędzel, deseń i gradient. Kliknięcie na jeden z nich umożliwi zmianę wybranego narzędzia.
A thumbnail of the active image can be displayed in this area if the „Display Active Image” option is checked in Preferences/Toolbox. If you click on this thumbnail, the „Images” dialog is opened, useful if you have many images on your screen. You can also click and drag this thumbnail to an enabled XDS[8] file manager to directly save the corresponding image.
Rysunek 13.6. Tool Options Dialog
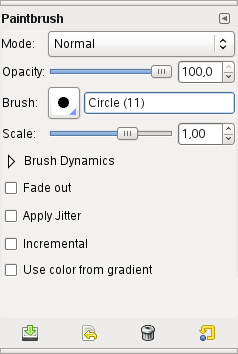
Tool Options dialog of the Paintbrush tool (with docking bars at its top and bottom).
Przy korzystaniu z ustawień domyślnych (jak większość użytkowników), aktywacja narzędzia spowoduje pojawienie się okna „Opcji narzędzia” poniżej paska narzędzi. Jeżeli zaś Twoje ustawienia są inne, powinieneś je zmienić: trudno jest efektywnie korzystać z narzędzi nie mając możliwości szybkiej zmiany ich opcji.
|
|
Podpowiedź |
|---|---|
|
The Tool Options appear beneath the Toolbox in the default setup. If you lose it somehow, you can get it back by creating a new Tool Options dialog using → → and then docking it below the Toolbox. See the section on Dialogs and Docking if you need help. |
Każde narzędzie posiada swój własny zestaw ustawień. Wszelkie zmiany ustawień są zachowywane w trakcie danej sesji lub do momentu ich modyfikacji. Tak naprawdę jednak opcje narzędzi są zachowywane między sesjami. Zachowywanie ustawień może być niekiedy drażniące: narzędzie zachowuje się w sposób niepożądany, a dojście przyczyny tego jest niemożliwe, do momentu przypomnienia sobie, że używane były niestandardowe opcje ostatnim razem, gdy dane narzędzie było wykorzystywane.
Poniżej okna „Opcji narzędzia” znajdują się cztery przyciski:
 Zapis opcji w wybranym zestawie
Przycisk ten pozwala na zapisanie ustawień aktualnie używanego narzędzia, co umożliwia późniejsze ich przywrócenie. Wywoływane jest niewielkie okno dialogowe, pozwalające na nazwanie zestawu opcji. Podczas przywracania ustawień, pokazywane są tylko zachowane zestawy dla aktualnie używanego narzędzia, tak więc przy wyborze nazwy zestawu nie trzeba uwzględniać nazwy narzędzia.
 Odczyt opcji z wybranego zestawu
Przycisk ten pozwala na przywrócenie zachowanego zestawu ustawień dla aktualnie używanego narzędzia. Jeżeli ustawienia nigdy nie były zapisywane, przycisk ten nie będzie aktywny. W przeciwnym wypadku pojawi się menu pokazujące nazwy wszystkich zachowanych zestawów ustawień: wybranie jednej z pozycji spowoduje zastosowanie zapisanych ustawień.
 Usunięcie wybranego zestawu opcji
Przycisk ten pozwala na usunięcie uprzednio zachowanego zestawu ustawień dla aktualnie używanego narzędzia. Jeżeli ustawienia nigdy nie były zapisywane, przycisk ten nie będzie aktywny. W przeciwnym wypadku pojawi się menu pokazujące nazwy wszystkich zachowanych zestawów ustawień: wybranie jednej z pozycji spowoduje usunięcie tych ustawień.
 Przywrócenie wartości domyślnych
Przycisk ten przywróci wartość domyślną ustawień dla aktualnie używanego narzędzia.