| 3. Paint Tools | ||
|---|---|---|
 |
Rozdział 13. Tools |  |
| 3. Paint Tools | ||
|---|---|---|
| |
Rozdział 13. Tools | |
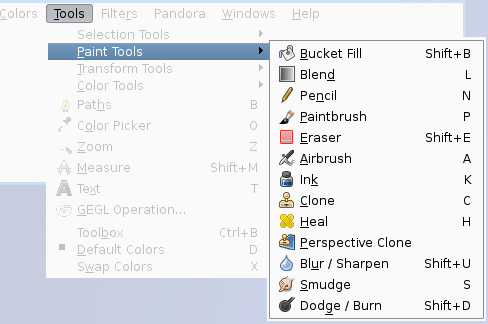
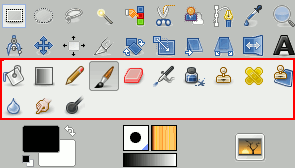
The GIMP Toolbox includes thirteen „paint tools”, all grouped together at the bottom (in the default arrangement).
zachowują się zgodnie z ogólnoprzyjętym wyobrażeniem o malowaniu pędzlem. Pozostałe używają pędzla do wprowadzania zmian na obrazie innym sposobem niż malowanie:
behave like the intuitive notion of „painting” with a brush. Pencil, Paintbrush, and Airbrush are called „basic painting tools” or brush tools.
The other tools use a brush to modify an image in some way rather than paint on it:
Wypełnienie kubełkiem wypełnia zaznaczony obszar kolorem lub deseniem;
Gradient wypełnia zaznaczony obszar kolorem z gradientu;
Gumka ściera tło lub przezroczystość;
Klonowanie kopiuje obraz lub deseń;
Klon perspektywy klonuje przekształcony obraz;
Łatka usuwa niedoskonałości z obrazu;
Rozmywanie / Wyostrzanie rozmywa lub wyostrza;
Rozsmarowywanie rozsmarowywuje;
i Rozjaśnianie / Wypalenie rozjaśnia lub przyciemnia.
The advantages of using GIMP with a tablet instead of a mouse probably show up more clearly for brush tools than anywhere else: the gain in fine control is invaluable. These tools also have special „Pressure sensitivity” options that are only usable with a tablet.
In addition to the more common „hands-on” method, it is possible to apply paint tools in an automated way, by creating a selection or path and then „stroking” it. You can choose to stroke with any of the paint tools, including nonstandard ones such as the Eraser, Smudge tool, etc., and any options you set for the tool will be applied. See the section on Stroking for more information.
Holding down the Ctrl key has a special effect on every paint tool. For the Pencil, Paintbrush, Airbrush, Ink, and Eraser, it switches them into „color picker” mode, so that clicking on an image pixel causes GIMP's foreground to be set to the active layer's color at that point (or, for the Eraser, GIMP's background color). For the Clone tool, the Ctrl key switches it into a mode where clicking sets the reference point for copying. For the Convolve tool, the Ctrl key switches between blur and sharpen modes; for the Dodge/Burn tool, it switches between dodging and burning.
Holding down the Shift key has the same effect on most paint tools: it places the tool into straight line mode. To create a straight line with any of the paint tools, first click on the starting point, then press the Shift key. As long as you hold it down, you will see a thin line connecting the previously clicked point with the current pointer location. If you click again, while continuing to hold down the Shift key, a straight line will be rendered. You can continue this process to create a series of connected line segments.
Holding down both keys puts the tool into constrained straight line mode. This is similar to the effect of the Shift key alone, except that the orientation of the line is constrained to the nearest multiple of 15 degrees. Use this if you want to create perfect horizontal, vertical, or diagonal lines.
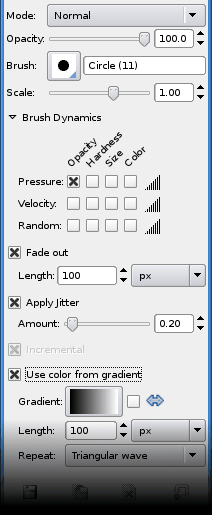
Many tool options are shared by several paint tools: these are described here. Options that apply only to one specific tool, or to a small number of tools, are described in the sections devoted to those tools.
The Mode drop-down list provides a selection of paint application modes. As with the opacity, the easiest way to understand what the Mode setting does is to imagine that the paint is actually applied to a layer above the layer you are working on, with the layer combination mode in the Layers dialog set to the selected mode. You can obtain a great variety of special effects in this way. The Mode option is only usable for tools that can be thought of as adding color to the image: the Pencil, Paintbrush, Airbrush, Ink, and Clone tools. For the other paint tools, the option appears for the sake of consistency but is always grayed out. A list of modes can be found in Sekcja 2, „Layer Modes”.
In this list, some modes are particular and are described below.
The Opacity slider sets the transparency level for the brush operation. To understand how it works, imagine that instead of altering the active layer, the tool creates a transparent layer above the active layer and acts on that layer. Changing Opacity in the Tool Options has the same effect that changing opacity in the Layers dialog would have in the latter situation. It controls the „strength” of all paint tools, not just those that paint on the active layer. In the case of the Eraser, this can come across as a bit confusing: it works out that the higher the „opacity” is, the more transparency you get.
The brush determines how much of the image is affected by the tool, and how it is affected, when you trace out a brushstroke with the pointer. GIMP allows you to use several different types of brushes, which are described in the Brushes section. The same brush choices are available for all paint tools except the Ink tool, which uses a unique type of procedurally generated brush. The colors of a brush only come into play for tools where they are meaningful: the Pencil, Paintbrush, and Airbrush tools. For the other paint tools, only the intensity distribution of a brush is relevant.
This option lets you to modify precisely the size of the brush. You can use the arrow keys to vary by ±0.01 or the Page-Up and Page-Down keys to vary by ±0.05. You can obtain the same result if you have correctly set your mouse-wheel in the Preferences. See How to vary the size of a brush
Brush dynamics let you map different brush parameters, commonly at least size and opacity, to one or more of three input dynamics: pressure, velocity and random. They are mostly used with tablets, but Velocity and Random are also usable with a mouse. The Ink tool, that supported velocity before, has been overhauled and now handles velocity-dependent painting much better.
A new option has been added in stroking paths. Stoke Path and Stroke Selection have now a check box for emulating brush dynamics when you stroke using a paint tool. That means that when you stoke, brush pressure and velocity are varying along the length of the stroke. Pressure starts with zero, ramps up to full pressure and then ramps down again to no pressure. Velocity starts from zero and ramps up to full speed by the end of the stroke.
Opcja ta ma sens tylko podczas pracy z tabletem. Pozwala on określić, które opcje narzędzia będą zależne od nacisku piórka na tablet. Dostępne są nastepujące opcje: krycie, twardość, tempo, rozmiar i kolor. Można wybrać dowolne z nich, ich efekty nakładają się. Nie wszystkie opcje mają wpływ na wszystkie narzędzia.
Efekty tej opcji są opisane powyżej.
Opcja ta ma wpływ na pędzle z rozmytymi krawędziami. Zaznaczenie pola powoduje, że im większy nacisk, tym ciemniejsze będą rozmyte części pociągnięcia.
Opcja ta ma wpływ na na Aerograf, Rozmywanie / Wyostrzanie i Rozsmarowywanie. Efekt zależny jest od czasu. Przy zwiększeniu nacisku, narzędzia pracują szybciej.
This option applies to all of the pressure sensitive paint tools. If the option is checked, then pressing harder will increase the size of the area affected by the brush.
This option only applies to the brush tools: the Pencil, Paintbrush, and Airbrush; and only if you are using colors from a gradient. If these conditions are met, then pressing harder causes colors to be taken from higher in the gradient.
This option causes each stroke to fade out over the specified distance. It is easiest to visual for „real” painting tools, and applies to all of the brush tools. It is equivalent to gradually reducing the opacity along the trajectory of the stroke. Note that, if you are using a tablet, this option does not change the effects of brush pressure.
„Odstępy” w pociągnięciach pędzla sprawiają, że pociągnięcia tworzone są z następujących po sobie kształtów pędzla. Gdy odstępy są bardzo małe końcowy rezultat przypomina ciągłą linię. W tym wypadku kształty pędzla rozrzucane są na odległość określoną przez suwak .
The Incremental check-box activates incremental mode for the tool. If it is deactivated, the maximum effect of a single stroke is determined by the opacity, and moving the brush repeatedly over the same spot will not increase the effect beyond this limit. If Incremental is active, each additional pass with the brush will increase the effect, but the opacity can't exceed the opacity set for the tool. This option is available for all paint tools except those which have a „rate” control, which automatically implies an incremental effect. See also Sekcja 2, „Layer Modes”.
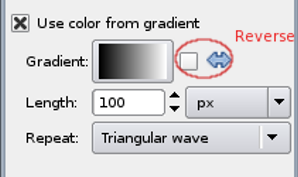
Zamiast używania koloru pierwszoplanowego (pokazanego w obszarze kolorów na pasku narzędzi), można rysować gradientem zaznaczając pole „Użyj koloru z gradientu”. Da to skalę kolorów, płynnie przechodzących po trajektorii pociągnięcia. Więcej informacji na Gradienty.
Gradient posiada następujące opcje:
Pokazuje aktywny gradient. Kliknięcie przycisku powoduje rozwinięcie listy pozwalającej na wybór gradientu.
Normally a brushstroke starts with colors from the left side
of the gradient, and progresses rightward. If
the „Reverse”
 is checked, the stroke starts with colors from the right
side, and progresses leftward.
is checked, the stroke starts with colors from the right
side, and progresses leftward.
Opcja wskazuje długość, na której będzie rozciągnięte jedno pociągnięcie kolorem z gradientu. Domyślna jednostką miary jest piksel, ale można wybrać inną korzystając z rozwijanej listy.
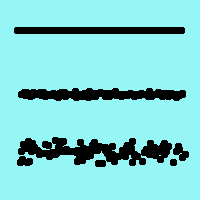
Rysunek 13.43. Ilustracja efektów trzech rodzajów okresowości gradientu, przy wykorzystaniu gradientu Abstract 2.
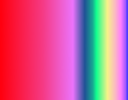
Gradient Abstract 2

Brak
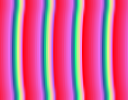
Fala piłokształtna
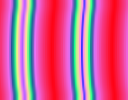
Fala trójkątna
This option determines what happens if a brushstroke extends farther than the Length specified above. There are three possibilities:
None means that the color from the end of the gradient will be used throughout the remainder of the stroke;
Sawtooth wave means that the gradient will be restarted from the beginning, which will often produce a color discontinuity;
Triangular wave means that the gradient will be traversed in reverse, afterwards bouncing back and forth until the end of the brushstroke.
The following examples demonstrate some of GIMP's paint modes:
Rysunek 13.44. Przykład trybu Przenikanie
Dwa pociągnięcia, zrobione Aerografem przy pomocy tego samego rozmytego pędzla. Z lewej strony - tryb zwykły, po prawej - tryb przenikanie.
For any paint tool with opacity less than 100%, this very useful mode doesn't draw transparency but determines the probability of applying paint. This gives nice patterns of dots to paint-strokes or filling.
Rysunek 13.45. Painting in Dissolve mode
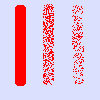
This image has only the background layer and no Alpha channel. The background color is sky blue. Three strokes with Pencil and various opacities: 100%, 50%, 25%. Foreground color pixels are scattered along brushstroke.
Rysunek 13.46. Przykład trybu „Z tyłu”

Wilber over a blue background layer
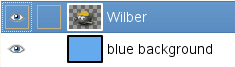
Layers dialog

Filled with pattern
Tryb ten ma zastosowanie jedynie dla warstw z kanałem alfa. Nanosi on kolor tylko na nieprzezroczyste części warstwy: im niższa jest wartość przezroczystości, tym więcej będzie koloru. Dlatego też rysowanie na nieprzezroczystym obszarze nie będzie miało żadnego efektu, a na przezroczystym - efekt nie będzie się odróżniał od trybu zwykłego. Efekt zawsze zwiększa krycie.
In the above example image, Wilber is on the top layer, surrounded by transparency. The lower layer is solid light blue. The Bucket Fill tool was used, with the Fill Whole Selection option checked and the entire layer was selected. A pattern was used to paint with the Bucket Fill tool.
The next image (below) has two layers. The upper layer is active. Three brushtrokes with pencil, red color at 100%, 50%, 25%: only transparent or semi-transparent pixels of the layer are painted.
Rysunek 13.47. Painting in „Behind” mode
Painting with 100%, 50%, 25% transparency (from left to right)
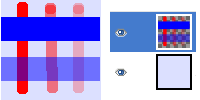
Rysunek 13.48. Przykład trybu „Z tyłu”
Wilber over a blue background layer

White foreground color erased
Tryb ten usuwa kolor pierwszoplanowy, zamieniając go na częściową przezroczystość. Zachowuje się on podobnie jak Kolor kanału alfa, ale tylko na obszarze pod pociągnięciem. Tryb stosuje się dla warstwy z kanałem alfa. W przeciwnym wypadku zachowuje się jak tryb zwykły.
In the above example image, the color of the Bucket Fill tool was white, so white parts of Wilber were erased and the blue background shows through.
This image below has only one layer, the background layer. Background color is sky blue. Three brushtrokes with pencil:
With the exact color of the blue area: only this blue color is erased.
With the exact color of the red area. Only this red color is erased, whatever its transparency. Erased areas are made transparent.
With the sky blue color of the layer background: only this color is erased.
Advanced users may be interested to know that paint tools actually operate at a sub-pixel level, in order to avoid producing jagged-looking results. One consequence of this is that even if you work with a hard-edged brush, such as one of the Circle brushes, pixels on the edge of the brushstroke will only be partially affected. If you need to have all-or-nothing effects (which may be necessary for getting a good selection, or for cutting and pasting, or for operating pixel-by-pixel at a high zoom level), use the Pencil tool, which makes all brushes perfectly hard and disables sub-pixel anti-aliasing.