| 3.10. Klonowanie | ||
|---|---|---|
 |
3. Paint Tools |  |
| 3.10. Klonowanie | ||
|---|---|---|
| |
3. Paint Tools | |
Narzędzie kopiuje obraz lub deseń przy pomocy aktywnego pędzla. Jest ono używane do wielu zadań, jednak najważniejszym zastosowaniem Klonowania jest poprawianie obszarów fotografii cyfrowych przy pomocy wypełnienia tych obszarów danymi z innych. Aby przyswoić sobie tę technikę potrzeba nieco czasu. Innym zastosowaniem narzędzia jest rysowanie linii deseniem lub krzywych. Przykłady zastosowania narzędzia można obejrzeć na Desenie.
If you want to clone from an image, instead of a pattern, you must tell
GIMP which image you want to copy from. You do this by holding down the
Ctrl key and clicking in the desired source image.
Until you have set the source in this way, you will not be able to paint
with the Clone tool: the tool cursor tells you this by showing
 .
.
Klonowanie desenia powoduje, że jest on rysowany kafelkowo, tj. jeśli piksle źródła przekraczają jedną z krawedzi desenia, to rysowanie desenia jest kontynuowane z drugiego jego końca. Zjawisko to nie zachodzi podczas kopiowania obrazu. W tym wypadku wyjście poza granice obrazu niczego nie zmienia.
Klonować można dowolny rysowalny obiekt (warstwę, maskę warstwy, kanał) na dowolny inny. Możliwe jest również klonowanie maski zaznaczenia. W tym celu należy przejść na tryb szybkiej maski. Kopiowanie kolorów, nie podtrzymywanych przez Cel (np. z RGB do obrazu indeksowanego), powoduje ich zamianę na najbliższy ekwiwalent.
You can activate this tool in several ways:
poprzez menu obrazu → → .
By clicking on the tool icon
 in Toolbox.
By pressing the C keyboard shortcut.
See the Paint tools key modifiers for a description of key modifiers that have the same effect on all paint tools.
The Ctrl key is used to select the source, if
you are cloning from an image: it has no effect if you are
cloning from a pattern. You can clone from any layer of any
image, by clicking on the image display, with the
Ctrl key held down, while the layer is active
(as shown in the Layers dialog). If Alignment is set to
None, Aligned, or
Fixed in tool options, then the point you
click on becomes the origin for cloning: the image data at that
point will be used when you first begin painting with the Clone
tool. In source-selection mode, the cursor changes to a reticle
cross symbol
 .
.
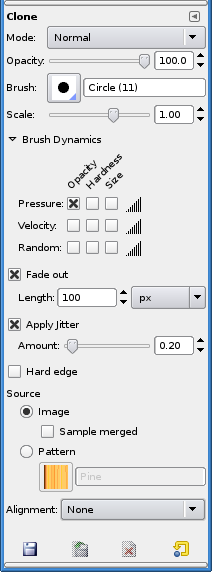
Normally, tool options are displayed in a window attached under the Toolbox as soon as you activate a tool. If they are not, you can access them from the image menu bar through → → which opens the option window of the selected tool.
Wybór źródła klonowania określa, czy kopiowany będzie deseń pokazany poniżej, czy też jeden z otwartych obrazów.
If you choose Image source, you must tell GIMP which layer to use as the source, by Ctrl-clicking on it, before you can paint with the tool.
If you check Sample merged it's what you „see” (color made with all the layers of a multi-layer image) that's cloned. If it's unchecked, only the selected layer is cloned. For more information see the glossary entry Sample Merge.
Kliknięcie ikony desenia spowoduje otwarcie listy, umożliwiającej wybór potrzebnego desenia. Opcja ta jest aktywna jednynie wtedy, gdy źródłem klonowania jest deseń.
Opcja określa, w jaki sposób pozycja źródła będzie przesuwana dla każdego pociągnięcia.
Na powyższym rysunku przedstawione zostały opcje Wyrównania. Kursor przedstawiony jest jako czerwony kwadrat, а punkt źródła - jako czarny krzyż.
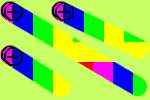
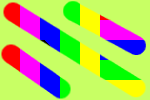
Rysunek 13.75. Original images for clone alignment

We will use the largest brush with the Pencil tool. The source is represented here with a ringed cross.

An image with a solid background only. We shall draw three cloning strokes successively.
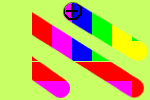
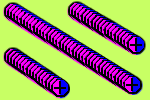
Każde pociągnięcie pracuje niezależnie. Dla każdego z nich punkt kliknięcia jest kopiowany ze źródła niezależnie od pozostałych pociągnięć. Opcja ta powoduje, że różne pociągnięcia kontrastują ze sobą.
Example below: At every new brush stroke, the source goes back to its first position. The same sample is always cloned.
Pierwsze kliknięcie w czasie rysowania określa przesunięcie pomiędzy źródłem a rezultatem klonowania dla wszystkich kolejnych pociągnięć. Dlatego też wszystkie pociągnięcia płynnie się ze sobą przeplatają.
Aby zmienić przesunięcie wystarczy wybrać źródło poprzez kliknięcie i jednoczesne przytrzymywanie Ctrl.
In the example below, at every new brush stroke, the source keeps the same offset it had with the previous brush stroke. So, there is no cloning offset for the first brush stroke. Here, for the following strokes, the source ends up out of the source image canvas; hence the truncated aspect.
The „Registered” mode is different from the other alignment modes. When you copy from an image, a Ctrl-click will register a source layer. Then painting in a target layer will clone each corresponding pixel (pixel with the same offset) from the source layer. This is useful when you want to clone parts of an image from one layer to another layer within the same image. (But remember that you can also clone from one image to another image.)
At every brush stroke, the source adopts the position of the mouse pointer in the destination layer. In the following example, the destination layer is smaller than the source layer; so, there is no truncated aspect.
Używając tego trybu przy rysowaniu wykorzystane zostanie zaznaczone źródło, nawet w trakcie rysowania linii (w przeciwieństwie do trybu Brak). Punkt źródłowy nie będzie przemieszczany.
See that the source remains fixed. The same small sample is reproduced identically in a tightened way:
Efekty Krycia w przypadku Klonowania są dość złożone, gdyż przezroczystości nie da się skopiować. Klonowanie przezroczystego źródła nie spowoduje żadnych zmian. W przypadku klonowania półprzezroczystego obszaru, efekt będzie zależny od przezroczystości źródła. Dla 100% krycia i twardego pędzla:
klon półprzezroczystego czarnego na białym da szary
klon półprzezroczystego czarnego na czarnym da czarny
klon półprzezroczystego białego na białym da biały
klon półprzezroczystego białego na czarnym da szary
Klonowanie nigdy nie powoduje zwiększenia przezroczystości, ale może ją zmniejszyć, jeśli nie zaznaczona jest opcja „Blokowanie” dla warstwy. Klon nieprzezroczystego obszaru na przezroczystym da nieprzezroczysty, zaś klon półprzezroczystego obszaru na półprzezroczystym zwiększy krycie.
There are a few non-obvious ways to use the Clone tool to obtain powerful effects. One thing you can do is to create „Filter brushes”, that is, create the effect of applying a filter with a brush. To do this, duplicate the layer you want to work on, and apply the filter to the copy. Then activate the Clone tool, setting Source to „Image source” and Alignment to „Registered”. Ctrl-click on the filtered layer to set it as the source, and paint on the original layer: you will then in effect be painting the filtered image data onto the original layer.
You can use a similar approach to imitate Photoshop's „History brush”, which allows you to selectively undo or redo changes using a brush. To do this, start by duplicating the image; then, in the original, go back to the desired state in the image's history, either by undoing or by using the Undo History dialog. (This must be done in the original, not the copy, because duplicating an image does not duplicate the Undo history.) Now activate the Clone tool, setting Source to „Image source” and Alignment to „Registered”. Ctrl-click on a layer from one image, and paint on the corresponding layer from the other image. Depending on how you do it, this gives you either an „undo brush” or a „redo brush”.