| 2.2. Zaznaczenie prostokątne | ||
|---|---|---|
 |
2. Narzędzia zaznaczania |  |
| 2.2. Zaznaczenie prostokątne | ||
|---|---|---|
| |
2. Narzędzia zaznaczania | |
The Rectangle Selection tool is designed to select rectangular regions of the active layer: it is the most basic of the selection tools, but very commonly used. For information on selections and how they are used in GIMP see Selections; for information on features common to all selection tools see Selection Tools.
Narzędzie może być również używane do tworzenia prostokątów na obrazie. W tym celu należy utworzyć zaznaczenie prostokątne, a nastepnie wypełnić je przy pomocy Wypełnienia kubełkiem. Aby uzyskać prostokątną ścieżkę, najłatwiej jest utworzyć zaznaczenie prostokątne, a następnie stworzyć pociągnięcie.
Narzędzie można aktywować na kilka sposobów:
from the image menu bar → → ,
by clicking on the tool icon
 in the ToolBox,
by using the keyboard shortcut R.
![[Uwaga]](images/note.png)
|
Uwaga |
|---|---|
|
Klawisze modyfikujące, wspólne dla wszystkich Narzędzi zaznaczania opisane zostały na Narzędzia zaznaczania. Poniżej opisano klawisze, charakterystyczne tylko dla „Zaznaczenia prostokątnego”. |
Pressing the Ctrl key after starting
your selection, and holding it down until you are finished,
causes your starting point to be used as the center of the
selected rectangle, instead of a corner. Note that if you
press the Ctrl key before
starting to make the selection, the resulting selection will be
subtracted from the existing selection. The cursor becomes

If you press the Shift key
before starting the selection, the
resulting selection will be added to the existing one. The cursor
becomes

Pressing the Shift key after starting your selection, toggles the Fixed option, and holding it down until you are finished, will constrain the selection to a square, if it is your first selection. Later, with the default Aspect Ratio , your selection will respect the aspect ratio of the previous selection.
Pressing both keys after starting your selection
combines the two effects, giving you a square selection centered
on your starting point. Note that pressing these keys before
starting your selection intersects the resulting selection with
the existing one and the pointer change shape accordingly :

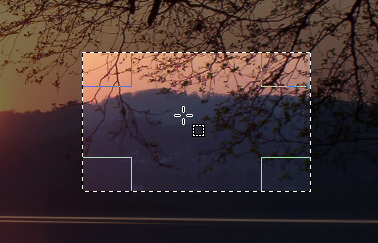
When this tool is selected the mouse pointer is displayed like this:
 as soon as it is over the image. A drag and drop allows to get a
rectangular (or square) shape. When the mouse button is relaxed, a
dotted line („marching ants”) outlines the selection. It's
not necessary to adjust the selection with care; you can resize it
easily later.
as soon as it is over the image. A drag and drop allows to get a
rectangular (or square) shape. When the mouse button is relaxed, a
dotted line („marching ants”) outlines the selection. It's
not necessary to adjust the selection with care; you can resize it
easily later.
When the pointer is moving on the canvas, the pointer and selection aspects change:
- outside the selection it looks like previously; this allows to design a new selection but will erase the existing one if this isn't combined with an action on the relevant key to add or subtract another selection as described in the previous paragraph.
- within selection peripheral parts, the mouse pointer changes into
various shapes when overflying rectangular sensitive and clearly marked
areas. These handles allow you to resize the
selection. In selection corners the pointer changes into a shape
according to the context; for instance in the low right corner it
becomes:
 .
So, by click-and-dragging these areas, you can magnify or shrink the
selection size. Over median selection parts, lateral, low or up,
pointer is changed into appropriate shapes according to the context.
For instance, when the mouse pointer is over the median right side, the
pointer looks like:
.
So, by click-and-dragging these areas, you can magnify or shrink the
selection size. Over median selection parts, lateral, low or up,
pointer is changed into appropriate shapes according to the context.
For instance, when the mouse pointer is over the median right side, the
pointer looks like:
 .
So you can click-and-drag to magnify or to shrink the selection size by
moving the chosen boundary.
.
So you can click-and-drag to magnify or to shrink the selection size by
moving the chosen boundary.
- inside selection central area the mouse pointer looks like usual for
object manipulation, i.e.:
 .
So you can move the whole selection by a click-and-drag.
.
So you can move the whole selection by a click-and-drag.
Moreover, if you have not unchecked the Highlight option, your work will be easier because what is out the selection will be darkest than what is in the selection, and then the selection seems highlighted.
![[Podpowiedź]](images/tip.png)
|
Podpowiedź |
|---|---|
|
If you use moving keys you can move the selection or modify its size by one pixel step. If you use it in combination with Shift you can move it by a 25 pixel step. |
Rysunek 13.11. Sensitive selection areas
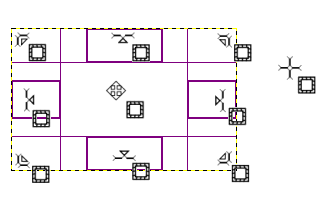
Display of all possible pointers in function of their localization with respect to the selection area.
After creating and modifying the selection, you will have to exit this editing mode (and commit any changes). You can do this with a single click inside the selection or by pressing the Enter key. Or you can just use a non-selection tool and, for example, fill or paint the selection.
Normally, tool options are displayed in a window attached under the Toolbox as soon as you activate a tool. If they are not, you can access them from the image menu bar through → → which opens the option window of the selected tool.
|
|
Uwaga |
|---|---|
|
Оpis opcji wspólnych dla wszystkich narzędzi zaznaczania znajduje się na Narzędzia zaznaczania. Poniżej opisane zostały jedynie opcje charakterystyczne dla Zaznaczenia prostokątnego. |
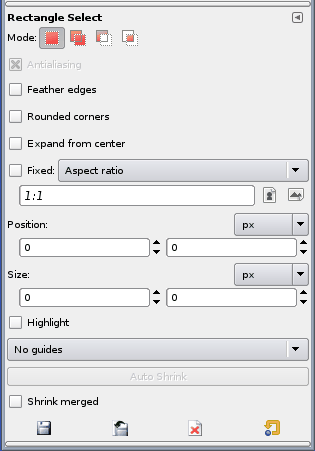
Common select options.
Zaznaczenie pola wyboru spowoduje pojawienie się suwaka, pozwalającego na wybór promienia, służącego do zaokrąglania rogów obrazu.
Zaznaczenie pola wyboru spowoduje, że punkt kliknięcia stanie się środkiem zaznaczenia.
Opcja ta pozwala na ograniczenie formy końcowego prostokąta na kilka sposobów:
Opcja ta pozwala na zmianę rozmiaru zaznaczenia, nie zmieniając proporcji, które są określone w polach Szerokość i Wysokość.
Dzięki tej opcji można zmieniać szerokość zaznaczenia.
Opcja pozwala określić wysokość zaznaczenia.
Opcja pozwala określić szerokość i wysokość zaznaczenia.
Cztery pola pozwalają określić punkt początkowy, szrokość i wysokość zaznaczenia.
Zaznaczając pole, zaznaczenie jest podkreślone poprzez otaczającą maskę, aby łatwiej było je zwizualizować.
Rozwijana lista pozwala wybrać rodzaj prowadnic, pokazywanych wewnątrz zaznaczenia. Ich zadaniem jest ułatwianie tworzenia zaznaczenia.
Prowadnice nie są pokazywane.
Jedynie linie środkowe są pokazywane w charakterze prowadnic wewnątrz zaznaczenia.
Prowadnice są wyświetlane wzdłuż jednej trzeciej podczas tworzenia zaznaczenia.
Prowadnice są pokazywane w celu oznaczenia złotego podziału.
Opcja Zmniejsz zaznaczenie zmniejszy zaznaczenie do najbliższej formy prostokątnej, dostępnej w warstwie. Algorytm znajdowania najlepszego prostokąta jest „inteligentny”, dlatego nie zawsze daje pożądane rezultaty. W każdym razie, jeśli obszar, który chcemy zaznaczyć, jest otoczony jednolitym kolorem, to opcja zawsze go znajdzie. Otrzymane zaznaczenie może się różnić od tego otrzymanego podczas ręcznego wprowadzania parametrów.
Jeśli wybrana jest opcja Próbkuj wszystkie warstwy, to Zmniejsz zaznaczenie będzie korzystać z informacji о pikselach z całego obrazu, а nie tylko warstwy aktywnej. Więcej informacji na Próbkuj wszystkie warstwy.