| 2. Su paveikslėlių struktūra susiję dialogai | ||
|---|---|---|

|
Skyrius 15. Dialogs |  |
| 2. Su paveikslėlių struktūra susiję dialogai | ||
|---|---|---|
|
|
Skyrius 15. Dialogs | |
The following dialogs let you control and manipulate image structures, such as layers, channels, or paths.
The „Layers“ dialog is the main interface to edit, modify and manage your layers.
The „Layers“ dialog is a dockable dialog; see the section Skyrius 2.3, „Dialogai ir dokai“ for help on manipulating it.
You can access it:
from the image menu: → → ;
from the Tab menu in any dockable dialog by clicking on
 and selecting
→ ,
and selecting
→ ,
from the (default) shortcut: Ctrl+L.
In the menu, there is a list of detached windows which exists only if at least one dialog remains open. In this case, you can raise the „Layers“ dialog from the image-menu: → .
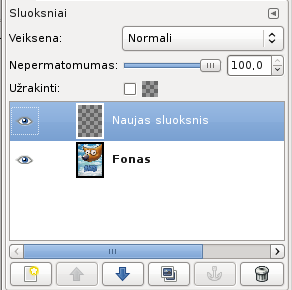
Kiekvienas sluoksnis dialoge rodomas miniatiūros forma. Kai paveikslėlyje yra keli sluoksniai, jie rodomi kaip sąrašas. Viršutinis šio sąrašo sluoksnis yra matomas pirmas, o apatinis sąrašo sluoksnis yra matomas paskutinis, tai yra fonas. Virš sąrašo galima matyti su kiekvienu sluoksniu susijusias charakteristikas. Po sąrašu yra sluoksnių sąrašo valdymo mygtukai. Dešiniuoju pelės mygtuku spustelėjus sluoksnio miniatiūrą atveriamas Sluoksnio meniu.
Every layer is shown in the list along with its attributes:

 Layer visibility
In front of the thumbnail is an icon showing an eye. By clicking on the eye, you toggle whether the layer is visible or not. (Shift-clicking on the eye causes all other to be hidden.)
 Chain layers
Another icon, showing a chain, allows you to group layers for operations on more than one layer at a time (for example with the Move tool).
The layer content is represented in a thumbnail. Maintaining left-click for a second on this thumbnail makes it larger. When the layer is active, the thumbnail has a white border. The border is black if the layer is inactive. When the layer has a mask, the inactive element takes a black border.
The main attribute is the name of the layer. You can edit this by a double-click on the name of the layer. You can also use the „Edit Layer Attributes“ dialog you can find in the context menu that you get by through a right-click on the layer.
![[Pastaba]](images/note.png)
|
Pastaba |
|---|---|
|
Animacijos sluoksnio atveju (GIF arba MNG), sluoksnio pavadinimą galima naudoti norint nurodyti tam tikrus parametrus: sluoksnio_pavadinimas (delsa ms) (kombinavimo veiksena), pvz., Kadras-1 (100 ms) (replace). Delsa nurodo laiką, kurį sluoksnis yra matomas animacijoje. Kombinavimo veiksena nurodo, ar jūs kombinuojate sluoksnį su ankstesniuoju sluoksniu ar jį pakeičiate: šios dvi veiksenos yra (combine) arba (replace). |
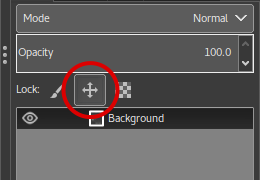
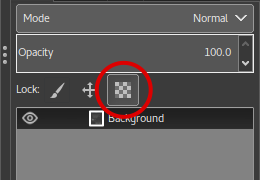
Above the layer list, it is possible to specify some properties for the active layer. The active layer is the one highlighted in blue. The properties are: „Layer mode“, „Opacity“, „Lock pixels“ and „Lock Alpha channel“.
Sluoksnio veiksena nurodo kaip sluoksnis sąveikauja su kitais sluoksniais. Išskleidžiamame laukelyje galite rasti visas programoje GIMP galimas veiksenas. Sluoksnio veiksenos išsamiai aprašytos sekcijoje Skyrius 2, „Sluoksnių veiksenos“.
Perkeldami slankiklį galite sumažinti arba padidinti paveikslėlio nepermatomumą. Kai nepermatomumo reikšmė yra 0, sluoksnis yra permatomas ir visiškai nematomas. Nemaišykite to su Sluoksnio kauke, kuri nustato permatomumą kiekvienam pikseliui atskirai.
You have three possibilities:
Lock pixels: When the button is pressed down, you cannot use any brush-based tool (Paintbrush, Pencil, Eraser etc.), the Airbrush or the Ink tool on the currently selected layer. This may be necessary to protect them from unwanted changes.
Lock position and size: This toggle button enables and disables protection of layers from moving them around or transforming them. When the button is pressed down, you cannot use any transform tool (Rotate, Shear, Perspective and others) or move it.
Lock alpha channel: This toggle button controls the „Lock“ setting for the transparency of the layer . If this is pressed down, then the alpha channel for the layer is locked, and no manipulation has any effect on it. In particular, nothing that you do to a transparent part of the layer will have any effect.
Pav. 15.5. „Užrakinti Alfa kanalą“ pavyzdys
Aktyvaus sluoksnio permatomame fone yra trys nepermatomos, horizontalios, žalios juostos. Piešiame vertikalią raudoną juostą. „Užrakinti“ nepažymėta: nepermatomos ir permatomos aktyvaus sluoksnio sritys uždažomos raudona spalva.
„Užrakinti“ pažymėta: raudona spalva uždažomos tik nepermatomos aktyvaus sluoksnio sritys. Permatomos sritys yra išsaugomos.
![[Patarimas]](images/tip.png)
|
Patarimas |
|---|---|
|
If a layer name in the Layer Dialog is in bold, then this layer has no Alpha channel. |
Po sluoksnių sąrašu yra mygtukai, leidžiantys sluoksnių sąraše atlikti kai kurias pagrindines operacijas.
Here you can create a new layer. A dialog is opened, which is described in New Layer.
Press the Shift key to open a new layer with last used values.
Here you can create a new layer group. A new layer is created, where you can put layers down.
Layer groups are described in Layer groups.
Čia galite lygiu pakelti sąraše esantį sluoksnį. Norėdami perkelti sluoksnį į sąrašo viršų paspauskite klavišą Shift.
Čia galite lygiu nuleisti sąraše esantį sluoksnį. Norėdami perkelti sluoksnį į sąrašo apačią, paspauskite klavišą Shift.
|
|
Patarimas |
|---|---|
|
Norint perkelti sluoksnį į sąrašo apačią iš pradžių gali reikėti sluoksniui pridėti permatomumo kanalą (dar vadinamą Alfa kanalu). Tą galite padaryti dešiniuoju pelės mygtuku spustelėję Fono sluoksnį ir meniu pasirinkę Pridėti Alfa kanalą. |
 Sukurti sluoksnio kopiją
Čia galite sukurti aktyvaus sluoksnio kopiją. Naujo sluoksnio pavadinimo pabaigoje pridedamas skaičius.
 Pritvirtinti sluoksnį
Before GIMP-2.10.18, this button was permanently for anchoring.
Now, it becomes an anchor only when a floating selection is
created (it anchors the floating selection to the previous
active layer). Else, it is a
icon
![]() with several possibilities:
with several possibilities:
Merge this layer with the first visible layer below it.
Pressing Shift: merge the layer group's layers into one normal layer.
Pressing Ctrl: merge all visible layers into one normal layer.
Pressing Shift+Ctrl: merge all visible layers with last used values.
Čia galite ištrinti aktyvų sluoksnį.
Other functions about layer size are available in the Layer context menu you get by right clicking on the Layer Dialog. You can find them also in the Layer sub-menu of the image menu.
You will find merging layers functions in the Image menu.
Spustelėkite sluoksnio miniatiūrą ir laikykite: ji padidinama, kad galėtumėte ją vilkti pele.
Taigi šį sluoksnį galite perkelti į bet kurią sluoksnių sąrašo vietą.
You can also put the layer down into Toolbox: a new image is created that contains this layer only.
Finally, you can put the layer down into another image: this layer will be added to the layer list, above existing layers.
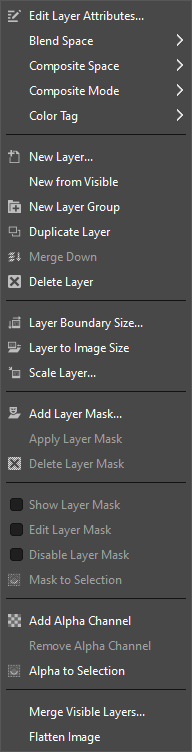
By right-clicking in the layer dialog, or by opening the from the tab menu, a context menu for the Layers dialog will open.
Most of the commands in this menu have already been documented above, or elsewhere:
Except for Width, Height, and Fill with, this dialog is the same as the New Layer Dialog. For information about the layer attributes we therefore refer to the documentation for that dialog.
See Blend space in the New Layer dialog.
See Composite space in the New Layer dialog.
See Composite mode in the New Layer dialog.
See the Color tag documentation in the New Layer dialog.
These commands are explained above, see layer characteristics.
See the New from Visible menu command documentation.
See the Layer Boundary Size... menu command documentation.
See the Layer to Image Size menu command documentation.
See the Scale Layer... menu command documentation.
See the Layer Mask submenu documentation for these commands.
Only one of these will be enabled. If the current layer does not have an alpha channel, you will be able to add one. If it does, you can remove the alpha channel.
This command merges all visible layers into one layer.
This command merges all layers into one layer and removes transparency.
A transparency mask can be added to each layer, it's called Layer mask. A layer mask has the same size and same number of pixels as the layer to which it is attached. Every pixel of the mask can then be coupled with a pixel at the same location in the layer. The mask is a set of pixels in gray-tone on a value scale from 0 to 255. The pixels with a value 0 are black and give a full transparency to the coupled pixel in the layer. The pixels with a value 255 are white and give a full opacity to the coupled pixel in the layer.
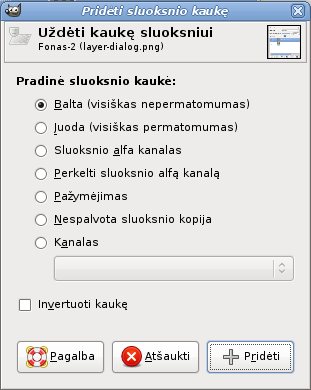
To create a layer mask start with a right click on the layer to call the context menu and select Add layer mask in the menu. A dialog appears where you can initialize the content of the mask:
Balta (visiškas nepermatomumas): kaukė Sluoksnių dialoge yra balta. Taigi visi sluoksnio pikseliai yra matomi paveikslėlio lange, kadangi piešiant kaukėje balta spalva sluoksnio pikseliai yra visiškai matomi. Norėdami, kad pikseliai būtų permatomi, turite piešti juoda spalva.
Juoda (visiškas permatomumas): kaukė Sluoksnių dialoge yra juoda. Taigi sluoksnis yra visiškai permatomas, kadangi piešiant kaukėje juoda spalva sluoksnio pikseliai tampa permatomi. Piešiant balta spalva kaukė bus pašalinta ir matytis sluoksnio pikseliai.
Sluoksnio alfa kanalas: kaukė inicializuojama atsižvelgiant į sluoksnio Alfa kanalo turinį. Jeigu sluoksnyje vis dar yra permatomumas, jis nukopijuojamas į kaukę.
Perkelti sluoksnio alfa kanalą: daro tą patį kaip ir ankstesnė parinktis, išskyrus tai, kad ji taip pat atstato sluoksnio alfa kanalą į visišką nepermatomumą.
Pažymėjimas: kaukė yra inicializuojama atsižvelgiant į pažymėjime rastas pikselių reikšmes.
Nespalvota sluoksnio kopija: kaukė inicializuojama atsižvelgiant į sluoksnio pikselių reikšmes.
Kanalas: sluoksnio kaukė yra inicializuojama su anksčiau jūsų sukurta pažymėjimo kauke, saugoma Kanalų dialoge.
Invertuoti kaukę: ši parinktis leidžia invertuoti: juoda pavirsta balta, o balta pavirsta juoda.
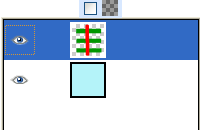
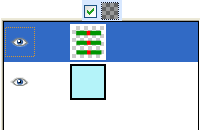
Sukūrus kaukę ji rodoma kaip miniatiūra šalia sluoksnio miniatiūros. Spustelėjus sluoksnio ir kaukės miniatiūras galima įjungti vieną arba kitą. Aktyvus elementas yra paryškintas baltu rėmeliu (kuris nėra labai gerai matomas aplink balta kaukę). Klavišo Alt (arba Ctrl+Alt ir sluoksnio kaukės miniatiūros spustelėjimas) spustelėjimas yra lygus komandai Rodyti sluoksnio kaukę: sluoksnio kaukės rėmelis pavirsta žaliu. Jeigu paspaudžiate klavišą Ctrl, rėmelis yra raudonas, o rezultatas yra lygus komandai Išjungti sluoksnio kaukę. Norėdami grįžti į normalų rodinį, atšaukite paskutinę operaciją. Šios parinktys yra jūsų patogumui.
Pressing Alt (or Ctrl+Alt and click on the layer mask thumbnail) is equivalent to the Show Layer Mask command : the layer mask border turns to green. If you press Ctrl the border is red and the result is equivalent to the Disable Layer Mask command. To return to normal view redo last operation. These options are for greater convenience in your work.
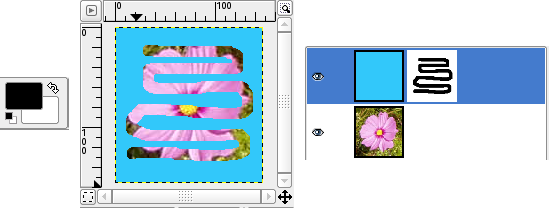
Pav. 15.8. Sluoksnis su sluoksnio kauke
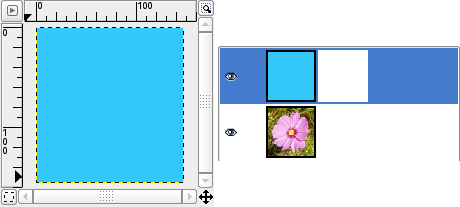
Šiame paveikslėlyje yra fono sluoksnis su gėle ir dar vienas visiškai nepermatomas mėlynas sluoksnis. Mėlynam sluoksniui buvo pridėta balta sluoksnio kaukė. Paveikslėlio lange mėlynas sluoksnis išlieka matomas, nes dėl baltos kaukės sluoksnio pikseliai yra matomi.
Pav. 15.9. Sluoksnio kaukės piešimas
The layer mask is active. You paint with black color, which makes the layer transparent: the underlying layer becomes visible.