| Skyrius 8. Combining Images | ||
|---|---|---|

|
Dalis II. How do I Become a GIMP Wizard? |  |
| Skyrius 8. Combining Images | ||
|---|---|---|
|
|
Dalis II. How do I Become a GIMP Wizard? | |
Turinys
You can think of layers as a stack of slides. Using layers, you can construct an image of several conceptual parts, each of which can be manipulated without affecting any other part of the image. Layers are stacked on top of each other. The bottom layer is the background of the image, and the components in the foreground of the image come above it.
There is no limit to the number of layers an image can have, only the amount of memory available on the system. It is not uncommon for advanced users to work with images containing dozens of layers. You can group layers to make your work easier, and there are many commands to handle layers.
The organization of layers in an image is shown in the Layers dialog, which is the second most important type of dialog window in GIMP, after the Main Toolbox. How it works is described in detail in the Layers Dialog section, but we will touch some aspects of it here, in relation to the layer properties that they display.
Each open image has at any time a single active drawable. A „drawable“ is a GIMP concept that includes layers, but also several other items, such as channels, layer masks, and the selection mask. Basically, a „drawable“ is anything that can be drawn on with painting tools. If a layer is currently active, it is shown highlighted in the Layers dialog, and its name is shown in the status area of the image window. If not, you can activate it by clicking on it. If none of the layers are highlighted, it means the active drawable is something else than a layer.
In the menu bar, you can find a menu called , containing a number of commands that affect the active layer of the image. The same menu can be accessed by right-clicking in the Layers dialog.
Kiekvienas paveikslėlio sluoksnis turi kelias svarbias savybes:
Every layer has a name. This is assigned automatically when the layer is created, but you can change it. You can change the name of a layer either by double-clicking on it in the Layers dialog, or by right-clicking there, and then selecting the top entry in the menu that appears, .
An alpha channel encodes information about how transparent a layer is at each pixel. It is visible in the Channel Dialog: white is complete opacity, black is complete transparency and gray levels are partial transparencies.
The background layer is special. If you have just created a new image, it only has one layer, which is the background layer. If the image has been created with an opaque Fill type, this one layer has no Alpha channel. To get a background layer with transparency, either create your new image with a transparent Fill type, or you use the Add an Alpha Channel command.
If you add a new layer, even with an opaque Fill type, an Alpha channel is automatically added to the layer.
Every layer other than the bottom layer of an image automatically has an Alpha channel, but you can't see a grayscale representation of the alpha values. See Alpha in Glossary for more information.
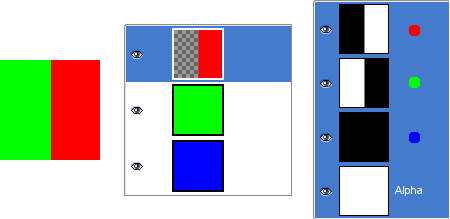
Pav. 8.2. Alfa kanalo pavyzdys: elementarus paveikslėlis
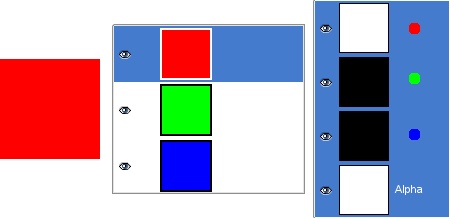
This image has three layers painted with pure 100% opaque Red, Green, and Blue. In the Channel Dialog, you can see that an alpha Channel has been added. It is white because the image is not transparent since there is at least one 100% opaque layer. The current layer is the red one: since it is painted with pure red, there is no green and no blue and the corresponding channels are black.
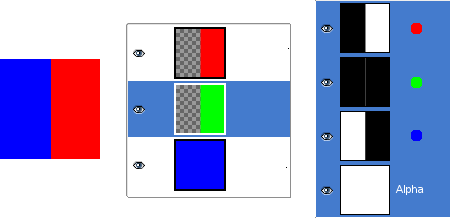
Pav. 8.3. Alfa kanalo pavyzdys: vienas permatomas sluoksnis
Kairioji pirmo sluoksnio dalis buvo padaryta permatoma (Stačiakampis pažymėjimas, Keisti / Išvalyti). Antrasis sluoksnis, žaliasis, yra matomas. Alfa kanalas vis dar yra baltas, kadangi šioje paveikslėlio dalyje yra nepermatomas sluoksnis.
Pav. 8.4. Alfa kanalo pavyzdys: du permatomi sluoksniai
Kairioji antrojo sluoksnio dalis buvo padaryta permatoma. Trečiasis sluoksnis, mėlynasis, yra matomas pro pirmąjį ir antrąjį sluoksnius. Alfa kanalas vis dar yra baltas, kadangi šioje paveikslėlio dalyje yra nepermatomas sluoksnis.
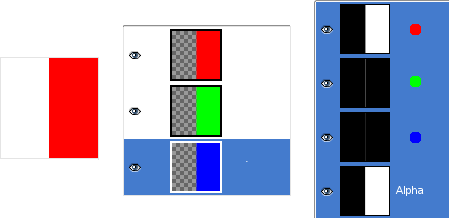
Pav. 8.5. Alfa kanalo pavyzdys: trys permatomi sluoksniai
The left part of the third layer has been cleared. The Alpha channel is still white and the left part of the layer is opaque, because the background layer has no Alpha channel. In this case, the Clear command works like the Eraser and uses the Background color of Toolbox.
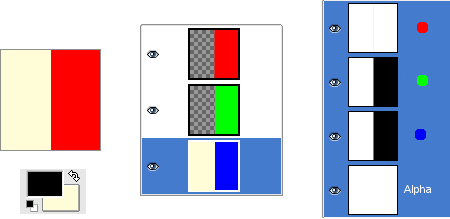
Pav. 8.6. Alfa kanalo pavyzdys: alfa kanalas pridėtas sluoksniui
We used the → → command, on the Background layer. Now, the left part of the image is fully transparent and has the color of the page where the image is shown. The left part of the Alpha Channel thumbnail is black (transparent) in the Channel Dialog.
The layer type is determined by the image type (see previous section), and the presence or absence of an alpha channel. These are the possible layer types:
RGB
RGBA
Pilkas
PilkasA
Indeksuotas
IndeksuotasA
The main reason this matters is that some filters (in the menu) only accept a subset of layer types, and appear disabled in the menu if the active layer does not have a supported type. Often you can rectify this either by changing the mode of the image, or by adding or removing an alpha channel.
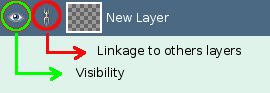
 Visibility
It is possible to remove a layer from an image, without destroying it, by clicking on the symbol in the Layers dialog. This is called „toggling the visibility“ of the layer. Most operations on an image treat toggled-off layers as if they did not exist. When you work with images containing many layers, with varying opacity, you often can get a better picture of the contents of the layer you want to work on by hiding some of the other layers.
![[Patarimas]](images/tip.png)
|
Patarimas |
|---|---|
|
Jeigu laikydami paspaudę klavišą Shift spustelėsite akies simbolį, visi sluoksniai išskyrus spustelėtąjį bus paslėpti. |
Usually, you activate a layer, to work on it, clicking it in the layer list. When you have a lot of layers, finding which layer an element of the image belongs to is not easy: then, press Alt and click with Mouse wheel on this element to activate its layer. The available layers will be looped through (starting from the upper one) while the Alt is held and the picked layer will be temporarily displayed in the status bar.
 Linkage to other layers
Jeigu spustelėsite tarp akies piktogramos ir sluoksnio miniatiūros, gausite grandinės piktogramą, įgalinančią grupuoti sluoksnius operacijoms, atliekamoms keliuose sluoksniuose (pvz., naudojant perkėlimo arba transformavimo įrankius).
In GIMP, the boundaries of a layer do not necessarily match the boundaries of the image that contains it. When you create text, for example, each text item belongs to its own separate layer, and the layer size is automatically adjusted to contain the text and nothing more. Also, when you create a new layer using cut-and-paste, the new layer is sized just large enough to contain the pasted item. In the image window, the boundaries of the currently active layer are shown outlined with a black-and-yellow dashed line.
Pagrindinė priežastis, kodėl tai yra svarbu, yra tai, kad sluoksniui, esančiam už šių ribų nieko negalite padaryti: negalite veikti to, kas neegzistuoja. Jeigu dėl to jums kyla problemų, galite pakeisti sluoksnio matmenis naudodamiesi keliomis meniu esančiomis komandomis.
![[Pastaba]](images/note.png)
|
Pastaba |
|---|---|
|
Sluoksnio naudojamos atminties dydis priklauso nuo jo matmenų, ne nuo jo turinio. Taigi, jeigu dirbate su dideliais paveikslėliais arba paveikslėliais, kuriuose yra daug sluoksnių, gali būti naudinga apkirpti sluoksnius iki mažiausio galimo dydžio. |
Sluoksnio nepermatomumas nurodo kiek yra matomos žemiau esančių sluoksnių spalvos. Nepermatomumas gali būti nuo 0 iki 100, 0 – visiškas permatomumas, o 100 – visiškas nepermatomumas.
Sluoksnio veiksena nurodo kiek sluoksnio spalvų yra kombinuojama su žemiau esančių sluoksnių spalvomis, norint gauti matomą rezultatą. Tai yra gana sudėtinga, ir pakankamai svarbu, kad šiam principui būtų skirta atskira sekcija, žr. Skyrius 2, „Sluoksnių veiksenos“.
Be alfa kanalo yra dar ir kitas būdas valdyti sluoksnio permatomumą: pridedant sluoksnio kaukę, kuri yra papildoma pilkų atspalvių piešimo sritis, susieta su sluoksniu. Pagal numatytuosius parametrus sluoksnis neturi sluoksnio kaukės: ją reikia pridėti atskirai. Kas yra sluoksnių kaukės ir kaip jas naudoti yra aprašyta sekcijoje Sluoksnio kaukė.