| Kapittel 8. Kombinere bilete med GIMP | ||
|---|---|---|

|
Del II. Korleis vert eg ein GIMP-ekspert? |  |
| Kapittel 8. Kombinere bilete med GIMP | ||
|---|---|---|
|
|
Del II. Korleis vert eg ein GIMP-ekspert? | |
Innhald
Du kan sjå på lag som ein stabel med plastfoliar. Ved å bruka lag, kan du konstruera eit bilete av fleire konseptuelle delar, som kan handsamast kvar for seg utan å påverka andre delar av biletet. Laga er stapla oppå kvarandre. Det nedste laget er bakgrunnen til biletet, og resten av laga kjem over dette laget.
Det er ikkje nokre avgrensingar for kor mange lag eit bilete kan ha, utover avgrensingane i minnet til datamaskinen. Det er ikkje uvanleg å arbeida med eit titals lag. Du kan gruppera laga for å gjera arbeidet enklare, og det finst mange funksjonar du kan bruka på laga.
Organiseringa av laga i eit bilete vert vist i lagdialogvindauget, som er den nest viktigaste typen dialogvindauge i GIMP, etter hovudverktøykassa. Utfyllande omtale kan du finna i Del 2.1, «Lagdialogvindauget». Her vil vi berre sjå på nokre av aspekta i høve til lageigenskapane dei viser.
Alle opne bilete har også eitt gjeldande teikneområde. Eit «teikneområde» er i GIMP-samanheng eit oppsett som inneheld lag, men også fleire andre element, som kanalar, lagmasker og utvalsmasker. (Eit «teikneområde» er i GIMP definert til å vera alt som det er råd å teikna på med ulike teiknereiskap). Det gjeldande laget er markert i lagdialogvindauget. Ønskjer du å skifta lag, kan du klikka på det ønskte laget. Namnet på det gjeldande laget vert også vist i statusområdet i biletvindauget. Dersom ingen av laga er markerte i lagdialogvindauget, betyr det at det gjeldande teikneområdet er noko anna enn eit lag.
I menylinja kan du finna ein meny kalla . Denne menyen inneheld ein del menyoppføringar som verkar på det gjeldande laget. Den same menyen kan du få fram ved å høgreklikka i lagdialogvindauget.
Kvart lag i eit bilete har fleire viktige eigenskapar:
Kvart lag får automatisk sitt eige namn når det vert oppretta. Du kan endre namnet ved å dobbeltklikka på laget i lagdialogvindauget, eller høgreklikka og deretter velja i sprettoppmenyen.
Alfakanalen inneheld informasjon om kor gjennomsiktig kvar piksel i laget er. Dette er synleg i kanaldialogvindauget ved at kvit representerer fullstendig ugjennomsiktig, svart fullstendig gjennomsikt og gråtonene delvis gjennomsikt.
Bakgrunnslaget er noko spesielt. Dersom du nettopp har oppretta eit nytt bilete, har dette biletet berre eitt lag, som er bakgrunnslaget. Dersom biletet vart oppretta med ein ugjennomsiktig fylltype, vil dette laget heller ikkje ha nokon alfakanal. Du kan laga eit bakgrunnslag med gjennomsikt anten ved å oppretta eit nytt bilete med ein gjennomsiktig fylltype, eller ved å bruka legg til alfakanal.
Viss du legg til eit nytt lag, sjølv med ein ugjennomsiktig fylltype, vert det automatisk lagt til eit alfalag.
Alle andre lag enn det nedste laget i eit bilete har automatisk ein alfakanal, men du kan ikkje sjå ein gråtonerepresentasjon av alfaverdiane. Sjå Alfa i ordlista for meir informasjon.
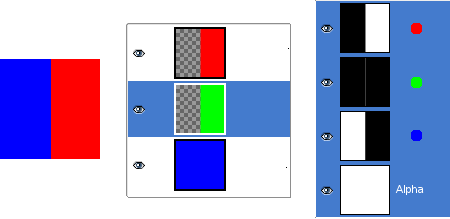
Figur 8.2. Alfakanaleksempel: originalbiletet
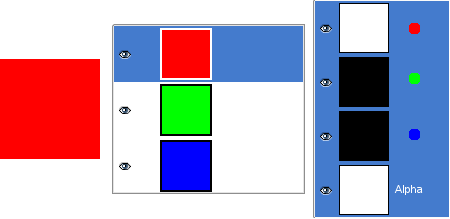
Dette biletet har tre lag der kvart av dei er farga med rein, fullstendig ugjennomsiktig farge. Kanaldialogvindauget viser at det også er lagt til ein alfakanal. Denne kanalen er kvit fordi biletet er ugjennomsiktig i og med at minst eitt av laga er fullstendig ugjennomsiktig (100 % dekkevne). Det raude laget er det gjeldande. Sidan dette er farga med rein raud, finst det ikkje blått eller grønt i dette laget. Difor er den grøne og den blå kanalen svart.
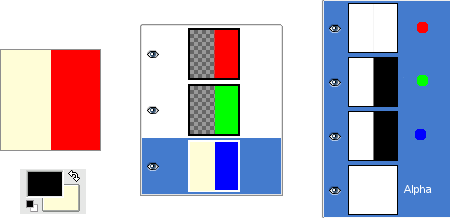
Figur 8.3. Alfakanaleksempel: eitt gjennomsiktig lag
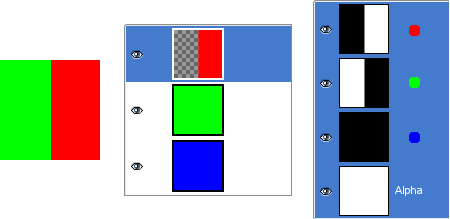
Den venstre delen av det første (øvste) laget er gjort gjennomsiktig (rektangelutval + rediger/tøm utvalet). Det andre laget, det grøne, er synleg. Alfakanalen er framleis kvit sidan det er minst eitt ugjennomsiktig lag i biletet.
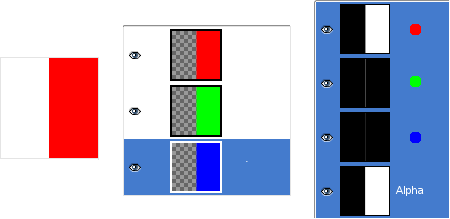
Figur 8.4. Alfakanaleksempel: to gjennomsiktige lag
Den venstre delen av det andre laget er gjennomsiktig. Det tredje, blå laget er synleg gjennom det første og det andre laget. Alfakanalen er framleis kvit sidan det er minst eitt ugjennomsiktig lag i biletet.
Figur 8.5. Alfakanaleksempel: tre gjennomsiktige lag
Den venstre delen av det tredje laget er tømt. Alfakanalen er framleis kvit, og den venstre delen av laget er ugjennomsiktig sidan bakgrunnslaget ikkje har nokon alfakanal. I dette tilfellet verkar kommandoen «tøm utvalet» på same måten som viskelêret og brukar bakgrunnsfargen frå verktøykassa.
Figur 8.6. Alfakanaleksempel: Alfakanal er lagt til bakgrunnslaget
Vi brukte kommandoen → → på bakgrunnslaget. Den venstre delen av biletet er fullstendig gjennomsiktig og vil få fargen til sida der biletet vert vist. Den venstre delen av miniatyren av alfakanalen i kanaldialogvindauget er svart, altså gjennomsiktig, i kanaldialogvindauget.
Lagtypen vert bestemt av bilettypen (sjå førre bolken) og om alfakanalen er til stades eller ikkje. Her er dei moglege lagtypane:
RGB
RGBA
Grå
GråA
Indeksert
IndeksertA
Hovudgrunnen til at dette er viktig, er at nokre filter i -menyen berre aksepterer nokre få lagtypar og vert gråmarkerte i menyen dersom filteret ikkje kan arbeida på det gjeldande laget. Ofte kan du ordna på dette ved å endra modus for biletet eller ved å leggja til eller ta bort ein alfakanal.
 Synleg eller usynleg
Du kan fjerna eit lag frå eit bilete utan å øydelegga det, ved å klikka på augesymbolet i lagdialogvindauget. Eit nytt klikk på auget gjer laget synleg igjen. Dei fleste operasjonane handsamar eit lag som er avslege på denne måten som eit lag som ikkje finst. Når du arbeidar med eit bilete med mange lag med varierande dekkevne, kan det ofte vera lurt å slå av lag som ikkje er nødvendige for å få eit betre oversyn over dei laga du arbeidar med.
![[Tips]](images/tip.png)
|
Tips |
|---|---|
|
Dersom du held nede Shift-tasten og klikkar på augesymbolet, vert alle laga unntatt det du klikka på gøymde. |
Til vanleg slår du på du eit lag for å arbeida på det. Dette gjer du ved å klikka i laglista. Har du mange lag, kan det vera vanskeleg å finna laget som eit element høyrer til i. Hald nede Alt-tasten og klikk med musehjulet på elementet for å slå på laget. Programmet vil gå gjennom lag for lag ovanfrå medan Alt vert halde nede og namnet på det aktuelle laget vert vist på statuslinja.
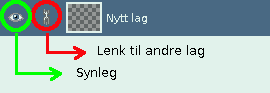
 Lenkje til andre lag
Dersom du klikkar mellom augeikonet og biletet av laget, dukkar det opp eit lenkjesymbol. Når dette er synleg, kan du gruppera lag for å arbeida på fleire lag samstundes for eksempel med flytteverktøyet og transformeringsverktøya.
I GIMP er det slik at grensene for eit bilete og grensene for laga i dette biletet ikkje treng vera dei same. Når du t.d. legg inn tekst, vert kvar tekstdel lagt inn i kvar sitt lag. Kvart av desse laga vert akkurat store nok til å gje plass til teksten. Det same skjer når du lagar eit nytt lag ved å klippa og lima. Det nye laget vert akkurat så stort at det er plass til objektet du limte inn. Grensene for det gjeldande laget vert markerte i biletet med ei svart og gul prikkelinje.
Det er litt viktig å hugse på dette, fordi du ikkje kan gjera noko som helst på eit lag utanfor grensene. (Du kan ikkje arbeida med noko som eigentleg ikkje finst). Dersom dette skaper problem, kan du endra på storleiken med ein av dei kommandoane som ligg nedst på -menyen.
![[Notat]](images/note.png)
|
Notat |
|---|---|
|
Kor mykje minne eit lag brukar, er avhengig av storleiken på laget, ikkje av innhaldet. Difor kan det løna seg å setja storleiken på laga til eit minimum dersom du arbeidar med store bilete eller på bilete med mange lag. |
Dekkevna til eit lag bestemmer kor mykje av fargane frå dei underliggande laga som skal vera synlege. Altså kor gjennomsiktig laget skal vera. Dekkevna vert sett på ein skala frå 0 til 100, med 0 som fullstendig gjennomsiktig (transparent) og 100 som fullstendig ugjennomsiktig (opakt).
Med modus til laget meiner ein korleis fargane i laget vert kombinerte med fargane frå laga under. Dette er såpass vanskeleg og samstundes så viktig, at det fortener eit eige avsnitt. Sjå Lagmodus.
I tillegg til alfakanalen, er det også ein annan måte å kontrollera kor gjennomsiktig eit lag skal vera, nemleg ved å leggja til ei lagmaske. Dette er eit ekstra gråtonelag som vert lagt til laget. Du kan bruka alle teiknereiskapa på denne maska. Lagmaska vert ikkje lagt til automatisk, så du må gjera dette manuelt dersom du har behov for maska. Du finn nærare omtale av lagmasker i Del 2.1.4, «Lagmasker».