| 3. 描画ツール | ||
|---|---|---|

|
第14章 ツール |  |
| 3. 描画ツール | ||
|---|---|---|
|
|
第14章 ツール | |
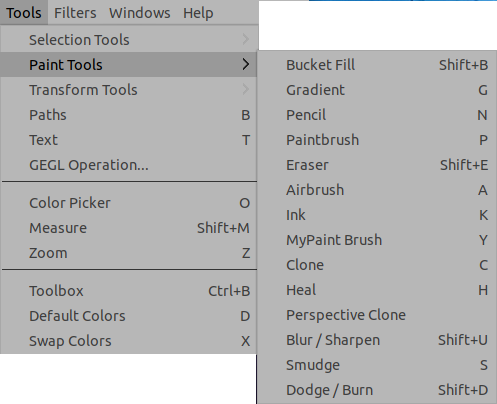
The GIMP Toolbox includes fourteen 「paint tools」. By default they are shown together in five groups, but this can be disabled in Toolbox Preferences by unchecking Use tool groups.
図14.38 The Paint Tools in the ToolBox
The default view groups similar tools together. The paint tools groups are inside the red square.
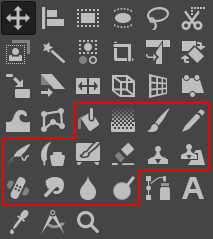
The paint tools in the toolbox in ungrouped view inside the red area.
The feature they all have in common is, that all of them are used by moving the pointer across the image display, creating brush-strokes. Five of them behave like the intuitive notion of 「painting」 with a brush. Pencil, Paintbrush, Airbrush, and MyPaint brush (introduced in GIMP 2.10.6) are called 「basic painting tools」 or brush tools.
The Pencil Tool.
The Paintbrush Tool.
The Airbrush Tool.
The Ink tool.
The MyPaint Brush Tool.
それ以外のツールは塗るのとはまた違った方法でブラシによる画像の加工を行います。
the Bucket Fill Tool fills with color or a pattern;
the Gradient Tool fills with gradients;
the Eraser Tool erases;
the Clone Tool copies from a pattern, or image;
the Perspective Clone Tool copies into a changed perspective;
the Heal Tool corrects small defects;
the Blur/Sharpen Tool blurs or sharpens;
the Smudge Tool smears;
and the Dodge/Burn Tool lightens or darkens.
があります。 GIMP でマウスではなくタブレットを使用した場合の利点が最も強く現れる場面はおそらくブラシツールを使うときでしょう。 高感度コントロールで得られる情報は他には替えがたいものです。 これらのツールには特別にタブレットでのみ利用できる「筆圧感知」オプションがついています。
通常利用される「受け渡し」のしくみに加え、 ブラシツールを利用するより自動化された連携があり、 選択ツールやパスツールが作った「境界線を描画」することができます。 ここで使うブラシツールはどれでもよく、 消しゴムやにじみツールなど特異なものも使えます。 使えるオプションも同じです。 詳しくは 境界線を描画 についての章をご覧ください。
Holding down the Ctrl key has a special effect on every paint tool. For the Pencil, Paintbrush, Airbrush, Ink, and Eraser, it switches them into 「color picker」 mode, so that clicking on an image pixel causes GIMP's foreground to be set to the active layer's color at that point (or, for the Eraser, GIMP's background color). For the Clone tool, the Ctrl key switches it into a mode where clicking sets the reference point for copying. For the Blur/Sharpen tool, the Ctrl key switches between blur and sharpen modes; for the Dodge/Burn tool, it switches between dodging and burning.
すべての描画ツールに同様の効果があるのが Shift キーです。 直線 が引けるモードに変わるのです。 どの描画ツールの場合も直線を引くにはまず始点をクリックして、 その後に Shift キーを押します。 キーを押したままでポインターを移動すると始点と現在地を繋ぐ細い線が示されます。 Shift キーを押し続けながらそこで次の点を打つと、 直線が描かれます。 この動作を繰り返すと線分が繋がって描けます。
両方のキーを押した状態でのブラシツールは 制限つきで直線を 引くモードになります。 使い方は Shift キー単独での方式と同じですが、 線の傾きは全方位を 24 分割した 15 度刻みの方向のうち最も近いものが選ばれます。 この制限は水平線や垂直線、 あるいは対角的な配置の斜線を引くときに便利です。
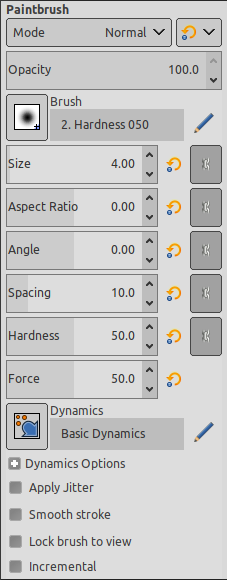
大多数のツールオプションがいくつかの描画ツールで共有されています。 ここでそれらのオプションについて説明します。 その他のオプションのうちツール個別で独自に持つものやごく一部で共有されているものは、 それぞれのツールの節の中で説明します。
モード ドロップダウンリスト (引き出しリスト) から描画の適用モードが選べます。 モードが果たす役割について理解するには 不透明度 に対するのと同じく、 ちょうど画像の上に描画を実施するためのレイヤーが別にあって、 そのレイヤーが画像と結合するモードをレイヤーダイアログで指定するところを想像されると最も解り易いでしょう。 モード指定によって多彩な計り知れない特殊効果が得られます。 モードオプションが利用できるのは画像に色を描き加えるツール (鉛筆、 絵筆、 エアブラシ、 インク、 スタンプ) に限られます。 それ以外の描画ツールでは利用できませんが、 ダイアログの統一感をはかる目的で灰色無効表示とされています。 「レイヤーのモード」 に関しては実例を挙げて説明しています。
中には 後述 のような独特なモードもあります。
不透明度スライダーはブラシ操作での透明度レベルを設定します。その効果を理解するには、 現在のレイヤーに直接描いているのではなく、 このツールによってその上に新たに透明なレイヤーが用意されているとみなすことです。 ツールオプションで不透明度を変更したときの効果は、 その仮のレイヤーの不透明度をレイヤーダイアログで変更するのと同じです。 このスライダーは活性レイヤーに描画するブラシツールだけでなく、 すべての描画ツールの「強さ」を調節しています。 消しゴムツールに関して言えば少々混乱しそうです。 「不透明度」が高いほど、 このツールが消した部分の透明感が増す結果になります。
ブラシ選びが、 ポインターを滑らせ描画する過程でツールが画像に及ぼす大きさと刻印の内容を決めます。 GIMP で使えるブラシは様々な種類があります。 ブラシ の節に説明があります。 「インクで描画」ツールを除き、 どの描画ツールに替えても同じブラシが選べます。 「インクで描画」ツールはオプションでの調整を経て特別に構成されたブラシを使用します。 色の現れ方がブラシと関わるのは鉛筆、 絵筆、 エアブラシの筆触ツールだけです。 それ以外の描画ツールではブラシの強度分布しか関係しません。
このオプションでブラシの大きさを緻密に調整できます。 上 下 の各キーで ×0.01 ずつ、 PgUp PgDn の各キーで ×1.00 ずつ増減できます。 マウスホイールでの操作も「設定」で正しく設定すれば利用できます。 ブラシの大きさの変更方法 をご覧ください。
ここでブラシの高さと幅の比を決めます。 このスライダーは -20.00 から 20.00 の間の値をとり、 デフォルト値は 0.00 です。 -20 から 0.00 未満までの負の値にするとブラシの高さが狭まり、 その一方で 0.00 を越し 20.00 までの正の値にするとブラシの幅が狭まります。
このオプションはブラシの中心を軸にしてブラシ刻印を一定の角度に傾け回転します。 したがってブラシ刻印が円形だったり向きのない回転体図形であったりすると変化が見えません。
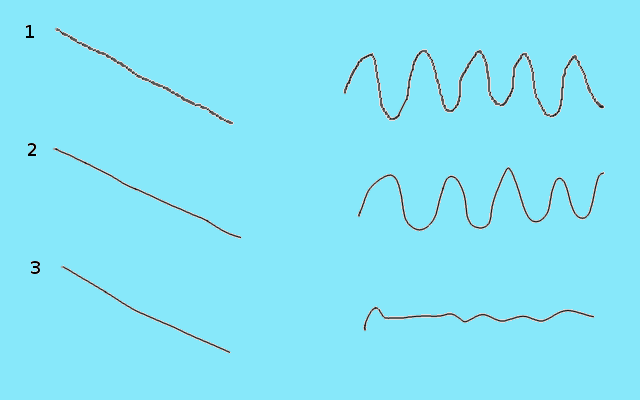
This option sets the distance between the brush marks in a stroke.
Modifies the size of the brush hard center.
Modifies gain.
動的特性オプションは、 入力側のさまざまな動作とブラシの出力パラメーターを結び付けるためにあります。 ペンタブレットで使われる場合がほとんどですが、 その一部はマウスに対しても有効です。
動的特性に関してはさらに 動的特性 で説明しています。
When stroking paths and selections using a paint tool there is an option to select 「Emulate brush dynamics」. That means that when you stroke, brush pressure and velocity are varying along the length of the stroke. Pressure starts with zero, ramps up to full pressure and then ramps down again to no pressure. Velocity starts from zero and ramps up to full speed by the end of the stroke.
このオプションは 動的特性のオプション で説明しています。
ブラシ描画での「間隔」について思い出してください。 描線は次々と繰り出されるブラシの刻印で成り立っており、 互いの間隔が非常に狭ければ繋がった線の姿になります。 そこで、 スライダーを調節すれば、 整列していたブラシの刻印を散り散りに離すこともできます。
散布は動的特性と結びつけることもでき、 描画の動的特性エディターでブラシの性格づけに利用できます。
このオプションで変化するのはブラシの刻印ではなく筆の「軌道」です。 描いた線のブレを抑えます。 マウスを使う描画が容易になります。
このオプションはチェックを入れると 品質 と ウエイト の 2 つのスライダーが現れます。 ご自分の技量と好みに合わせて初期値より増減が可能です。
ウエイトを高く設定すると筆跡が硬くなりがちです。
When you are working on an image that is bigger (in pixels) than your screen, you have to zoom in and out a lot. This option allows a very natural "iterative refinement" process with no need to repeatedly ask the application to change brush size as you go between the broad strokes and the detailing.
If the brush size is relative to the canvas (option unchecked), zooming in makes the brush zoomed also and it appears larger (takes up more pixels on the screen). If you're working with a 300 pixels radius brush and you zoom in from 12% to 100%, the brush is now half the size of your screen! So you have to shrink the brush back down.
If the brush size is relative to the screen (option checked), then when you zoom in, the size of the displayed brush doesn't change, it looks smaller and so you can work on tiny details.
図14.45 Lock brush example
This image is the screenshot of a small part of a TIFF image bigger than my screen. Here, GIMP displays this TIFF image at 50% zoom, so the whole image is visible. The option is not checked, brush size in toolbox is 100 pixels high.
Screenshot: zoom 200. The option is not checked. We paint with pencil and the pepper brush that is 100 pixels high in toolbox: displayed brush stroke is 200 pixels high.
Screenshot: zoom 200. The option is checked. We paint with pencil and the pepper brush that is 100 pixels high in toolbox: displayed brush stroke is 100 pixels high.
"Lock brush to view" can also be used to lock brush to view rotation:
図14.46 Lock brush to view rotation example
Screenshot. Here, the option is unchecked and we use → → : brush stroke is rotated.
Same thing but the option is checked: the brush is locked to the original, not rotated view and brush stroke is not rotated.
Applies the effect incrementally as the mouse pointer moves.
The incremental checkbox does not seems to work as everyone expect. If it is deactivated (the default value) the maximum effect of a single stroke is determined by the opacity set in the opacity slider. If the opacity is set to less than 100, moving the brush over the same spot will increase the opacity if the brush is lifted in the meantime. Painting over with the same stroke has no such effect. If Incremental is active the brush will paint with full opacity independent of the slider's setting. This option is available for all paint tools except those which have a 「rate」 control, which automatically implies an incremental effect. See also 「レイヤーのモード」.
GIMP の描画モードを使った例を以下に示します。
不透明度を 100% 未満としたどんな描画ツールで描いても、 この大変便利なモードは透過表現によらない方法で描画を果たす可能性を探ります。 つまり筆書きや塗りつぶしに対してすばらしい点描による紋様を描きます。
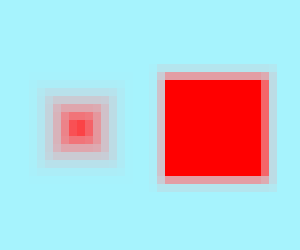
図14.48 ディザー合成モードで描画
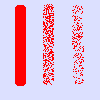
この画像は背景レイヤーだけを用いて描かれ、 アルファチャンネルは使用していない。 背景色は スカイブルー。 鉛筆による描画を透過度を変えて 3 本: 右から 100%、 50%、 25%。 描画色の画素が描線内で拡散している。
このモードでは現在のレイヤーの透過部分にのみ描画できます。 不透明度が低いところほど強く描画されます。 つまり完全不透明な部分には何も描画できませんが、 完全透過な部分での描画効果は標準モードと同じです。 描画するほどにつねに不透明度が増す結果になります。 当然アルファチャンネルの無いレイヤーでは何の意味もありません。
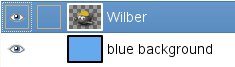
上の例の図では最前面のレイヤーにウィルバー君が描かれ、 その周りは透明です。 その下のレイヤーは一様にライトブルーで塗られています。 次にそのレイヤー全体を選択してから、 選択範囲を塗りつぶす オプションが有効な状態で塗りつぶしツールを使いました。 塗りつぶしにはパターンを使用しています。
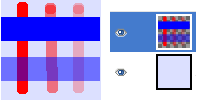
The next image (below) has two layers. The upper layer is active. Three brush strokes with pencil, red color at 100%, 50%, 25%: only transparent or semi-transparent pixels of the layer are painted.
This mode erases the foreground color, replacing it with partial transparency. It acts like the Color to Alpha filter, applied to the area under the brushstroke. Note that this only works on layers that possess an alpha channel; otherwise, this mode is identical to Normal.
上の例の図では、 白色で塗りつぶしたところ、 ウィルバー君の白い部分が消えて青い背景が透けて見えます。
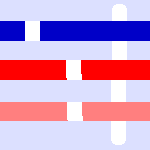
This image below has only one layer, the background layer. Background color is sky blue. Three brush strokes with pencil:
青い部分に対応する色を適用: 青色だけが消えた。
赤い部分に対応する色を適用: 赤色だけがそのいずれの透明度でも消えた。 消去された部分は透明になった。
レイヤーの背景色に用いられているスカイブルーを適用: この色だけが消えた。