| 第9章 文字入れ | ||
|---|---|---|

|
パート II. GIMP の達人になるには |  |
目次
文字 (テキスト) はテキストツールを使って操作します。 このツールはテキストを含む新しいレイヤーをつくり、 文字入れに使ったテキストボックスの大きさにし、 現在のレイヤーの上に置きます (上下関係はレイヤーダイアログで確認できる)。 入れた文の冒頭部分がレイヤーの名前になります。
図9.1 テキスト品目の例
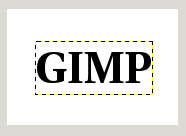
テキスト品目の例、 テキストレイヤーの境界線が見えている。 (フォント名: Utopia Bold)
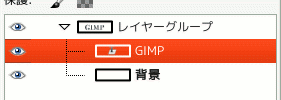
レイヤーダイアログと、 現在のレイヤー上に重ねられたテキストレイヤー。
Text can be edited directly on canvas. A text tool box, which shows up on top of the canvas above the text box, allows you to quickly change some of the text characteristics.
![[注記]](images/note.png)
|
注記 |
|---|---|
|
The settings you change in this on canvas dialog only apply to the parts of the text that are selected, or any new text you type after the current cursor position. |
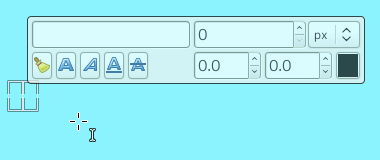
テキストツールで画像をクリックするとただちに閉じたテキストボックスが半透明なツールボックスつきで現れる。
テキストツールのオプションについては 「テキスト」 で説明しています。
You can start typing text at once. The text box will enlarge gradually. Press Enter to add a new line.
You can also enlarge the text box by click-and-dragging, as you do with selections. The box size appears then in the status bar at the bottom of the image:

To edit text, you must, first, select the part you want to edit by click-and-drag, or Shift+arrow keys and then use the options of the 「Text Toolbox」.
文字入れは画像上で直接編集する機能のほかに、 従来の「テキストエディター」ダイアログも利用できます。 「テキストエディター」 をご覧ください。
画像に入れた文字は 「移動」 ツールで移動できます。 ただし文字そのものをクリックせず透過部分をクリックすると背景が動くので注意が要ります。
You can get Unicode characters with Ctrl+Shift+U plus hexadecimal Unicode code of the desired char, for example:
Of course this feature is more useful for entering special (even exotic) characters, provided that the required glyphs for these characters are supplied by the selected font — only few fonts support Klingon. ;-)
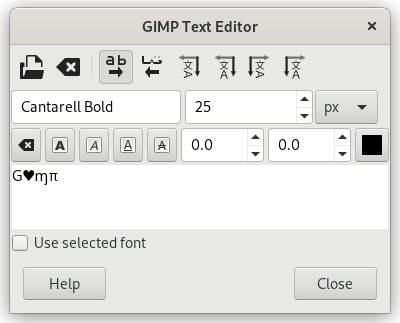
Unicode 0x47 (「G」), 0x2665, 0x0271, 0x03C0
既に作ったテキストレイヤーは (下記に示す) 他のツールで加工される前であれば後からでも編集できます。 そのテキストレイヤーを レイヤーダイアログ で選んで活性化させ、 テキストツールを呼び出し、 そのテキストレイヤーの文字を画像ウィンドウでクリックします。
テキストレイヤーは他のレイヤーと同じ要領で操作できますが、 操作によってはその成果を失なわずにテキストを再編集する望みの無いことも覚悟せねばなりません。
テキストレイヤーには見たままの画素データだけではない情報が詰まっていることがわかると、 テキスト操作の特質を少しでも理解する助けになるかもしれません。 その情報とは、 テキストについてのテキストエディター形式による表現です。 テキストツールを使うときに現れるテキストエディターウィンドウ内で見られます。 テキストを変更するたびに画像のレイヤー上でもその成果が反映されます。
テキストレイヤーを作成したあとで、 テキストツールを通さない操作 (たとえば回転) をしたとします。 そのテキストをまたテキストツールで編集すると、 テキストツールはテキストレイヤーを再描画しますので、 それまでのこのレイヤーに対する操作の成果は破棄されることになります。
目立たない危険ですので、 テキストツールはそれに陥らないようにはからいます。 操作してあるテキストレイヤーのテキストを再び編集しようとすると、 メッセージが現れ、 それまでの操作が取り消されてしまうことを警告し、 つぎの 3 つの選択肢を示します。
そのまま編集を続行
断念
そのテキストレイヤーはそのままに、 テキストや属性が同じテキストレイヤーを新たに作成
You get this box, which overlays canvas, as soon as you click on canvas with the Text Tool. It allows you to edit text directly on canvas.
Apart from the usual text formatting features like font family, style and size selectors you get numeric control over baseline offset and kerning, as well as the ability to change text color for a selection.
Change font of selected text: as soon as you start editing the default font name, a drop-down list appears, allowing you to select a font.
Change size of selected text: self-explanatory.
Bold, Italic, Underline, Strikethrough : self-explanatory.
Change baseline of selected text: "In European typography and penmanship, baseline is the line upon which most letters "sit" and below which descenders extend" (Wikipedia). In HTML, there are several kinds of baselines (alphabetic, ideographic, bottom…). Here, consider that baseline is "bottom" and determines the place for descenders. The default baseline "0" gives place for descenders. You can use it to increase space between two lines only, while 「Adjust line spacing」 in tool options increases space between all lines.
Change kerning of selected text: "In typography, kerning… is the process of adjusting the spacing between characters in a proportional font." (Wikipedia). You will probably use this setting to adjust letter spacing of a selected part of text.
Let us look at a selected text (zoomx800 to see pixels):
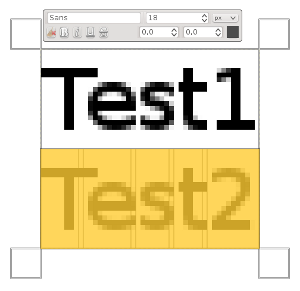
We can see that the Sans font is a proportional font: letters widths are different, and 「T」 glyph comes over the 「e」. Letters widths are marked with thin vertical lines and left borders of letter width cover preceding letters by one pixel. Now we set 「Change kerning of selected text」 to 2 pixels:
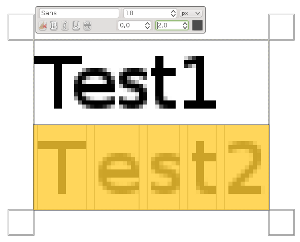
Blank spaces, 2 pixels wide, are added between all selected characters and letter widths are preserved. If no text is selected, a blank space is added at the place of the mouse pointer between two characters.
Now, we compare with the 「Adjust letter spacing」 option of Text tool:
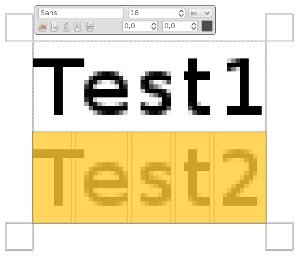
The option applies to the whole text, not only to the selected text. Blank spaces are added inside letters widths and letter widths are not respected.
You can also use Alt+arrow keys to change baseline offset and kerning.
Change color of selected text: this command opens a color dialog where you choose a color for the selected text.
Clear style of selected text: using this command, you can get rid of all new settings you applied to the selected text.
このメニューは文字を でクリックすると出てきます。 テキストエディターダイアログのメニューとはいくぶんその構成が異なります。
: これらのオプションは選択してある文字に作用します。 選択されている文字がないときはいずれも灰色無効の表示になります。 貼り付け はクリップボードの中身が文や語句のときに利用できます。
: このコマンドはファイルブラウザーを開きますので目当てのファイルを探し出しましょう。
: このコマンドはそのレイヤー内の文字を選択のあるなしにかかわらず全部消去します。
: このコマンドは現在のテキストの文字の輪郭をもとにパスを作成します。 しかしその結果はすぐには解りません。 キャンバスで表示するにはパスダイアログを開いて、 できたパスを可視状態に切り替える必要があります。 そのあとパスツールを呼び出してから文字をクリックします。 すべての文字や記号がパス成分で囲まれている様子が見られます。 つまりこのあとパスのコントロールポイントを操作すれば文字の形が加工できるのです。
このコマンドは画像ウィンドウのメニューの → と同じものです。
このオプションは パス があるときだけ利用可能です。 文字を収めたテキストレイヤーを作ったら、 パスを作成するかもしくはインポートで生成してからそれを活性化します。 もし既に作ったパスを利用する場合は不可視になっていることが多いのでパスダイアログで可視化します。
このコマンドも同じものが メニューにあります。
コマンドを実行します。 するとテキストはパスに沿ってうねるように綴られます。 それぞれの文字は輪郭だけが描かれています。 これらは新たなパスの成分になっていて、 パスダイアログ でも確認できます。 パスに適用できるオプションはすべてこのパスにも適用できます。
左から右への書式「LTR」と右から左への書式「RTL」: 使う言語の文字綴り方向をここで指定します。
: いくつかの言語は入力メソッドが選べます。 たとえば を選ぶと一時的にキーボードがイヌクティトゥト言語用に替わります。