| 第12章 GIMP 宇宙管理局 | ||
|---|---|---|

|
パート II. GIMP の達人になるには |  |
| 第12章 GIMP 宇宙管理局 | ||
|---|---|---|
|
|
パート II. GIMP の達人になるには | |
目次
GIMP の設定ダイアログは画像ウィンドウのメニューより → と進んで呼び出します。 ここで GIMP の動作慣習を様々な面で変更できます。 以下の各節は個々に誂え得る設定とその効果を詳細に解説します。
ここで定義した設定情報はすべて個人用の GIMP ディレクトリーに置かれた gimprc というファイルに記入して保管されます。 グラフィカルユーザーインターフェースよりもテキストエディターで作業したいというパワーユーザーの方はこのファイルを編集して設定を変更しても構いません。 また UNIX™ システム風のシステムではそういう方のための詳しいオンラインマニュアルがあり、 このファイルの内容についての技術的情報と、 各設定項目の用途が man gimprc とすれば読めます。
図12.2 System Resources
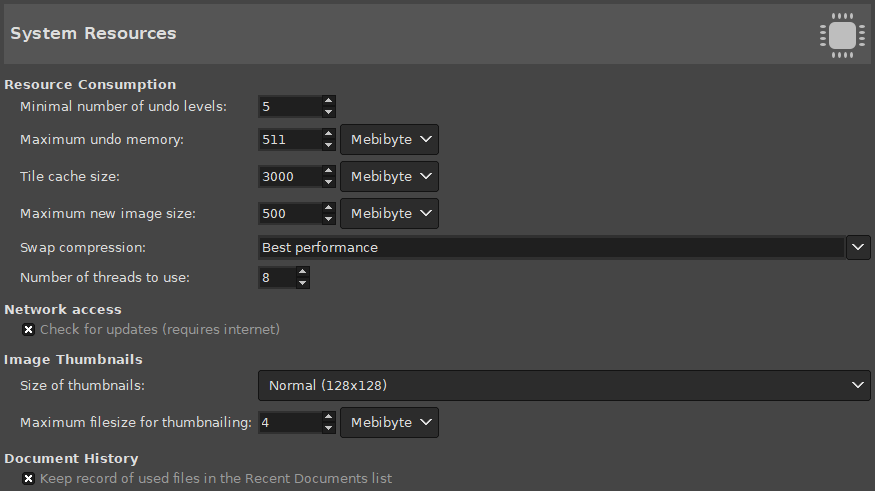
This page lets you customize the amount of system memory allocated for various purposes. It also allows you to set the size of thumbnail files that GIMP produces.
リソースの使い方
GIMP はほとんどの操作が取り消せるようにするため、 各画像ごとに「作業履歴」を保持していますが、 その目的で一定量のメモリーを割り当てることになります。 ただし GIMP はメモリーの総消費量を無視してでも直近の操作には最小限の取り消し手数を確保します。 その手数はここで指定します。 GIMP の作業履歴機能についてのさらなる情報が 「取り消し」 にあります。
これは各画像ごとに割り当てる作業履歴のためのメモリー量の仮の上限です。 作業履歴がこの容量を越すと、 最も古い操作の記録から順に削除されることになりますが、 もし履歴の手数が上記の最小エントリー数を下回るようならば削除しません。
これは GIMP の画像データに割り当てるシステム RAM の容量です。 この上限を越えてメモリーを要求するときは、 GIMP はディスクへスワップ[データの一時退避]を始めますので、 情況によっては劇的な減速をもたらします。 この数値は GIMP をインストールする際にも設定可能ですが、 この場でそれが変更できます。 タイルキャッシュの設定方法 に詳しい情報があります。
これは厳しい制限ではありません。 この容量を越える大きさの画像を作成しようとすると、 本当にそうするか尋ねるようになっています。 超巨大な画像を作成すると GIMP が異常終了するか、 反応が極端に遅ーーーーくなるので、 こうして意図しない偶発的な作成を防いでいます。
This sets the compression method used for tile data stored in the swap. Compression can both reduce the swap size, and increase its speed, by minimizing input and output. Values are best performance (the default), balanced, and best compression, or none to disable compression altogether.
Multi-threading allows making use of multiple cores for processing. Not all features make use of that for the moment. A point of interest is that multi-threading happens through GEGL processing, but also in GIMP core itself, for instance to separate painting from display.
Network Access
When this option is enabled, GIMP will regularly check at start-up if a new version is available. If there is, you will get an alert that you can update. Note that this option requires you to have an internet connection and for GIMP to be allowed access to the internet.
画像サムネイル
This options allows you to set the size of the thumbnails shown in the File Open dialog (and also saved for possible use by other programs). The options are 「No thumbnails」, 「Normal (128x128)」, and 「Large (256x256)」.
GIMP はここで指定した最大容量を越す画像ファイルに対して縮小見本画像を作成しません。 このオプションで極端に大きな画像ファイルをサムネイル化する際に GIMP がノロノロと遅くなってしまうのを防げます。
Document History
これを有効にすると、 開いたファイルそれぞれの記録が文書開覧履歴に保存されます。 それらファイルの一覧は画像ウィンドウメニューの → サブメニュー上の若干数のほか、 その底部にあるメニュー項目 をクリックすると開かれる 最近開いたファイル ダイアログにもあります。
![[注記]](images/note.png)
|
注記 |
|---|---|
|
This settings page is not available on Windows. |
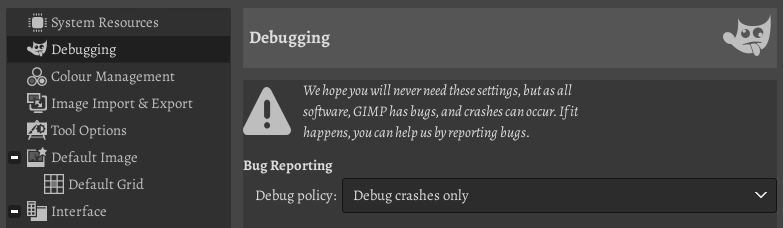
Debug Policy
The Debug Policy tells GIMP what you want to do if GIMP encounters a problem. You have four choices:
This is the most intrusive option. Usually only used when trying to find a specific bug. This starts the debugger for any kind of crash, error or warning.
Start debugging when GIMP encounters a crash or a critical error.
Only start debugging when GIMP encounters a crash.
Whatever happens, the debugger will never be started.
Effective debugging is only possible if you have gdb or lldb installed.
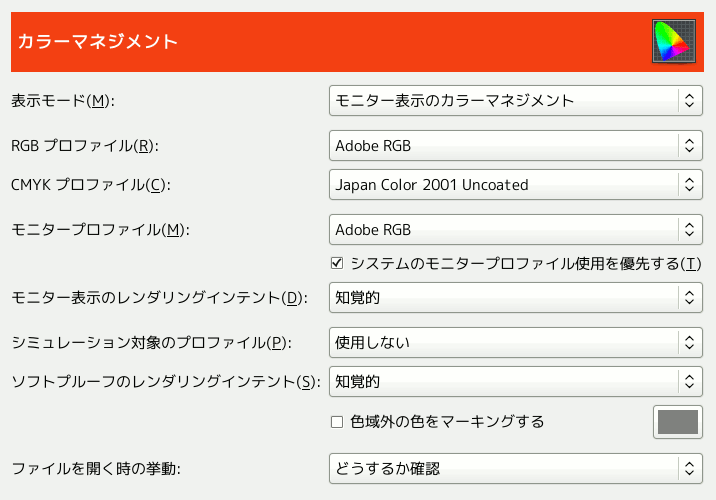
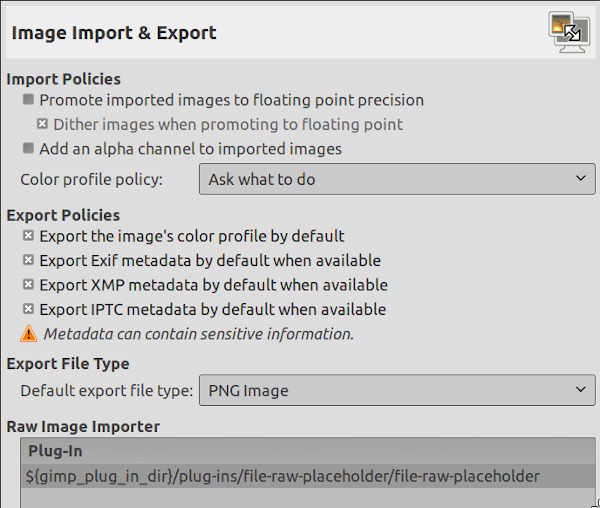
This page lets you customize GIMP color management.
Some of the options let you choose a color profile from a menu. If the desired profile is not present in the menu yet, you can add it by clicking on .
![[ヒント]](images/tip.png)
|
ヒント |
|---|---|
|
Files containing color profiles are easily recognizable by their
|
Using this option, you can decide how GIMP color management operates. There are three modes you can choose from:
No color management: choosing this shuts down color management in GIMP completely.
Color managed display: this enables GIMP color management and provides a fully corrected display of the images according to the given color profile for the display.
Soft-proofing: when choosing this option, you enable GIMP color management not only to apply the profile for the display, but also for the selected printer simulation profile. Doing so, you can preview the color results of a print with that printer.
|
|
注記 |
|---|---|
|
Please note, that GIMP color management is used to enhance the display of images and the embedding of profiles to image files only. More specifically, the options you choose in this dialog are not used for printing from within GIMP. This is because printing is a special task done by a printing engine that is not part of GIMP. |
モニタープロファイル
None: GIMP uses the colorimetric profile of your monitor.
Select color profile from disk: choose a profile that you have available on your computer.
Try to use the system monitor profile
When enabled, GIMP will try to use the display color profile supplied by the system. The configured monitor profile is then only used as a fallback.
Rendering intent
This option is about how colors are converted from the color space of your image to your display device. Four modes are available: 「Perceptual」, 「Relative colorimetric」, 「Saturation」 and 「 Absolute colorimetric」.
Relative colorimetric is usually the best choice (default). Unless you use a LUT monitor profile (most monitor profiles are matrix), choosing perceptual intent actually gives you relative colorimetric. See also Rendering Intent .
Use black point compensation
This option is checked by default. Do use black point compensation unless you have a reason not to.
Optimize image display for:
Two options: and . 「Speed」 is activated by default. If not, image display might be better at the cost of speed.
Soft-proofing is a mechanism that allows you to see on your screen what printing on paper will look like. More in general, it is soft-proofing from the color space of your image to another color space (printer or other output device).
Soft-proofing profile
is the choice by default. The drop-down list offers the possibility of .
Rendering intent As above, four modes: 「Perceptual」, 「Relative colorimetric」, 「Saturation」 and 「 Absolute colorimetric」. Try them all and choose what looks the best.
Use black point compensation
Try with and without black point compensation and choose what looks best.
Optimize soft-proofing for:
Two options: and . 「Speed」 is activated by default. If not, soft-proofing might be better at the cost of speed.
Mark out of gamut colors
When this box is checked, the soft-proofing will mark colors that can not be represented in the target color space. On the right there is a color button that you can click to open a color selector to choose the color you want to be used for marking out of gamut colors.
RGB プロファイル
Default is 「None」, which causes the built-in RGB profile to be used. You can select another RGB working space color profile from disk: it will be offered next to the built-in profile when a color profile can be chosen.
Grayscale profile
Default is 「None」, which causes the built-in Grayscale profile to be used. You can select another Grayscale working space color profile from disk: it will be offered next to the built-in profile when a Grayscale profile can be chosen.
CMYK プロファイル
Default is 「None」. You can select a CMYK working space color profile from disk to convert RGB to CMYK.
File Open Behavior
Default is 「Ask what to do」. You can also select 「Keep embedded profile」 or 「Convert to built-in sRGB or grayscale profile」 to indicate how to treat embedded color profiles when opening an image file.
|
|
注記 |
|---|---|
|
さらに詳しい説明をお求めならば:
Some online available color profiles:
|
Show advanced color options: advanced color options in filter dialogs are not visible when this option is not checked.
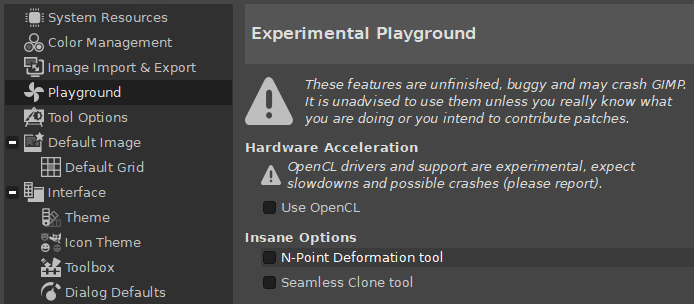
Hardware acceleration
The Playground settings are only available if you have explicitly started GIMP with the 「--show-playground」 command line setting, or if you have previously enabled one of the experimental settings in Playground.
OpenCL is an acronym for Open Computing Language (see Wikipedia). This option tries to improve the processing speed of certain operations by using the GPU (graphic processing unit) instead of the CPU.
![[警告]](images/warning.png)
|
警告 |
|---|---|
|
This is a very experimental feature that is known to crash often! Only enable this if you intend to work on improving it and don't forget that you enabled it. |
Insane Options - Experimental Tools
This tool lets you create a rubber-like deformation of the image using points.
This tool lets you seamlessly paste one image into another.
|
|
警告 |
|---|---|
|
These are experimental tools that are known to crash, cause slowdowns and not work as expected! Only enable this if you want to test it, or intend to work on improving it, and don't forget that you enabled it. |
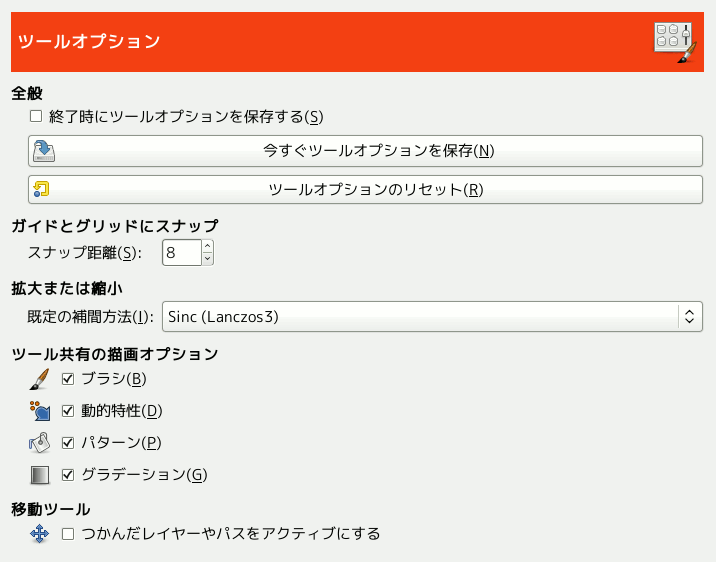
全般
You can edit layers with disabled visibility (the eye icon in the layer dock).
Self-explanatory
Self-explanatory
Self-explanatory
拡大または縮小
[ラスター画像に]描画されたものを拡大もしくは縮小すると、 できた結果の画素はいずれも元画像のいくつかの画素が補間計算されてつくられます。 このオプションは既定の 補間方法 を定めますが、 「拡大・縮小」ツールではツールオプションの 補間アルゴリズム で、 「拡大・縮小」ダイアログでは 補間方法 でいつでも変更可能です。
There are five choices:
This is the fastest method, but it's quite crude: you should only consider using it if your machine is very seriously speed-impaired, or when you are designing pixelized images.
A simple form of interpolation which is good enough for most purposes.
This is the default choice, but also slower than Linear. In general this gives better results than Linear, but there are some cases where it can actually look worse.
This method performs a high quality interpolation. Use the NoHalo method when you downscale an image to less than a half of the original size.
This method performs a high quality interpolation. Use the LoHalo method when you do not reduce the size much (rotate, shear).
ツール共有の描画オプション
これらは何かの描画ツールでブラシ等を選ぶと他の描画ツールでもその新たに選択された物品が使われるようにするか、 それとも個々の描画ツール (鉛筆、 絵筆、 エアブラシなどなど) それぞれが直前に選ばれた物品を記憶しておくようにするかを定めます。
移動ツール
ここでは修飾キーなしで移動ツールを使いながら他のレイヤーやパスの活性化が可能かどうかを定めます。
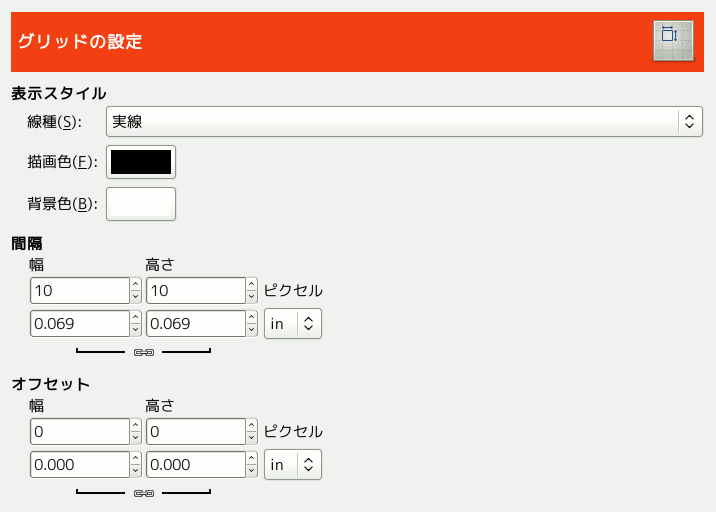
このページでは GIMP のグリッド (格子線) の属性の初期設定値を誂えられます。 グリッドはメニューの → で表示と非表示が切り替えられます。 ここにある設定内容はメニューより → と進むと開かれる「画像のグリッドを調整」ダイアログの設定内容にそっくりですが、 そのダイアログは既存の画像においてグリッドを再設定するために使われています。 各設定項目の意味についての情報は グリッドの設定 でご覧ください。
オプション
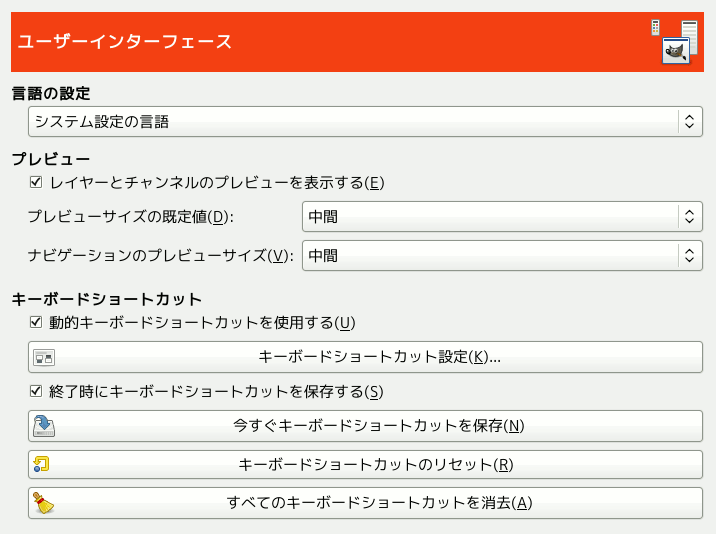
GIMP は初期設定の場合、 お使いのシステムと同じ言語を用います。 他の言語へはこの引き出しリストで切り替えできます。 ただしこの指定は GIMP を再起動したあとに反映されます。 「言語」 を参照してください。
By default, GIMP shows miniature previews of the contents of layers and channels in several places, including the Layers dialog. If for some reason you would prefer to disable these, you can do it by unchecking Enable layer and channel previews and Enable layer group layers previews. If you do want previews to be shown, you can customize their sizes using the menus for Default layer and channel preview size and Navigation preview size.
You can also customize the Undo preview size and the Navigation preview size.
GIMP can give you the ability to create keyboard shortcuts (key combinations that activate a menu entry) dynamically, by pressing the keys while the pointer hovers over the desired menu entry. However, this capability is disabled by default, because it might lead novice users to accidentally overwrite the standard keyboard shortcuts. If you want to enable it, check Use dynamics keyboard shortcuts here. For more information see Creating Shortcuts to Menu Commands.
Pressing the button for Configure Keyboard Shortcuts brings up the Keyboard Shortcuts Dialog, which allows you to see all actions and assign or change their keyboard shortcuts.
If you change shortcuts, you probably want your changes to be available in future GIMP sessions. If not, uncheck Save keyboard shortcuts on exit. But remember that you have done this, or you may be frustrated later. If you don't want to save shortcuts on exit every session, you can save the current settings at any time using the Save Keyboard Shortcuts Now button, and they will be applied to future sessions. If you decide that you have made some bad decisions concerning shortcuts, you can reset them to their original state by pressing Reset Saved Keyboard Shortcuts to Default Values. You can also choose to Remove All Keyboard Shortcuts.
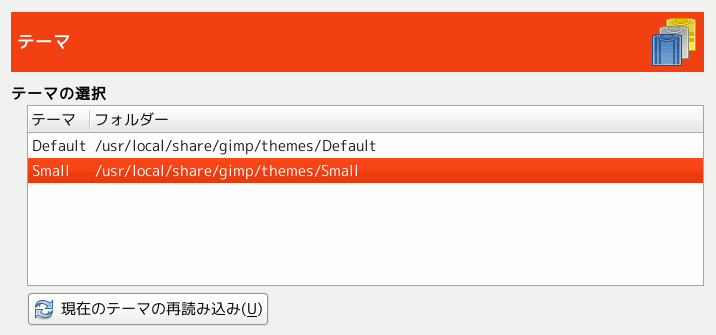
This page lets you select a theme, which determines many aspects of the appearance of the GIMP user interface. Clicking on a theme in the list causes it to be applied immediately, so it is easy to see the result and change your mind if you don't like it.
This page lets you select a theme for the icons of the GIMP user interface. Test them: you will see the result instantly in this preference dialog.
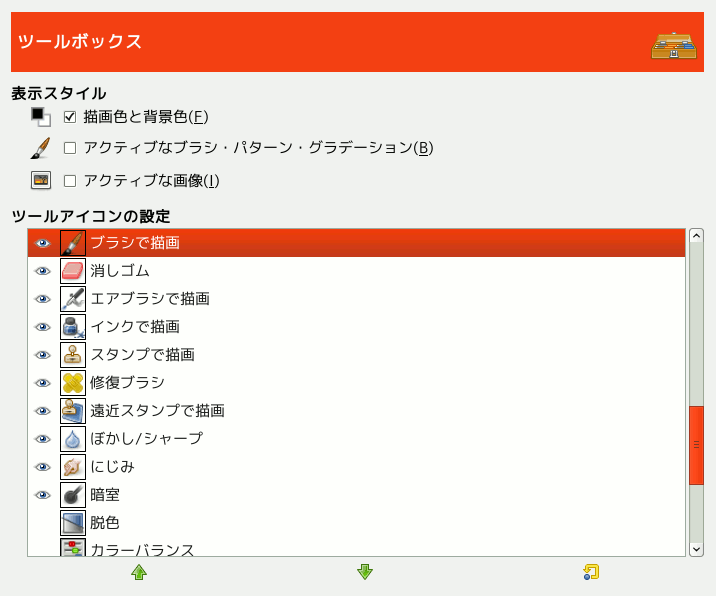
このページはツールボックスの底部にある 3 つの脈絡情報区画のそれぞれについて表示するかどうかを決めて外観を誂えるものです。 その効果については 「色と標識の区画」 をご覧ください。
表示スタイル
You can click-drag-and-drop an image from a file browser into this area to open it.
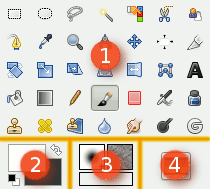
ツールボックスの下部左側 (2) の区画に色の標識区画を置くかどうか定めます。
ツールボックスの下部中央 (3) に現在のブラシとパターンとグラデーションのアイコンを表示するかどうかを指定します。
ツールボックスの下部右側 (4) に現在活性化している画像の縮尺見本を表示するかどうか決めます。
Since GIMP-2.10.18, tools can be grouped in the toolbox (see 「ツールアイコン」).
ツールアイコンの設定
In this list, tools with an eye are present in the Toolbox. By default, color tools have no eye: you can add them to the Toolbox by clicking the corresponding checkbox to create an eye.
Since GIMP-2.10.18, tools are grouped. You can:
Move groups by using drag-and-drop or the arrow buttons at the bottom of the dialog.
Create a new group by using the at the bottom of the dialog. This tool group is created empty.
Changes take effect immediately.
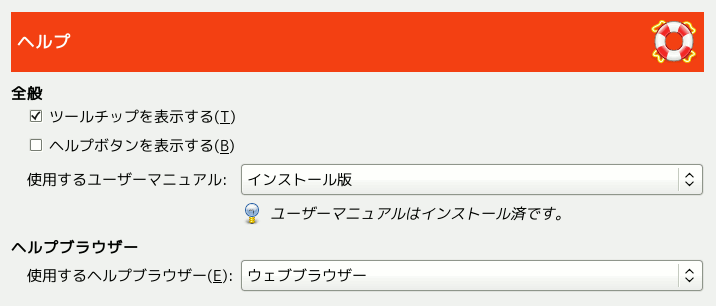
全般
ツールチップとはボタンやアイコンのような一部のインターフェース要素の上にマウスポインターをかざしたときに短時間だけ現れる小さなふきだしのことで、 中に文章が書かれています。 その内容はときにはその要素が何であるかを述べ、 ときにはその要素の明らかには気付かれない使い方を示唆します。 でもこれが作業の集中の妨げになるというときは、 ここでオプションのチェックを外せば無効にできます。 非常に熟達したユーザーでもない限りはここに手をつけずにおくことをお勧めします。
このオプションは、 情況適応ヘルプを利用するための ボタンが各ツールのダイアログの底部に表示されるかどうかを制御するものです。
この引き出しリストで か を選択してください。 「ヘルプ」 もご覧ください。
ヘルプブラウザー
GIMP Help is supplied in the form of HTML files, i.e., web pages. You can view them using either a special help browser that comes with GIMP, or a web browser of your choice. Here you choose which option to use. Because the help pages were carefully checked to make sure they work well with GIMP's browser, whereas other web browsers are somewhat variable in their support of features, the safer option is to use the internal browser; but really any modern web browser should be okay.
|
|
注記 |
|---|---|
|
Note that the GIMP help browser is not available on all platforms. If it is missing, this option is hidden and the standard web browser will be used to read the help pages. |
Action Search
Default value is 100 (0-1000) items in the history.
When this check-box is enabled, a search of actions will also return inactive actions.
Self-explanatory.
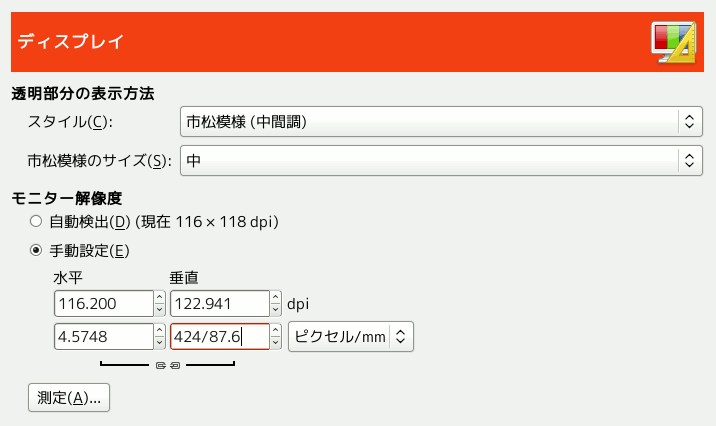
透明部分の表示方法
初期設定では GIMP は透過部分を中間調の市松模様で表現しますが、 変更可能です。 この中間調のほかに明るい市松模様と暗い市松模様があり、 単色では黒、 白、 灰色から選べます。
透明部分の表示方法に市松模様を選んだ場合にここでその正方形の大きさを指定できます。
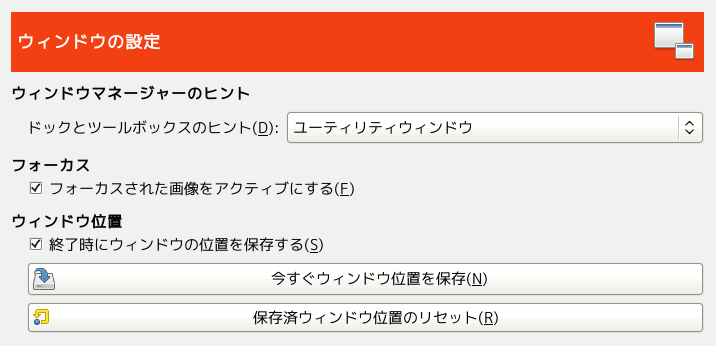
This page lets you customize the way windows are handled in GIMP. You should note that GIMP does not manipulate windows directly, instead it sends requests to the window manager (i.e., to Windows if you are running in Windows; to Mutter if you are running in a standard GNOME setup in Linux; etc). Because there are many window managers, and not all of them are well behaved, it cannot be guaranteed that the functions described here will actually work as described. However, if you are using a modern, standards-compliant window manager, they ought to.
ウィンドウマネージャーのヒント
ここで選択できるのはツールボックスとダイアログ群を纏めるドックの扱われ方です。 3 つの選択肢があります。
を選択した場合は他のウィンドウと同じように扱われます。
を選択した場合は、 タイトルバーから最小化ボタンが除かれドックが常時画面上に居座ります。
を選ぶと常時他のすべてのウィンドウよりも前面に居座ります。
この設定が有効になるのは次回 GIMP を起動して以降になりますことをご承知おきください。
フォーカス
普通はどれかの画像ウィンドウをフォーカスすると (大抵はそのウィンドウ枠の色が変化するのでわかる)、 その画像は GIMP の「活性画像」になり、 画像に関連した操作の対象となります。 ところがウィンドウにマウスポインターをかざしただけだけで自動的にフォーカスするようなウィンドウマネージャーの設定を好む人々もいます。 この設定を適用してみると画像ウィンドウにフォーカスしただけでその画像が自動的に活性化するのは不便なことがわかります。 そういった方はこのオプションのチェックを外すとよいでしょう。
ウィンドウ位置
このオプションにチェックを入れると、 GIMP を起動したときに、 ダイアログのウィンドウやツールボックスが前回終了時点で置かれた位置と大きさのままに開かれます。
This button is only useful if 「Save window positions on exit」 is unchecked. It allows you to set up your windows they way you like, click the button, and then have them come up in that arrangement each time you start GIMP.
いったん保存したウィンドウ配置が気に入らなくなったときに、 それらをいちいち再配置するよりは初期設定の配置に戻してしまいたいとお考えならばこのボタンをクリックすればよいのです。
図12.21 設定 画像ウィンドウのページ
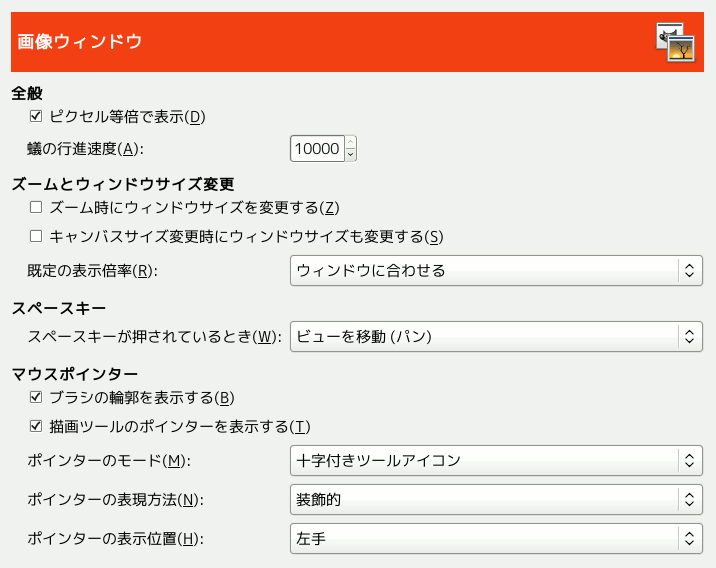
This page lets you customize several aspects of the behavior of image windows.
全般
Please refer to 「Show All」 to understand this option.
「ピクセル等倍」は「Dot for dot」とも言われ、 1:1 の等倍率にズームされます。 このオプションを無効にすると、 画像の大きさは画像の X と Y の解像度で判断されます。 より詳しくは 画像の拡大・縮小 をご覧ください。
選択範囲を作成すると、 その輪郭線は破線で囲まれ、 破線は輪郭線上を行進しているように見えます。 これには「蟻の行進」という冗談みたいな名前がついています。 ここで指定する数値が小さくなるにつれ、 蟻たちの行進は速く (そして騒々しく) なります。
ズームとウィンドウサイズ変更
このオプションにチェックが入ると、 画像を伸縮ズーム表示する度に画像ウィンドウが自動的にその大きさに合わせてサイズ変更します。 逆に無効にすれば、 画像の表示倍率を変えても画像ウィンドウの大きさはそのままです。
このオプションにチェックが入ると、 切り抜きや拡大・縮小によって画像の大きさを変える度に、 画像ウィンドウもそれに合わせて大きさを変えます。 逆に無効にすれば、 画像ウィンドウの大きさはそのままです。
画像を初めて開いたときに、 その画像がディスプレイ画面をはみ出さないように縮小表示するか、 倍率 1:1 で等倍表示するかをここで選択します。 第 2 の選択肢を選んでいて画像がディスプレイ画面より大き過ぎる場合には、 画像ウィンドウでは画像の一部だけが見えるように表示されます。 (残りの部分を見るには画像キャンバスをスクロールします。)
スペースキー
ビューを移動 (パン) これが初期設定です。 キャンバスをウィンドウ内で移動します。 スクロールや 「ナビゲーションダイアログ」 と同じ用途に使えます。
Toggle to Move Tool
何もしない
マウスポインター
このオプションにチェックを入れると、 描画ツールを起用したときに画像上にブラシの輪郭が表示されマウスポインターとして動かせます。 低速なシステムでの GIMP でとくに大きなブラシを用いている場合に、 マウスやタブレットの動きとポインターの位置にずれが生じることがあります。 このオプションを切ればそれを避けられそうです。 でもブラシ表示は実に役に立つものではないでしょうか。
ここにチェックを入れると、 ポインターの表示が変更できます。 ブラシの輪郭を表示している場合は、 その姿はブラシの輪郭に重ねられます。 ポインターの形状は次のオプションで定まります。
このオプションは 描画ツールのポインターを表示する にチェックが入っていなければ何の効果もありません。 有効な場合には 3 つの選択肢があります。 はポインターの側に現在起用しているツールを示す小さなアイコンが付きます。 このアイコンは次のオプションでその姿が変更できます。 もツールを示す小さなアイコンが付きますが、 ポインターの中心を表す照準十字も表示されます。 そのほか があります。
This option decides the direction of the pointer. The default is Right-handed. When Left-handed is chosen, the pointer is flipped horizontally.
図12.22 設定 画像ウィンドウの表示スタイルのページ
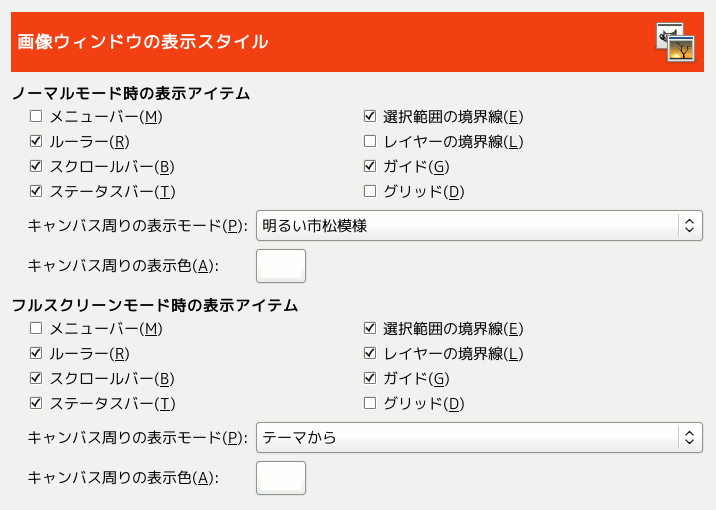
This page lets you customize the default appearance of image windows, for normal mode and for fullscreen mode. All of the settings here can be altered on an image-specific basis using entries in the View menu.
The only parts that may need further explanation are the ones related to padding. 「Padding」 is the color shown around the edges of the image. You can choose among four colors for the padding color: to use the color specified by the current theme; to use the light or dark colors specified for checks, such as represent transparent parts of the image; or to use a custom color, which can be set using the color button for 「Custom padding color」.
Keep canvas padding in Show All mode: in this mode (「Show All」), you can see pixels outside the canvas. When this option is not checked, the area outside the canvas is filled with a checkerboard pattern, even if you have selected a custom padding color. When the option is checked, the canvas has the custom padding color.
図12.23 Example
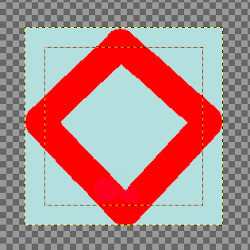
Padding color is yellow. 「Keep canvas padding」 is not checked.
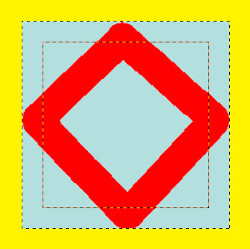
Padding color is yellow. 「Keep canvas padding」 is checked.
図12.24 設定 画像ウィンドウのタイトルとステータスバーの形式のページ
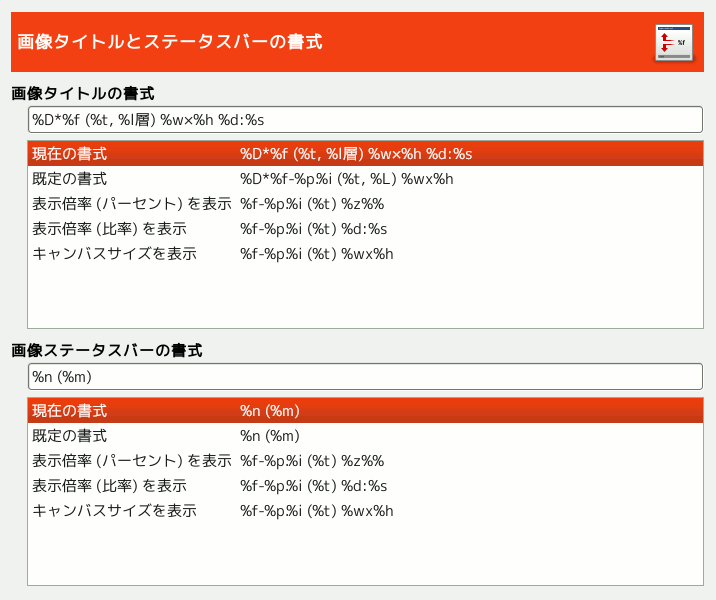
このページでは画像ウィンドウのタイトルバーとステータスバーの 2 つの部分での文字表記の形式を誂えられる。 タイトルバーは画像ウィンドウの上部に現れるはずだが、 これはウィンドウマネージャーの助力に依存するためすべての状況で動作する保証はない。 ステータスバーは画像ウィンドウの下部右寄りにある。 より詳しくは 画像ウィンドウ を見てほしい。
数点のお仕着せな表現形式からひとつを選ぶか、 自分流の 形式文字列 を入力欄に書いてください。 ここで形式文字列について説明しましょう。 % 記号で始まるアルファベット (大文字と小文字の区別あり) で表せる 変数 を除き、 書き込んだ文字はそのまま表示されます。 使用可能な変数はつぎのとおりです。
| 変数 | 意味 |
|---|---|
| %f | 画像ファイルの素の名前、 さもなくば「名称未設定」 |
| %F | ファイル名をフルパスで、 さもなくば「名称未設定」 |
| %p | 画像の id 番号 (重複なし) |
| %i | 表示番号。 複数のウィンドウで同じ画像を開いている場合に |
| %t | 画像のモード (RGB カラー、 グレースケール、 インデックスカラー) |
| %z | 表示倍率 (百分率) |
| %s | 倍率の分母 (倍率 = %d/%s) |
| %d | 倍率の分子 (倍率 = %d/%s) |
%Dx |
画像が手付き (未保存の変更あり) の場合には文字 x を表示、 手付かずならば何もしない |
%Cx |
画像が手付かず (未保存の変更なし) の場合には文字 x を表示、 手付きならば何もしない |
| %l | レイヤーの層数 |
| %L | レイヤーの層数 (長い表記) |
| %m | その画像のメモリー使用量 |
| %n | 活性化レイヤー/チャンネルの名称 |
| %P | 活性化レイヤー/チャンネルの id 番号 |
| %w | 画像の幅 (ピクセル単位) |
| %W | 画像の幅 (実測的単位) |
| %h | 画像の高さ (ピクセル単位) |
| %H | 画像の高さ (実測的単位) |
| %u | 単位表記 (ピクセルなら px) |
| %U | 簡略化単位 |
| %% | % 記号そのもの |
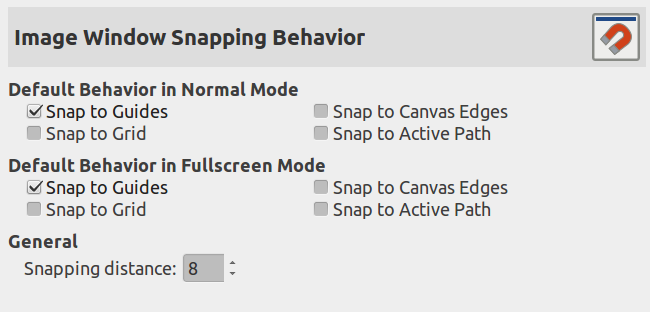
This page allows you to customize snapping in the image. Only Snap to Guides is activated by default. You can also check Snap to Grid, Snap to Canvas Edges and Snap to Active Path, in normal mode and fullscreen mode.
Snapping distance is the activation distance of snapping, in pixels. Default value is 8 pixels (1-255).
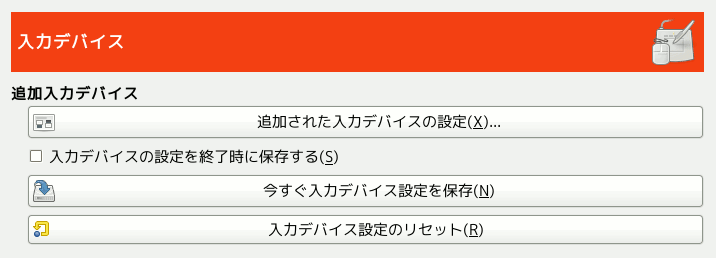
追加入力デバイス
When enabled, the same tool and tool options will be used for all input devices. No tool switching will occur when the input device changes.
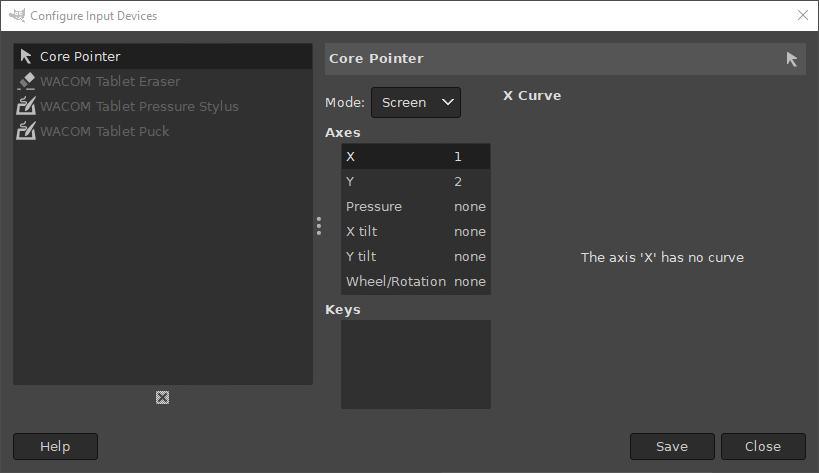
This large button allows you to set the devices associated with your computer: tablet, MIDI keyboard, etc. If you have a tablet, you will see a dialog like this:
When you check this box, GIMP remembers the tool, color, pattern, and brush you were using the last time you quit.
Self-explanatory.
これまでの設定を破棄し、 既定の設定に戻します。
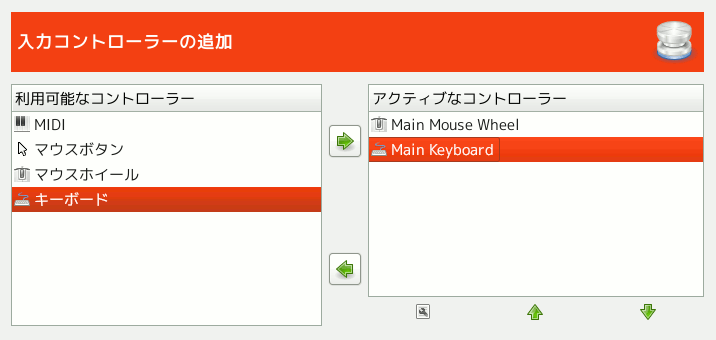
This dialog has two lists of additional input controllers: Available Controllers on the left, Active Controllers on the right. It is used to enable or disable an input device and configure it.
項目をクリックして強調表示させてから、 左右の矢印ボタンをクリックすればそのコントローラーはもう一方のリストに移動できます。 アクティブなコントローラーの側の項目を利用可能なコントローラーの側に移動すると、 ダイアログが現れてそのコントローラーを削除するのか無効にするだけなのかを問われます。
一覧表 (主にアクティブなコントローラー) の項目をダブルクリックするか、 あるいはその一覧表の下側にある 選択したコントローラーの設定 アイコンをクリックすると、 そのコントローラーを設定するダイアログが開かれます。
Main Mouse Wheel
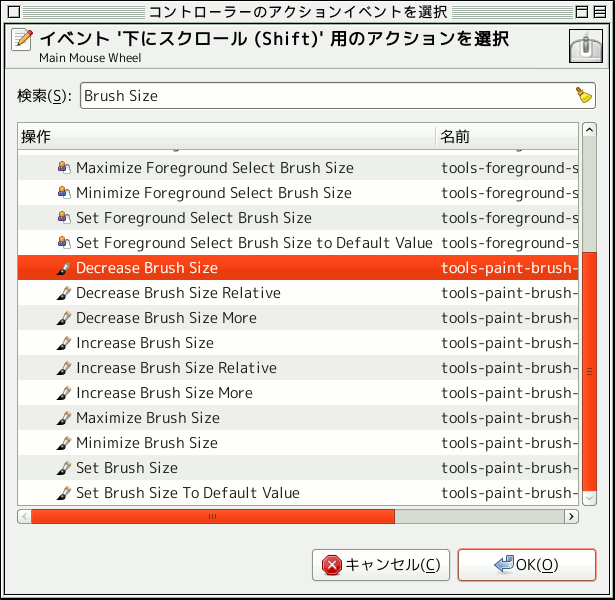
このウィンドウのスクロールバーの付いた表をご欄ください。 左側にはマウスホイールと多少の修飾キーの考えうるすべての組み合わせが並び、 右側にはそれらのイベント発生のどれかに関連づけられた GIMP の操作があります。 さらにここにはボタンが 3 つあります。 。 ボタンをクリックすると「コントローラーのアクションイベントを選択」ダイアログが開かれますので、 ここでイベントに関連づけたい GIMP の操作を選択してください。 ボタンはそのイベントに何も関連づけられていない状態にします。
操作がいくつか既にイベントに関連づけられています。
イベントを選択してから ボタンをクリックするとつぎのようなダイアログが開かれます。
このイベントに対するアクションが既にある場合は、 ウィンドウではそのアクションが強調表示されます。 無ければウィンドウはアクションをメニューの分類で列挙します。 クリックした行が選択されます。
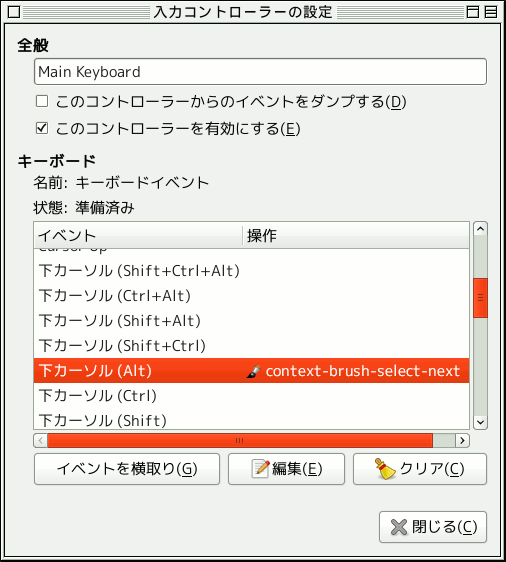
Main Keyboard
|
|
注記 |
|---|---|
|
以上のことをふまえた例が 大きさの変わるブラシの作成法 にあります。 |
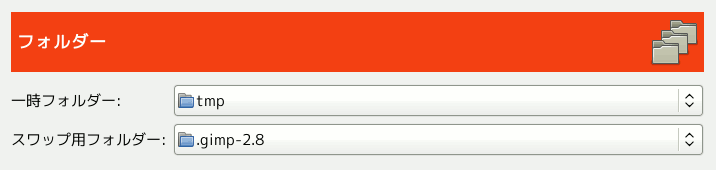
このページでは GIMP が一時的なファイルを置くための 2 箇所の重要なフォルダーの位置を設定できます。 このページ以降では GIMP で扱うたとえばブラシのようなファイル資材を探し出す位置を、 個別に設定できるようになっています。 それぞれの説明が次項 データフォルダー にあります。ここに示されたフォルダー以外の位置を指定する場合は、 引き出しメニューから選択するか、 その下端にある をクリックしておのおののフォルダー選択ダイアログで指定してください。
フォルダー
このフォルダーは一時的に発生するファイルを置くために使われます。 これらのファイルは作業用データを暫時保存するために作成され、 その GIMP 操作の期間内に消去されます。 大きな容量も高い性能も必要ありません。 初期設定では個人用 GIMP 内の tmp というサブディレクトリーが使われますが、 ディスク残量がたいへん窮屈になっていたり重大な性能問題がある場合には、 ここで他のディレクトリーに替えましょう。 ただしそのディレクトリーが存在し、 なおかつそのディレクトリーに対する読み書きの権限が必要です。 無ければまずいことになるでしょう。
このフォルダーは GIMP で開かれたすべての画像とデータの容量が使用可能な RAM の限界を越してしまった場合のメモリー貯蔵庫として使われます。 とても大きな画像やレイヤーを多数持つ画像を扱ったり、 多数の画像を同時に開いたときに GIMP は可能性として数百メガバイトものスワップ空間を要求することになりうるのですが、 ディスク容量がどこまで利用可能かという問題やその性能についてはこのフォルダーに明確にかかっています。 初期設定ではここは GIMP の個人用ディレクトリー内に置かれますが、 もっと大きな容量のディスクや、 実際的に性能がより良いディスクが他にある場合には、 そちらにスワップフォルダーを移動すれば目に見えて恩恵を得るでしょう。 もちろんそのディレクトリーが必ず存在し、 書き込み権限を持っていなくてはなりません。
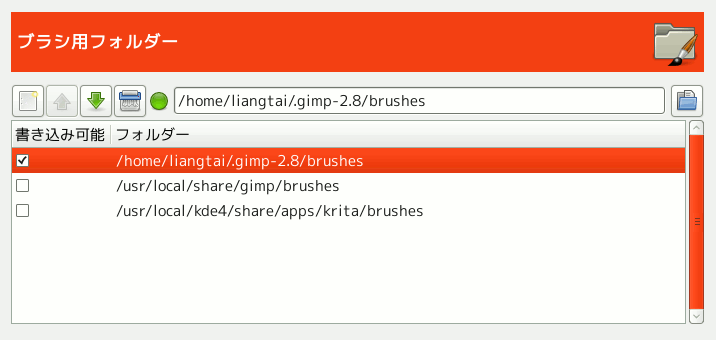
GIMP uses several types of resources – such as brushes, patterns, gradients, etc. – for which a basic set are supplied by GIMP when it is installed, and others can be created or downloaded by the user. For each such resource type, there is a Preference page that allows you to specify the search path: the set of directories from which items of the type in question are automatically loaded when GIMP starts. These pages all look very much the same: the page for brushes is shown above as an example.
By default, the search path consists of two folders: a system folder, where items that are included with GIMP are placed, and a personal folder, inside your personal GIMP directory, where items added by you should be placed. The system folder should not be marked as writable, and you should not try to alter its contents. The personal folder must be marked as writable or it is useless, because there is nothing inside it except what you put there.
このダイアログページの上に並んでいるボタンを使えば検索対象位置を設定できます。
オプション
一覧表内のいずれかのフォルダーをクリックすると、 つぎに挙げる操作の対象として選択されます。
If you type the name of a folder in the entry space, or navigate to
it using the file chooser button
 on the right, and then click the left button, this will replace the
selected folder with the one you have specified. If nothing in the
list is selected, the folder will be added to the list.
on the right, and then click the left button, this will replace the
selected folder with the one you have specified. If nothing in the
list is selected, the folder will be added to the list.
The icon to the left of the text entry area will change when the folder you have specified does not exist. GIMP will not create it for you, so you should do this yourself. Depending on the icon-theme you use, the icon mentioned above will change from green to red, or from thumbs-up to thumbs-down, to notify you of a non-existent folder.
![]() ボタンや
ボタンや ![]() ボタンをクリックすると、 選択されたフォルダーが一覧表内で前後に移動します。 上から順にフォルダーが読み込まれますので、 そこに置かれた物品の読み込み優先順位がこのボタンで変更できることになります。
ボタンをクリックすると、 選択されたフォルダーが一覧表内で前後に移動します。 上から順にフォルダーが読み込まれますので、 そこに置かれた物品の読み込み優先順位がこのボタンで変更できることになります。
If you click on the button that shows the trash-can or X icon, depending on the icon theme used, the selected folder will be deleted from the list. Note that the folder itself is not affected; it is merely removed from the search path. Deleting the system folder is probably a bad idea, but nothing prevents you from doing it.