| 2.2. Diàleg dels canals | ||
|---|---|---|

|
2. Diàlegs relacionats amb l'estructura de la imatge |  |
| 2.2. Diàleg dels canals | ||
|---|---|---|
|
|
2. Diàlegs relacionats amb l'estructura de la imatge | |
El diàleg dels canals és la principal interfície per a editar, modificar i administrar els canals. Els canals tenen un doble ús. És per això que el diàleg es divideix en dues parts: la primera part és per als canals de color, i la segona és per les màscares de selecció.
Els Canals de color s'apliquen a la imatge i no a una capa específica. Bàsicament són necessaris tres colors primaris per representar la totalitat de l'ampli ventall de colors naturals. Com altres programes digitals, el GIMP utilitza el vermell, el verd i el blau com a colors primaris. El primer i els canals primaris mostren els valors del Vermell, el Verd i el Blau de cada píxel de la imatge.
Al costat del nom del canal hi ha una miniatura que mostra una representació en escala de grisos de cada canal, on el blanc és el 100% i el negre el 0% del color primari. Alternativament, si la vostra imatge no és en color sinó en escala de grisos, només hi ha un canal principal anomenat Gris. Per a una imatge indexada amb un nombre fix de colors coneguts, també hi ha un sol canal principal anomenat Indexat.
A continuació, hi ha un canal opcional anomenat Alfa. Aquest canal mostra els valors de transparència de cada píxel de la vostra imatge (mireu Canal alfa al glossari). Davant d'aquest canal hi ha una miniatura que mostra una representació en escala de grisos de la transparència on el blanc és opac i visible, i el negre és transparent i invisible. Si creeu la vostra imatge sense transparència, el canal alfa no hi serà present, però podeu afegir-lo des del menú del diàleg Capes. A més, si teniu més d'una capa a la imatge, el GIMP crea automàticament un canal alfa.
![[Nota]](images/note.png)
|
Nota |
|---|---|
|
El GIMP no suporta els models de color CMYK i YUV. |
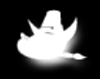
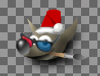
Figura 15.11. Representació d'una imatge amb canals
Canal vermell

Canal verd

Canal blau
Canal alfa
Tots els canals
La imatge de la dreta està composta per tres canals de color (vermell, verd i blau) i un canal alfa per a la transparència. En la imatge de la dreta, la transparència es mostra com un escaquer. En el canal de color, el blanc és sempre blanc perquè tots els colors hi són, i el negre és negre. El barret vermell és visible al canal vermell però invisible en els altres dos canals. Passa el mateix per al verd i el blau pur, que apareixen respectivament en el canal verd i el canal blau i estan absents en els altres.
El diàleg de «Canals» és un diàleg acoblable; mireu Secció 2.3, «Diàlegs i acobladors» per a obtenir més informació.
Podeu accedir-hi:
des del menú de la imatge: → →
des del menú de la pestanya en qualsevol diàleg acoblable fent clic a  i seleccionant → .
En el menú , hi ha una llista de finestres separades que només existeix si almenys un diàleg roman obert. En aquest cas, podeu obrir el diàleg «Canals» des del menú de la imatge: → .
Els canals de dalt són: els canals de color i el canal alfa opcional. Sempre s'organitzen en el mateix ordre i no es poden treure. Al mig hi ha dos botons de bloqueig que mostren l'estat de bloqueig del canal actual seleccionat a la part de sota. L'àrea inferior mostra una llista de màscares de selecció. Cada canal apareix a la llista amb els seus atributs, inclosa una miniatura i el seu nom. Un clic-dret en una entrada de la llista de canals obre el menú contextual del canal.
A sobre de la llista dels canals de la màscara de selecció hi ha dues caselles de selecció que mostren l'estat dels atributs blocats del canal de l'actual màscara seleccionada.
La icona del pinzell mostra si els «píxels de bloqueig» estan habilitats (ressaltat) pel canal actual. Quan això està activat, el canal es bloca per a qualsevol acció que canviï els píxels, és a dir, no es faran canvis en aquest canal.
La icona de creu de fletxes mostra si la «posició i mida de bloqueig» estan activats (ressaltat) pel canal actual. Quan això està activat, el canal es bloca per a qualsevol acció que canviï la posició o la mida.
Cada canal apareix a la llista amb els seus atributs, molt similars als atributs de les capes:

 Visibilitat dels canals
Per defecte, cada canal i cada color són visibles. S'indica amb una icona d'un «ull obert». Fent clic sobre el símbol de l'ull (o l'espai si el canal no és visible) canviarà la visibilitat del canal.
 Enllaçar els canals
Els canals que representen màscares de selecció (a la part inferior de la llista de canals) es poden agrupar mitjançant el botó amb el símbol d'una «cadena». Tots els canals que tinguin la cadena activada es veuran afectats de la mateixa manera per les operacions aplicades a qualsevol d'ells.
Els canals de colors primaris (per defecte en la part superior de la llista de canals) també es poden agrupar. Per defecte, se seleccionen tots els canals de color i el canal alfa, les entrades de la llista estan ressaltades. Les operacions es realitzaran en tots els canals. En fer clic en un d'aquests canals, es desactiva. Operacions com to-saturació a una capa, s'aplicaran només en els canals seleccionats («agrupats»). Fent clic de nou sobre l'entrada de la llista, s'activarà el canal.
Una miniatura mostra l'efecte del canal. Aquesta previsualització es pot engrandir mantenint premut el botó esquerre del ratolí.
El nom del canal, que ha de ser únic dins de la imatge. Feu doble clic al nom d'un canal de màscara de selecció i us permetrà editar-lo. Els noms dels canals principals (vermell, verd, blau, alfa) no es poden canviar. Si feu doble clic a la icona de la previsualització, s'obrirà un diàleg on podreu definir tots els atributs del canal.
![[Atenció]](images/caution.png)
|
Atenció |
|---|---|
|
Els canals actius apareixen ressaltats en el diàleg. Si feu clic sobre un canal de la llista, es pot (des)activar. La desactivació d'un canal vermell, verd o blau té greus conseqüències. Per exemple, si desactiveu el canal blau, tots els píxels que s'afegeixin a la imatge des d'ara no tindran component blau, i per tant un píxel blanc tindrà el groc com a color complementari. |
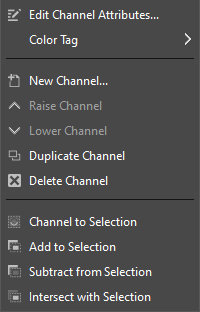
Sota la llista de canals hi ha un conjunt de botons que us permeten realitzar algunes operacions bàsiques en la llista de canals.
Això crea un nou canal. S'obrirà un diàleg on podreu definir el Nom del canal, l'Etiqueta color, els atributs del canal i els atributs de bloqueig, i finalment l'Opacitat i el color utilitzats per a la màscara en la finestra de la imatge. Un clic al botó de color mostra el selector de color GIMP on podreu canviar el color de la màscara. Si premeu la tecla Maj mentre feu clic al botó , el diàleg del canal nou no s'obrirà. En canvi, el nou canal es crearà amb la mateixa configuració que s'utilitzava anteriorment. Aquest nou canal és una màscara de canal (una màscara de selecció) aplicada sobre la imatge. Vegeu Màscara de selecció
Només disponible per a les màscares de selecció: es pot pujar el canal dins la llista. Premeu Maj per pujar el canal a dalt de la llista.
Es pot baixar el canal dins la llista. Pressioneu la tecla Maj per moure el canal a baix de la llista.
 Duplica el canal
Permet crear una còpia del canal actiu. El nom del nou canal apareix amb un sufix amb un nombre.
![[Suggeriment]](images/tip.png)
|
Suggeriment |
|---|---|
|
També podeu duplicar un canal de color o el canal alfa. És una forma senzilla de tenir una còpia per a utilitzar-la més endavant com la selecció d'una imatge. |
 Substitueix la selecció per aquest canal
Transforma el canal en selecció. Per defecte, la selecció derivada del canal reemplaça la selecció activa. Podeu canviar-ho pressionant les tecles de control.
Maj: la selecció que es deriva d'un canal s'afegeix a la selecció activa. La selecció resultant és la fusió d'ambdues.
Ctrl: la selecció resultant és la resta de la selecció derivada d'un canal des de la selecció activa.
Maj+Ctrl: la selecció resultant és la intersecció de la selecció derivada d'un canal amb la selecció activa. Només queden les parts comunes seleccionades.
Només disponible per a les màscares de selecció: això us permet eliminar el canal actiu.
Podeu obtenir el menú contextual del canal fent clic botó dret sobre un canal. Diverses de les operacions dels canals també estan disponibles amb els botons de baix de la llista dels canals. Aquestes operacions estan documentades allà.
Consulteu la Gestió de canals.
Només disponible per a màscares de selecció. Aquí podeu canviar el Nom del canal, l'etiqueta color, els atributs del canal, atributs de bloqueig, l'Opacitat i el color utilitzat per a la màscara en la finestra de la imatge. Un clic al botó de color, mostrarà el selector de color GIMP on podreu canviar el color de la màscara.
Només disponible per a màscares de selecció. Això us permet assignar una etiqueta color a un canal. Si teniu molts canals, us pot ajudar a identificar-los si poseu la mateixa etiqueta de color als canals relacionats. Per eliminar-les, trieu Cap.
La selecció derivada d'un canal substitueix la selecció prèviament activa.
La selecció derivada d'un canal s'afegeix a la selecció activa. La selecció final és una fusió dels dos.
La selecció resultant és la resta de la selecció derivada d'un canal de la selecció prèvia activa.
La selecció resultant és la intersecció de la selecció derivada d'un canal amb l'actiu. Només es conserven les parts seleccionades comunes dels dos.
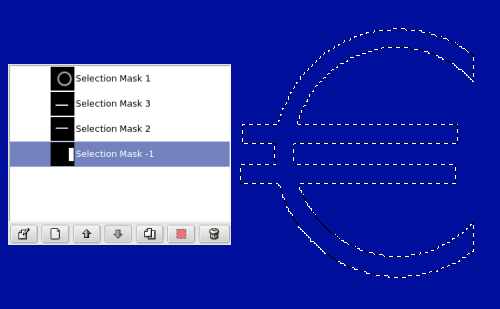
Els canals es poden utilitzar per a desar i restaurar les seleccions. En el diàleg de canals podeu veure una miniatura que representa la selecció. Les màscares de selecció són una manera gràfica de construir seleccions en un canal a escala de grisos on els píxels blancs se seleccionen i els píxels negres no se seleccionen. Per tant, els píxels grisos se seleccionen parcialment. Podeu considerar-los com un difuminat de la selecció, una transició suau entre seleccionat i no seleccionat. És important evitar l'efecte pixelat quan ompliu una selecció o quan s'esborra el contingut després d'aïllar un subjecte del seu fons.
Hi ha diverses maneres d'iniciar una màscara de selecció.
Des del menú de la finestra de la imatge → si hi ha una selecció activa.
En la finestra de la imatge el botó inferior esquerre crea una Màscara ràpida; el contingut s'inicialitzarà amb la selecció activa.
Des del diàleg de canals, quan feu clic al Nou canal o des del menú contextual. Una vegada creada la màscara de selecció apareix en el diàleg de canals amb el nom «Còpia de màscara de selecció», seguit d'un número. Podeu canviar aquest nom des del menú contextual que s'obté fent clic dret sobre el canal.
Once the channel is initialized, selected (highlighted in blue), visible
(eye-icon in the dialog), and displayed as you want (color and opacity
attributes), you can start to work with all the paint tools. The colors
used are important. If you paint with some color other than white, gray,
or black, the color Value (luminosity) will be used to define a gray
(medium, light, or dark). When your mask is painted, you can transform
it to a selection by clicking on the
button (Channel to
Selection) or from the
context menu.
També podeu treballar les màscares de selecció amb altres eines, no només amb les eines de pintar. Per exemple, podeu utilitzar les eines de selecció per a omplir zones amb degradats o amb patrons. Afegint diverses màscares de selecció a la llista podeu compondre fàcilment seleccions molt complexes. Es pot dir que una màscara de selecció és a una selecció el que una capa és a una imatge.
|
|
Atenció |
|---|---|
|
Una vegada que la màscara de selecció està activada, es treballa sobre la màscara i no sobre la imatge. Per a tornar a treballar en la imatge, heu de desactivar totes les màscares de selecció. Tampoc no oblideu ocultar les màscares desactivant la icona ull. Comproveu que tots els canals RGB i alfa estiguin activats i visibles en la imatge. |
Una Màscara ràpida és una Màscara de selecció pensada per a ser utilitzada temporalment per a pintar una selecció. Temporalment significa que s'eliminarà de la llista del canal després d'haver estat convertida en selecció, a diferència de la màscara de selecció normal. Les eines de selecció de vegades mostren els seus límits quan s'han d'utilitzar per a fer seleccions complicades, de manera progressiva. En aquest cas, la màscara ràpida pot donar molt bons resultats.
La Màscara ràpida es pot activar de diverses maneres:
Des del menú de la imatge: → .
Fent clic al botó de la part inferior esquerra, es veu en vermell en la captura de pantalla.
Utilitzant la drecera Maj+Q.
Per a iniciar una Màscara ràpida, feu clic al botó de la part inferior esquerra en la finestra de la imatge. Si s'activa una selecció en la vostra imatge, el seu contingut apareixerà sense canvis mentre que la vora es cobrirà amb un color vermell translúcid. Un altre clic al botó de la part inferior esquerra desactivarà la màscara ràpida.
Des del diàleg dels canals podeu fer doble clic en el nom o la miniatura per a editar els atributs de la Màscara ràpida. Llavors podeu canviar l'Opacitat i el seu color d'emplenat. En qualsevol moment podeu amagar la màscara fent clic a la icona ull davant de la Màscara ràpida.
La màscara es codifica en escala de grisos, així heu d'utilitzar el blanc o el gris per a reduir l'àrea limitada per la màscara i el negre per a incrementar-la. Les zones pintades de gris seran de transició per a la selecció, zones difuses. Quan la màscara estigui a punt, feu clic de nou al botó de la part inferior esquerra en la finestra de la imatge, i la màscara ràpida serà retirada de la llista del canal i es convertirà en una selecció.
El propòsit de la màscara ràpida és pintar una selecció i les seves transicions amb una eina de pintura sense la preocupació per a la gestió de les mascares de selecció. És una bona manera d'aïllar un objecte en una imatge perquè un cop feta la selecció només caldrà treure el contingut (o revertir-ho si l'objecte està en la selecció).
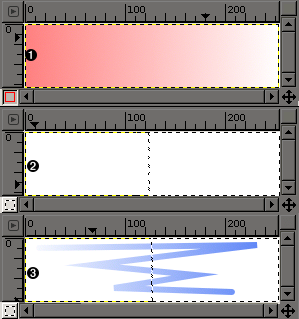
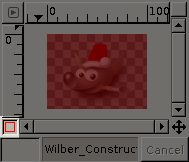
Descripció
Captura de pantalla amb la màscara ràpida activada. Tan aviat com s'activa la Màscara ràpida, s'hi realitzen totes les operacions. S'aplica a la màscara un degradat de negre (esquerra) a blanc (dreta).
La màscara ràpida està desactivada. La selecció ocupa la meitat dreta de la imatge (caminet de formiguetes) a causa que el límit de la selecció està al mig del degradat.
S'afegeix un traç a la selecció habilitada. Que estrany! El degradat encara que no sigui visible, roman actiu en tota la imatge, a les àrees seleccionades i en les no seleccionades.
Després de fer clic al botó de la Màscara ràpida, l'ordre genera un canal temporal de 8 bits (0-255), en el qual s'hi desa progressivament el treball de la selecció. Si ja hi ha una selecció present, la màscara s'inicialitza amb el contingut de la selecció. Un cop activada la màscara ràpida, la imatge queda coberta amb un vel vermell semitransparent. Això representa els píxels no seleccionats. Podeu utilitzar qualsevol eina de pintura per a modificar aquesta màscara i crear la selecció resultant. S'utilitzaran només colors de l'escala de grisos, d'acord amb les propietats del canal, el blanc permet definir els futurs llocs seleccionats. La selecció es mostrarà tan aviat com la màscara ràpida es desactivi però el canal temporal ja no estarà disponible.
|
|
Suggeriment |
|---|---|
|
Per a desar en un canal la selecció feta amb la màscara ràpida, seleccioneu el menú |
Obre una imatge o comença un document nou.
Activeu la Màscara ràpida fent clic en el botó de la cantonada inferior esquerra de la finestra de la imatge. Si una selecció hi és present, la màscara s'inicialitzarà amb el contingut de la selecció.
Trieu una eina de dibuix i utilitzeu-la amb colors de l'escala de grisos sobre la màscara ràpida.
Desactiveu la Màscara ràpida emprant el botó de la part inferior esquerra de la finestra de la imatge.