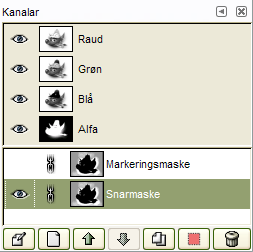
| 2.2. Kanaldialogvindauget | ||
|---|---|---|

|
2. Dialogvindauge relaterte til biletstruktur |  |
| 2.2. Kanaldialogvindauget | ||
|---|---|---|
|
|
2. Dialogvindauge relaterte til biletstruktur | |
Kanaldialogvindauget er staden du brukar for å utføra arbeid direkte på kanalane, både å redigera og gjera andre endringar. Kanalane vert brukte på to måtar. Det er difor dialogvindauget er delt i to. Den første delen er for fargekanalar og den andre for utvalsmasker.
Fargekanalar gjeld for biletet og ikkje for eit bestemt lag. I utgangspunktet trengs det tre primærfargar for å gje att heile spekteret av naturlege fargar. Som anna digital programvare, brukar GIMP raudt, grønt og blått som primærfargar. Den første og primære kanalen viser verdiane Raud, Grøn og Blå for kvar piksel i biletet.
Ved sida av kanalnamnet er det ein miniatyr som viser ein representasjon av kvar kanal i gråtoner. Kvit er 100 % og svart er 0 % av primærfargen. Viss biletet er i gråtoner, er det berre éin primærkanal kalla Grå. Er biletet indeksert med eit bestemt tal på fargar, er det berre éin primærkanal kalla Indeksert.
Så er det ein valfri kanal kalla Alfa. Denne kanalen viser gjennomsiktsverdiane for kvar piksel i biletet (sjå Alfakanal i ordlista). Framføre denne kanalen er det eit miniatyrbilete som viser ein gråtonerepresentasjon av gjennomsikta der kvitt er ugjennomsiktig og synleg, og svart er gjennomsiktig og usynleg. Viss du lagar biletet ditt utan gjennomsikt, manglar alfakanalen, men du kan leggja han til frå Dialogmenyen for lag. Dessutan, viss du har meir enn eitt lag i biletet, opprettar GIMP automatisk ein alfakanal.
![[Notat]](images/note.png)
|
Notat |
|---|---|
|
GIMP har ikkje støtte for fargemodellane CMYK og YUV. |
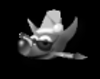
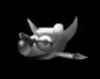
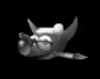
Biletet heilt til høgre er sett saman av dei fire kanalane, raud, grøn, blå og alfa. Sjakkbrettmønsteret viser gjennomsiktige område. Sidan kvit farge i den brukte fargemodellen er sett saman av alle primærfargane, vil kvit vera kvitfarga (100 %) i alle kanalane. Svart er mangel på farge, og vil difor visast som svart (0 %) i alle kanalane. Den raude hatten er synleg i raudkanalen, men ikkje i dei andre. Dette gjeld for alle reine grøne eller blå fargar også. Dei er berre synlege i respektive kanalar.
Vindauget «Kanalar» er eit dokkpanel som kan limast inn i andre dialogvindauge. Sjå nærare om dette i Del 2.3, «Dialogvindauge og dokkpanel».
Du har tilgang til det:
frå ein biletmeny via → → ,
frå fanemenyen i kva dokkpanel som helst ved å klikka på fana  og velja → .
Dersom minst eitt dialogvindauge er ope, kan du i menyen finna ei liste over løyste vindauge. Du kan i tilfelle lyfta banedialogvindauget frå biletmenyen: → .
Kanalane øvst er fargekanalane og den valfrie alfakanalen. Dei er alltid sett opp i same rekkjefølgja og dei kan ikkje fjernast. I midten er det to låseknappar som viser låsestatusen for den valde kanalen i det nedste området. Det nedste området viser ei liste over utvalsmasker. Kvar kanal vert vist i lista med attributta sine, inkludert eit miniatyrbilete og namnet. Høgreklikkar du i ei oppføring i kanallista, vert sprettoppmenyen for kanalinnhaldet opna.
Ovanfor lista over utvalsmaskekanalar er det to avkryssingsboksar som viser status for låsatributta for den valde maskekanalen.
Penselikonet viser om «lås pikslar» er slått på (utheva) for den gjeldande kanalen. Når dette er slått på, er kanalen låst for alt som endrar pikslane, noko som betyr at det ikkje vert gjort nokre endringar i denne kanalen.
Ikonet med kryss med piler viser om «lås posisjon og storleik» er slått på (utheva) for den gjeldande kanalen. Når denne er slått på, er kanalen lå¨st for alle handlingar som vil endra plasseringa og storleiken.
Kvar kanal vert vist i lista saman med attributta for kanalen. Dette er nokså likt det som er brukt for lagattributta:

 Endra elementvisinga
I utgangspunktet er alle kanalane, og såleis også alle fargane, synlege. Dette vert vist med eit augesymbol. Klikk på symbolet for å slå av maska, eller på den tomme plassen for å slå maska på.
 Lenk saman kanalar
Kanalane som representerer utvalsmasker, dvs. dei kanalane som vert vist i nedre del av dialogvindauget, kan grupperast ved å klikka på kjedesymbola framføre kanalane. Operasjonar på éin av kanalane vil påverka alle kanalane som er kjeda saman.
Også kanalane med primærfargane (standardkanalane i den øvre delene av kanallista) kan lenkjast saman. Normalt er alle fargekanalane (og alfakanalen) utvalde. Dette vert vist ved at namnet er utheva. Operasjonar utført på ein av kanalane vert også utført på dei andre kanalane. Operasjonar som for eksempel innfarging vert då utført på alle merkte (grupperte) kanalane. Klikkar du på ei oppføring som er slått av, vert kanalen slått på igjen.
Effekten av kanalen vert vist i ei lita førehandsvising. Du kan forstørra førehandsvisinga ved å halde nede den venstre museknappen over ho.
Namnet på kanalen må vera unikt i biletet. Dobbeltklikk på ein utvalsmaskekanal for å kunna redigera han. Namna på primærkanalane (raud, grøn, blå og alfa) kan ikkje endrast. Dobbeltklikk på ei førehandsvising opnar eit dialogvindauge der du kan setja alle kanalinnstillingane.
![[Obs]](images/caution.png)
|
Obs |
|---|---|
|
Kanalar som er slått på vert viste utheva i dialogvindauget. Klikkar du på ein kanal i lista, vert aktiviteten byt om. Det kan få alvorlege konsekvensar om du slår av ein fargekanal. Slår du for eksempel av den blå kanalen, vil alle pikslane i biletet mangla blåkomponenten. Ein kvit piksel vert vist med den gule komplementærfargen. |
Under kanallista finn du eit sett med knappar som kan brukast til ulike operasjonar på kanallista.
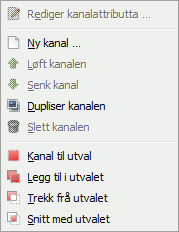
Dette opprettar ein ny kanal. Det vert opna eit dialogvindauge der du kan setja Kanalnamn, Fargefana, kanalattributta og låsattributta og til slutt Dekkevne og farge brukt på maska i biletvindauget. Klikkar du på fargeknappen vert GIMP sin fargeveljar opna slik at du kan velja maskefarge. Held du nede Shift-tasten medan du trykkjer på vert dialogvindauget for ny kanal ikkje opna. Den nye kanalen vert då laga med dei same innstillingane som er brukte tidlegare. Den nye kanalen er ei kanalmaske (ei utvalsmaske) som vert lagt over biletet. Sjå utvalsmaske.
Er berre tilgjengeleg for utvalsmasker, og vert brukt for å lyfta kanalen oppover i lista, eller til topps om du held nede Shift-tasten samtidig.
Denne flyttar kanalen nedover i lista. Hald nede Shift-tasten for å flytta kanalen til nedst i lista.
 Kopier kanalen
Dette gjer at du kan laga ein kopi av den gjeldande kanalen. Kopien får same namnet som originalen med eit etterfølgjande tal.
![[Tips]](images/tip.png)
|
Tips |
|---|---|
|
Du kan også kopiera ein fargekanal eller alfakanalen. Denne kopien kan du så bruka som eit utval i biletet. |
 Byt ut utvalet med denne kanalen
Her kan du omforma kanalen til eit utval. Normalt vil det nye utvalet erstatta det utvalet som finst frå før, men dette kan du forandra på ved hjelp av kontrolltastane.
Shift: Gjer at det nye utvalet vert lagt til det eksisterande utvalet. Resultatet vert ei samanfletting av begge utvala.
Ctrl: resultatet vert at det nye utvalet vert trekt frå det eksisterande.
Shift+Ctrl: Det nye utvalet vert eit snitt av begge utvala. Berre det som er felles i begge vert tatt med.
Slettar den gjeldande kanalen. Denne er berre tilgjengeleg for utvalsmasker.
Du kan få fram denne sprettoppmenyen ved å høgreklikka i kanaldialogvindauget. Mange av operasjonane på kanalane er tilgjengelege frå knappane nedst i kanallista. Desse operasjonane er dokumenterte her.
Sjå kanalhandsaming.
Berre tilgjengeleg for utvalsmasker. Her kan du endra kanalnamnet, fargetaggen, kanalattributta og låsattributta og endeleg dekkevne og fargen på maska brukt i biletvindauget. Trykk på fargeknappen for å få fram GIMP sin fargeveljar for å forandra maskefargen.
Tilgjengeleg berre for utvalsmasker. Dette let deg tilordna ein fargetagg til ein kanal. Viss du har mange kanalar, kan dette gjera det lettare å identifisera dei ved å gje relaterte kanalar same fargemerke. For å fjerna fargemerket, vel Ingen.
Utval oppretta frå ein kanal vil erstatta tidlegare gjeldande utval.
Utvalet som er utleidd frå ein kanal er lagt til i det gjeldande utvalet. Det endelege utvalet er fletta saman av begge.
Det endelege utvalet er laga ved å subtrahera utvalet utleidd frå ein kanal frå det gjeldande utvalet.
Det endelege resultatet vert snittet mellom utvalet utleidd frå ein kanal og det gjeldande laget. Berre dei utvalde delane som er felles for begge vert halde på.
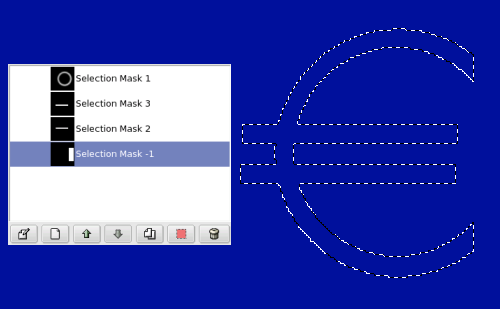
Du kan bruka kanalar for å lagra og henta fram igjen utval. I kanaldialogvindauget kan du sjå ein miniatyr som viser utvalet. Utvalsmaskene er ein metode for laga utvalet om til ein gråtonekanal der kvite punkt er utvalde og svarte punkt ikkje er utvalde. Grå punkt er delvis utvalde. Du kan sjå på desse som ein mjuk overgang frå utvalde til ikkje utvalde område. Dette er viktig for å unngå den stygge «pikseleringseffekten» (hakkete overgangar) som kan oppstå når du fyllar utvalet med farge eller brukar viskeleret på utvalet.
Utvalsmaska kan opnast på fleire måtar.
Frå biletmenyen via → dersom det finst eit gjeldande utval i biletet.
I biletvindauget vil knappen nede til venstre oppretta ei snarmaske. Innhaldet vil svara til set gjeldande utvalet.
Frå kanaldialogvindauget når du trykkjer på knappen eller frå sprettoppmenyen. Når utvalsmaska er oppretta, vert ho synleg i kanaldialogvindauget med namnet «Kanal», eventuelt med eit tal etter dersom det er fleire kopiar. Du kan endra namnet ved å høgreklikka på kanalen.
Når kanalen er initialisert, vald (utheva med blått), synleg (vist med augeikonet i dialogvindauget) og vist som du ønskjer (farge- og gjennomsiktsattributt), kan du byrja å arbeida med alle teikneverktøya. Fargene som vert brukte er viktige. Viss du teiknar med ein annan farge enn kvit, grå eller svart, vert fargeverdien (lysmengd) brukt til å definera ein grå (middels, lys eller mørk) farge. Når maska er teikna, kan du gjera ho om til eit utval ved å klikka på knappen
(Kanal til utval) eller frå sprettoppmenyen.
Du kan arbeida på utvalsmaska med andre verktøy enn teikneverktøya. For eksempel kan du bruka utvalsverktøya for å fylla eit område av maska med fargeovergangar eller mønsterelement. Det er såleis mogleg å komponera svært komplekse utval ved å kombinera ulike utvalsmasker.
|
|
Obs |
|---|---|
|
Så lenge utvalsmaska er slått på, arbeidar du på denne og ikkje på biletet. Skal du arbeida på biletet, må du slå av alle utvalsmaskene. Gløym heller ikkje å gøyma maskene ved å klikka på augeikonet. Det er også ein god ide å kontrollera at alle RGB- og alfakanalane er slått på og vert viste i biletet. |
Ei Snarmaske er ei utvalsmaske tenkt brukt temporært for å teikne på eit utval. Med temporært meiner ein her at, ulikt vanlege utvalsmasker, vert snarmaska ikkje lagra i lista etter at ho er omforma til eit utval. Når du arbeider med svært komplekse bilete, kan det hende at utvalsverktøya møter grensene sine. I slike høve er snarmaska god å ty til, ofte med svært godt resultat.
Snarmaska kan hentast fram på fleire måtar:
Frå biletmenyen via → .
Ved å klikka på den venstre knappen vist i raudt på skjermbiletet.
Ved å bruka snarvegen Shift+Q.
For å setja opp Snarmaske klikkar du på knappen nede til venstre i biletvindauget. Dersom det finst eit gjeldande utval i biletet, vil dette vera uforandra, men alt rundt vert dekka av ein raud, gjennomsiktig film. Dersom biletet ikkje har noko utval, vert heile biletet dekka med filmen. Klikk ein gong til på knappen for å slå av snarmaska.
Frå kanaldialogvindauget kan du klikka på namnet eller på miniatyren for å redigera innstillingane for Snarmaske. Du kan endra Dekkevne og filmfargen. Du kan når som helst gøyma maska ved å klikka på symbolet framføre Snarmaske.
Maska er koda i gråtoner, så du må bruka kvitt eller grått for å minska området eller svart for å gjera området større. Område som er teikna med mørk eller lys grå vert omformingsområda for mjuke kantar i utvalet. Når maska er ferdig, klikk ein gong til på knappen nede til venstre i biletet for å fjerna snarmaska frå kanallista og gjera ho om til eit utval.
Føremålet med snarmaska er å kunna bruka teikneverktøya for å markera utval og overgangar utan å bry seg med utvalsmaska. Snarmaska er ein god måte å isolera eit objekt i eit bilete fordi når utvalet er gjort, kan du berre fjerna innhaldet, eventuelt etter å ha invertert maska dersom objektet er inne i markeringa.
Beskriving
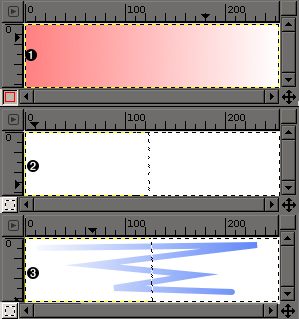
Biletvindauget med gjeldande snarmaske. Alle operasjonar vert gjort på snarmaska. Snarmaska er fylt med ein fargeovergang frå svart (venstre) til kvit (høgre).
Snarmaska er no kopla ifrå og det er laga eit utval frå den snarmaska som var fylt med fargeovergangen. Du kan sjå skiljet mellom meir og mindre enn 50 % dekkevne for utvalet midt i biletet.
Det vert no påført eit strok i det tilgjengeleg utvalet. Underleg! Sjølv om fargeovergangen ikkje er synleg, er han no aktiv over heile biletet, både i markerte og umarkerte område!
Etter at du har trykt på knappen for snarmaske vert det laga ein mellombels 8-bits (0 - 255) kanal der fargeovergangen vert lagra. Dersom det finst eit utval i biletet når maska vert laga, vil maska henta data frå dette utvalet. Når snarmaska vert slått på, vert dei områda som ikkje er utvalde markerte med ei raud, halvgjennomsiktig hinne. Du kan bruka alle teikneverktøya for å laga utval på snarmaska. Sidan snarmaska berre vert påverka av gråtoner, er det enklast å teikna med ulike gråtoner for å laga ulike grader av utveljing. Bruk kvit farge der du kan koma til å leggja inn andre grader av utveljing seinare. Utvalet vert gjeldande så snart du slår av snarmaska, men den mellombels kanalen forsvinn for alltid.
|
|
Tips |
|---|---|
|
For å lagra utvalet laga med snarmaska, kan du bruka → i biletmenyen |
Slå på snarmaska ved å trykkja på knappen i biletvindauget. Dersom det finst eit utval i biletet, vert maska laga med data frå denne.
Vel eit teikneverktøy og bruk dette med gråtoner på snarmaska.
Slå av snarmaska med knappen i biletvindauget.