| 2.2. チャンネルダイアログ | ||
|---|---|---|

|
2. 画像構造に関連するダイアログ |  |
| 2.2. チャンネルダイアログ | ||
|---|---|---|
|
|
2. 画像構造に関連するダイアログ | |
チャンネルダイアログはチャンネルを編集、 加工、 管理する主要なインターフェースです。 チャンネルには二重の使い道があります。 そのためダイアログも 2 つに区切られています。 上側には色のチャンネルがあり、 下側には選択マスクが置かれます。
Color channels apply to the image and not to a specific layer. Basically, three primary colors are necessary to render all the wide range of natural colors. As other digital software, GIMP uses Red, Green, and Blue as primary colors. The first and primary channels display the Red, Green, and Blue values of each pixel in your image.
Next to the channel name is a thumbnail displaying a grayscale representation of each channel, where white is 100% and black is 0% of the primary color. Alternatively, if your image is not a colored but a Grayscale image, there is only one primary channel called Gray. For an Indexed image with a fixed number of known colors there is also only one primary channel called Indexed.
Then there is an optional channel called Alpha. This channel displays transparency values of each pixel in your image (See Alpha Channel in Glossary). In front of this channel is a thumbnail displaying a grayscale representation of the transparency where white is opaque and visible, and black is transparent and invisible. If you create your image without transparency then the Alpha channel is not present, but you can add it from the Layers dialog menu. Also, if you have more than one layer in your image, GIMP automatically creates an Alpha channel.
![[注記]](images/note.png)
|
注記 |
|---|---|
|
GIMP は CMYK 色モデルや YUV 色モデルを扱えません。 |
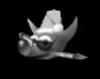
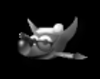
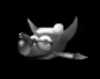
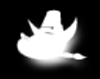
右端の画像を赤・緑・青の 3 つの色チャンネルと透明度を表すアルファチャンネルに分解した様子です。 右端の画像では透過部分を灰色濃淡による市松模様で表現してあります。 いずれの色チャンネルでも白の部分はすべての色が出ているので白くなっており、 黒の部分は黒くなっています。 赤い帽子は赤チャンネルでは見えても他の色チャンネルでは全く見えません。 このことは仮に純緑や純青であっても同じで、 その色のチャンネルでは見えても他の色チャンネルでは見えなくなります。
「チャンネル」ダイアログはドッキング可能です。 その扱い方については 「ダイアログとその合体」 をご覧ください。
呼び出し方はつぎのとおりです。
画像ウィンドウのメニューより → →
任意のドッキング可能なダイアログのボタンアイコン  をクリックすると出てくるタブメニューより →
ダイアログが少なくともひとつ開かれておれば、 メニューに 切り放したウィンドウ のリストが現れます。 このときは画像メニューより → と進めば「チャンネル」ダイアログを浮かび上がらせられます。
The channels at the top are the color channels and the optional Alpha channel. They are always organized in the same order and they cannot be removed. In the middle are two lock buttons, that show the lock status for the currently selected channel in the bottom area. The bottom area shows a list of selection masks. Every channel appears in the list with its attributes, including a thumbnail and its name. A right-click in a channel list entry opens the channel context menu.
Above the list of selection mask channels are two check boxes that show the lock attributes state of the currently selected mask channel.
The paintbrush icon shows whether 「lock pixels」 is enabled (highlighted) for the current channel. When this is enabled, the channel is locked for any action that changes the pixels, meaning there will be no changes done to this channel.
The cross-with-arrows icon shows whether 「lock position and size」 is enabled (highlighted) for the current channel. When this is enabled, the channel is locked for any action that changes the position or size.
一覧表上ではいずれのチャンネルにもその属性が表示されており、 その内容は レイヤーのプロパティ (属性) と非常によく似ています。

 チャンネルの可視度
最初はすべてのチャンネルが、 つまりはすべての色成分が可視化されています。 どれかのチャンネルを不可視にするにはその左側にある「開いた眼」のアイコンをクリックすればよいのです。 そうすると画像からこのチャンネルに対応する色成分が失われ、 そのチャンネルの段の眼のアイコンが消えます。 その空き地を再びクリックすれば画像にそのチャンネルの色成分が蘇ります。
 チャンネルの連結
The channels representing selection masks (in the lower part of the channel list) may be grouped using the button with the 「chain」 symbol. All channels that have the chain enabled will be affected in the same way by operations applied to any one of them.
Primary color channels (the default channels in the upper part of the channel list) may be grouped too. By default, all color channels (and the alpha channel) are selected, their list entries are highlighted. Operations will be performed on all channels. By clicking on a channel list entry you can deactivate this channel. Operations like colorizing a layer will then be applied to the selected (「grouped」) channels only. Clicking on the deactivated list entry will activate the channel again.
A small preview icon represents the effect of the channel. This preview can be enlarged by holding down the left mouse button on it.
The name of the channel, which must be unique within the image. Double-clicking on the name of a selection mask channel will allow you to edit it. The names of the primary channels (Red, Green, Blue, Alpha) can not be changed. Double-clicking on the preview icon will open a dialog where you can set all channel attributes.
![[注意]](images/caution.png)
|
注意 |
|---|---|
|
Activated channels appear highlighted in the dialog. If you click on a channel in the list you toggle activation of the corresponding channel. Disabling a color channel red, blue, or green has severe consequences. For instance if you disable the blue channel, all pixels from now on added to the image will not have a blue component, and so a white pixel will have the yellow complementary color. |
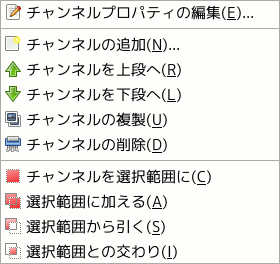
Below the channel list is a set of buttons allowing you to perform some basic operations on channel list.
This creates a new channel. A dialog will open where you can set the Channel name, the Color tag, the channel attributes and lock attributes, and finally the Opacity and color used for the mask in the image window. A click on the color button displays the GIMP color selector where you can change the mask color. If you press the Shift key while clicking the button, the New Channel Dialog will not be opened. Instead the new channel will be created with the same settings as used previously. This new channel is a channel mask (a selection mask) applied over the image. See Selection Mask
Only available for selection masks: here you can move the channel up in the list. Press Shift key to move the channel to the top of the list.
This moves the channel down in the list. Press the Shift key to move the channel to the bottom of the list.
 チャンネルの複製
This allows you to create a copy of the active channel. The name of the new channel is suffixed with a number.
![[ヒント]](images/tip.png)
|
ヒント |
|---|---|
|
色チャンネルやアルファチャンネルの複製も可能です。 複製は簡単に保管できるうえ、 後で選択範囲として画像操作に使えます。 |
 Replace the Selection with this Channel
Here you can transform the channel to become a selection. By default the selection derived from a channel replaces the active selection. You can change this by using control keys.
Shift: the selection derived from a channel is added to the active selection. The final selection is merged from both.
Ctrl: the final selection is the subtraction of the selection derived from a channel from the active selection.
Shift+Ctrl: the final selection is the intersection of the selection derived from a channel with the active one. Only the selected parts common to both are kept.
Only available for selection masks: this allows you to delete the active channel.
You can get the channel context menu by right clicking on a channel. Several of the operations on channels are also available through buttons at the bottom of the channels list. Those operations are documented there.
上述の チャンネルの管理 をご覧ください。
Only available for selection masks. Here you can change the Channel name, the Color tag, the channel attributes and lock attributes, and finally the Opacity and color used for the mask in the image window. A click on the color button displays the GIMP color selector where you can change the mask color.
Only available for selection masks. This allows you to assign a color tag to a channel. If you have a lot of channels this can make it easier to identify them by giving related channels the same color tag. To remove the color tag choose None.
The selection derived from a channel replaces the previously active selection.
The selection derived from a channel is added to the active selection. The final selection is merged from both.
The final selection is the subtraction of the selection derived from a channel from the active selection.
The final selection is the intersection of the selection derived from a channel with the active one. Only the selected parts common to both are kept.
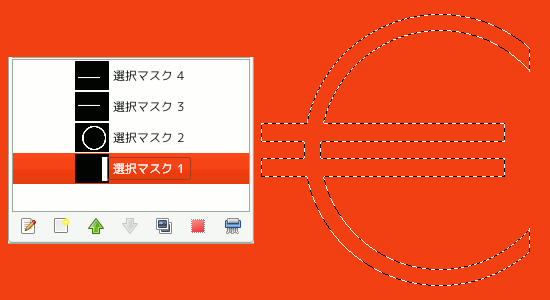
チャンネルは選択範囲を保存して再利用するのにも使えます。 チャンネルダイアログでは選択範囲を図示する縮小画像が見られます。 ここでは白い部分が選択されており黒い部分は選択範囲外を示しています。 GIMP には矩形選択ツールやファジー選択ツールをはじめたくさんの選択ツールがありますが、 選択マスクは選択範囲をそういった描画方法で灰色濃淡のチャンネルに変換するしくみです。 ですから灰色の画素は不完全選択です。 選択範囲の境界線をぼかしたとき選択されたところとされていないところの区切りがなだらかになる様子になぞらえてもよいでしょう。 選択範囲を塗りつぶしたり画像上の物体を背景から孤立させて消去するときに醜いモザイク処理効果に陥るのを避けるためにも、 このことが重要です。
選択マスクを初期化するにはつぎのような方法があります。
活性化させた選択範囲があるなら、 画像ウィンドウのメニューから → を実行します。
In the image window the bottom-left button creates a Quick Mask; the content will be initialized with the active selection.
チャンネルダイアログ上で、 ![]() ボタンをクリックするか脈絡メニューから と進みます。 作成された選択マスクは「選択マスク コピー」と名付けられて (さらに作成されるチャンネルには番号が振られて) チャンネルダイアログに現れます。 名前の変更はチャンネルの項目上をマウスで クリックすると出てくる脈絡メニューの最初の項目を実行するか、 チャンネルの名前をダブルクリックすればできます。
ボタンをクリックするか脈絡メニューから と進みます。 作成された選択マスクは「選択マスク コピー」と名付けられて (さらに作成されるチャンネルには番号が振られて) チャンネルダイアログに現れます。 名前の変更はチャンネルの項目上をマウスで クリックすると出てくる脈絡メニューの最初の項目を実行するか、 チャンネルの名前をダブルクリックすればできます。
Once the channel is initialized, selected (highlighted in blue), visible
(eye-icon in the dialog), and displayed as you want (color and opacity
attributes), you can start to work with all the paint tools. The colors
used are important. If you paint with some color other than white, gray,
or black, the color Value (luminosity) will be used to define a gray
(medium, light, or dark). When your mask is painted, you can transform
it to a selection by clicking on the
button (Channel to
Selection) or from the
context menu.
選択マスクの加工に使えるのは描画ツールだけではありません。 たとえば一様にグラデーションやパターンで塗りつぶす領域を選択ツールで区切られます。 一覧表に選択マスクをたくさん並べ、 それらを組み合わせれば容易に複雑な選択範囲が描けます。 選択マスクの選択範囲に対する関係を画像に対するレイヤーになぞらえて言う人もいます。
|
|
注意 |
|---|---|
|
選択マスクを活性化している間は、 画像でなくマスクを加工していることにご注意ください。 画像上で作業するには選択マスクをすべて不活性にする必要があります。 それから目のアイコンを消してマスクの表示を止めるのを忘れないでください。 もちろん RGB の各色チャンネルすべてを (もしあればアルファチャンネルも) 活性化して画像を表示させましょう。 |
「クイックマスク」とは一時的に選択範囲を描画可能にする目的をもつ 選択マスク だと言えます。 一時的と断わったのは、 通常の選択マスクとは異なり選択範囲に戻すとチャンネルの一覧表から消えるからです。 徐々に変化がつくような複雑な選択範囲を描こうとすると、 選択ツール はしばしばその限界を見せてしまいます。 こんなとき、 クイックマスクを使ってみると非常に良好な仕上がりが期待できるでしょう。
クイックマスクを起用する方法はつぎのいずれかです。
画像ウィンドウのメニューより →
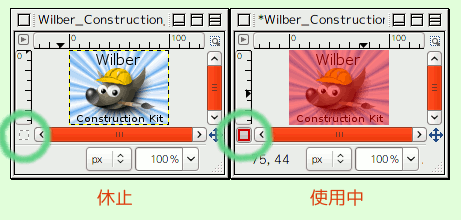
スクリーンショットでも見えている画像ウィンドウの左下にある小さな正方形のボタンをクリック
キーボードショートカット Shift+Q
「クイックマスク」を使うにはまず画像ウィンドウの左下のボタンをクリックしてください。 画像上に何か選択範囲があれば、 その境界線が半透明な赤で覆われて選択範囲の内容が変更を受けることなく表示されます。 選択範囲が何も無かったときは画像全体が半透明な赤で覆われます。 この左下のボタンをまたクリックするとクイックマスクは解除されます。
チャンネルダイアログ上ではクイックマスクの縮小見本画像か名前をダブルクリックすれば「チャンネルのプロパティ」ダイアログが開かれますので、 ここでクイックマスクの 不透明度 や塗りつぶし色を変更できます。 いつ何時でも一覧表の クイックマスク の欄の「目」のアイコン をクリックすればマスクを隠せます。
マスクは灰色濃淡の階調で構成されているので、 マスクで塞がれた領域を減らすには白か灰色を、 増やすには黒を使わなくてはなりません。 濃淡のついた灰色で塗られている領域は選択範囲のぼかされた境界付近のような漸進変化をしています。 マスクができあがったら画像ウィンドウの左下のボタンを再びクリックすればチャンネルの一覧表からクイックマスクが消え、 その内容は選択範囲に変換されます。
クイックマスクの使用目的は選択マスクの管理に煩わされることなく選択範囲を描画ツールで描くこと、 しかも必要なら選択になだらかな強弱を加えることです。 このような手法は画像内にある物体を孤立させて取り出すのに使うと、 選択範囲はもうできあがっているのであとはその範囲内の画像を (もし欲しい物体が範囲内にあるときは反転してから) 削除すればよいだけになりますから便利です。
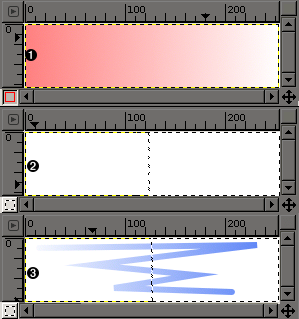
説明
クイックマスクを有効にした画像ウィンドウのスクリーンショット。 クイックマスクが有効な間はすべての操作をクイックマスクが受ける。 マスクに対しグラデーションを黒 (左) から白 (右) にかけた。
クイックマスクを解除した。 選択範囲の枠 (蟻の行進) が画像の右半分だけにあるのは、 選択範囲の境界線がグラデーションの中央にあるからである。
選択範囲が活性化したままで描線を加えた。 不思議なことが起こった。 もう見えなくなったはずのグラデーションが、 選択範囲の枠内・枠外を問わず画像の全域にわたっていまだに残っている。
クイックマスクボタンをクリックすると発行されるコマンドが 8 ビット (0-255) チャンネルを一時的に作成するので、 ここに漸進的変化のある選択範囲も収められます。 あらかじめ選択範囲ができていた場合はクイックマスクは選択範囲の内容をもとに初期化されます。 クイックマスクが起用されると画像は赤い半透明な薄膜で覆われます。 これは非選択画素を表しています。 クイックマスクを通して選択範囲を作成するときは 描画ツール がどれでも使えます。 チャンネルの属性を強化するにあたり、 利用できる色は白黒と灰色濃淡に限られます。 白い領域があとで選択範囲になります。 選択範囲の境界線は再びクイックマスクの切り替えをすれば直ちに表示されますが、 一時的なチャンネルはもうその時点から利用できなくなります。
|
|
ヒント |
|---|---|
|
クイックマスクで作成した選択範囲をチャンネルに保存するには、 画像ウィンドウのメニューより → してください。 |
画像を 開くまたはインポートする か、 あるいは 新しい画像 を用意します。
画像ウィンドウの左下のボタンをクリックしてクイックマスクを有効にします。 選択範囲があるとマスクは選択範囲の内容を基に初期化されます。
描画ツール を呼び出して灰色濃淡でクイックマスクを塗ります。
画像ウィンドウの左下のボタンを使ってクイックマスクを解除します。