| 2.2. New… | ||
|---|---|---|

|
2. Meniu „Failas“ |  |
| 2.2. New… | ||
|---|---|---|
|
|
2. Meniu „Failas“ | |
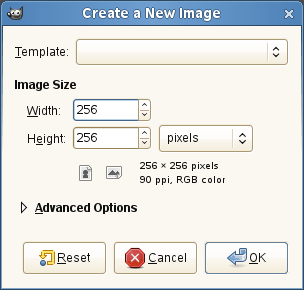
Using the „Create a New Image“ dialog, you can create a new empty image and set its properties. The image is shown in a new image window. You may have more than one image on your screen at the same time.
You can access the command in the image menu through: → ,
arba naudojant klavišų kombinaciją Ctrl+N.
Užuot įvedant visas reikšme rankiniu būdu, šablonų, kurie nurodo dažnai naudingus paveikslėlio tipus, meniu galite pasirinkti kelias iš anksto nustatytas reikšmes. Šablonai nustato dydžio, raiškos, komentarų ir kitas reikšmes. Jeigu yra kokia nors konkreti paveikslėlio forma, kurią dažnai naudojate, bet jos nėra sąraše, galite sukurti naują šabloną, naudodami dialogą Šablonai.
Čia galite nustatyti naujo paveikslėlio Plotį ir Aukštį. Numatytieji vienetai yra pikseliai, tačiau jeigu norite, šalia esančiame meniu galite pasirinkti kitus vienetus. Tokiu atveju atminkite, kad gaunamą pikselių dydį nurodo X ir Y raiška (kurią galite pakeisti Sudėtingesnėse parinktyse) ir meniu esantis parametras „Taškas į tašką“.
If no image is open, the „New“ image is opened in the empty image window, with the default size you have determined. If you open the „New“image when another is open (or has been), then it is opened in another window, with the same size as the first image.
![[Pastaba]](images/note.png)
|
Pastaba |
|---|---|
|
Atminkite, kad kiekvienas paveikslėlio pikselis yra saugomas atmintyje. Jeigu sukuriate didelius failus su dideliu pikselių tankumu, programai GIMP kiekvienos jūsų paveikslėliui pritaikomos funkcijos atlikimui reiks daug laiko ir atminties. |
Yra du mygtukai, perjungiantys tarp Stačios ir Gulsčios veiksenos. Jie sukeičia Aukščio ir Pločio reikšmes. (Jeigu Aukščio ir Pločio reikšmės yra vienodos, šie mygtukai yra išjungti). Jeigu X ir Y raiškos yra ne tokios pačios (tą galite nustatyti Sudėtingesnėse parinktyse), tada šios reikšmės taip pat sukeičiamos. Dialogo dešinėje rodomas paveikslėlio dydis, ekrano raiška ir spalvų gama.
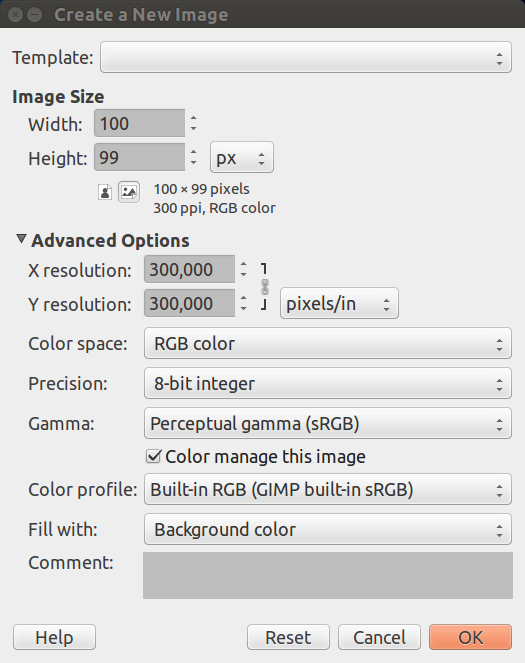
Sudėtingesnės parinktys yra labiausiai aktualios labiau patyrusiems GIMP naudotojams. Galite pamatyti šias parinktis spustelėdami dialogo lango apačioje esantį mažą trikampį.
Laukeliuose X raiška ir Y raiška nurodytos reikšmės pagrinde susijusios su spausdinimu: jos neįtakoja paveikslėlio dydžio pikseliais, tačiau gali nurodyti jo spausdinio fizinį dydį. X ir Y raiškos reikšmės gali nurodyti kaip pikseliai yra verčiami į kitus matavimo vienetus, pavyzdžiui, milimetrus arba colius.
![[Patarimas]](images/tip.png)
|
Patarimas |
|---|---|
|
Jeigu norite, kad paveikslėlis ekrane būtų rodomas teisingų matmenų, pasirinkite → . Nustatykite mastelio daugiklį į 100%, kad pamatytumėte paveikslėlį tikro jo dydžio. Ekrano dydžio kalibravimas paprastai atliekamas įdiegus programą GIMP, tačiau jeigu jūsų paveikslėlis rodomas netikslaus dydžio, jums gali reikti programoje GIMP pakoreguoti ekrano parametrus. Tą galite padaryti dialoge Nustatymai. |
You can create the new image in different color modes, as either an RGB image or a grayscale image.
The image is created in the Red, Green, Blue color system, which is the one used by your monitor or your television screen.
The image is created in black and white, with various shades of gray. Aside from your artistic interests, this type of image may be necessary for some plug-ins. Nevertheless, the GIMP allows you to change an RGB image into grayscale, if you would like.
You cannot create an indexed image directly with this menu, but of course you can always convert the image to indexed mode after it has been created. To do that, use the → → command.
A huge step for GIMP: 16-32 bits per channel support is at last available. You are now able to work with a lot more color information and detail in your pictures. This support basically gives you the ability to create super-smooth color transitions on your picture. Next improvement will be to have RAW files edited with GIMP directly since there is enough color space to bring back all the details that are stored inside a RAW file – however this is not implemented yet.
Five options are available:
8-bit integer
16-bit integer
32-bit integer
16-bit floating point
32-bit floating point
If you wonder what the difference is between integer and floating point (in the graphics area): If you have an image with 16-bit integer precision per channel, then you have 65.536 shades of different red, green and blue color tones – all of them equally stepped to each other (equal color distance). If you have it in floating point, then there are no equal-wide steps – so you can distribute the possible color values over selected ranges. For example: if you know that you have a very dark image with many shades of dark red color tones then you would benefit from floating point because you can decrease the importance of the brighter color tones and get most color detail out of only the darker reds.
Pav. 16.7. Precision example

Left image is 8-bit, right is 32-bit. You can see that there are much more available colors between color transitions on the right image.
Here you can choose the channel encoding for your image. Choices are Perceptual gamma (sRGB) and Linear light. For 8-bit integer precision the default is Perceptual gamma, and for 32-bit floating point precision it is Linear light. For more information see which precision options should you choose.
When enabled (this is the default and should usually be left alone unless you know what you are doing), the image is color managed. This means that everything you do in GIMP will base their operations on the chosen color profile (see below) of your image. See for more information also Enable Color Management.
Here you can choose a color profile to be used for your image. The default is GIMP's standard color profile based on Color space, Precision, and Gamma. If you prefer to use a different color profile you can select an ICC color profile file from a location on your computer by choosing Select color profile from disk....
Čia galite nurodyti fono spalvą, naudojamą jūsų naujam paveikslėliui. Žinoma, paveikslėlio foną galima bet kada vėliau pakeisti. Daugiau informacijos apie tai galite rasti Sluoksnių dialoge.
There are several choices:
Užpildyti paveikslėlį dabartine įrankinėje parodyta Priekinio plano spalva.
Note that you can change the foreground color while the „New Image“ dialog window is open.
Fill the image with the current Background color, shown in the Toolbox. (You can change the background color too, while the dialog window is open.)
Užpildyti paveikslėlį Balta spalva.
Fill the image with Transparency. If you choose this option, the image is created with an alpha channel and the background is transparent. The transparent parts of the image are then displayed with a checkered pattern, to indicate the transparency.
Fill the image with a Pattern. If you choose this option, the image is filled with the currently active pattern (which you can change while this dialog is open).
You can write a descriptive comment here. The text is attached to the image as a parasite, and is saved with the image by some file formats (PNG, JPEG, GIF).
|
|
Pastaba |
|---|---|
|
Šį komentarą galite peržiūrėti ir pakeisti dialoge Paveikslėlio savybės. |