| 5. Μονοπάτια | ||
|---|---|---|

|
Κεφάλαιο 7. Ζωγράφισμα με το GIMP |  |
Τα μονοπάτια είναι καμπύλες (γνωστές ως καμπύλες Bézier). Είναι εύκολο να μάθετε και να χρησιμοποιήσετε τα μονοπάτια στο GIMP. Για να καταλάβετε τη λογική τους και το μηχανισμό τους δείτε στο γλωσσάρι Καμπύλη Bézier ή στη Wikipedia [WKPD-BEZIER]. Το εργαλείο μονοπατιών είναι πολύ ισχυρό, επιτρέποντας σας να σχεδιάσετε σύνθετα σχήματα. Κατά τη σχεδίαση ενός σχήματος, χρησιμοποιήστε πρώτα το εργαλείο Μονοπατιών στο GIMP, για να δημιουργήσετε ένα μονοπάτι. Κατόπιν συνήθως βάφετε ή γεμίζετε το μονοπάτι.
Στο GIMP, ο όρος «χρωματισμός μονοπατιού» σημαίνει την εφαρμογή μιας ειδικής μορφοποίησης στο μονοπάτι (χρώμα, πλάτος, μοτίβο...).
Ένα μονοπάτι μπορεί να χρησιμοποιηθεί με διάφορους τρόπους:
Μπορείτε να μετατρέψετε ένα κλειστό μονοπάτι σε επιλογή.
Οποιοδήποτε μονοπάτι, ανοιχτό ή κλειστό, μπορεί να βαφτεί με ποικίλους τρόπους.
Ένα μονοπάτι μπορεί να γεμιστεί με χρώμα ή μοτίβο. Εάν το μονοπάτι δεν είναι κλειστό, θα προσπαθήσει να καταλάβει το σχήμα και στη συνέχεια να το γεμίσει. Ωστόσο, αυτό δεν θα λειτουργήσει εάν το μονοπάτι είναι ευθεία γραμμή.
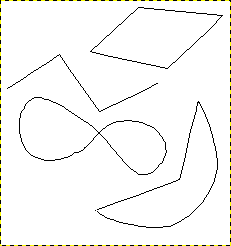
Σχήμα 7.10. Εικονογράφηση τεσσάρων διαφορετικών μονοπατιών

Τέσσερα παραδείγματα μονοπατιών του GIMP: ένα κλειστό πολυγωνικό, ένα ανοιχτό πολυγωνικό, ένα κλειστό καμπύλο και ένα με μείγμα ευθειών και καμπύλων τμημάτων.
Ξεκινήστε χαράσσοντας το περίγραμμα για το μονοπάτι σας· το περίγραμμα μπορεί να τροποποιηθεί αργότερα (δείτε το εργαλείο Μονοπάτια). Για να ξεκινήσετε, επιλέξτε το εργαλείο μονοπατιών χρησιμοποιώντας μία από τις παρακάτω μεθόδους:
Χρησιμοποιήστε → από το μενού.
Πατήστε το σχετικό εικονίδιο στην εργαλειοθήκη  .
.
Χρησιμοποιείστε το πλήκτρο συντόμευσης B.
Όταν είναι επιλεγμένο το εργαλείο Μονοπάτια, ο δρομέας του ποντικιού μετατρέπεται σε σταυρόνημα με καμπύλη από προεπιλογή. Το πραγματικό σχήμα εξαρτάται από τη ρύθμιση κατάστασης δείκτη του ποντικιού. Βεβαιωθείτε ότι τα Μονοπάτια Κατάσταση επεξεργασίας στις Επιλογές εργαλείου έχει οριστεί σε Σχεδίαση.
Αριστερό πάτημα στην εικόνα για να δημιουργήσετε το πρώτο σημείο του μονοπατιού. Μετακινήστε το ποντίκι σε ένα νέο σημείο και αριστερό πάτημα για να δημιουργήσετε ένα άλλο σημείο συνδεδεμένο με το προηγούμενο σημείο. Αν και μπορείτε να δημιουργήσετε όσα σημεία επιθυμείτε, χρειάζεστε μόνο δύο σημεία για να μάθετε για τα μονοπάτια.
Κατά την προσθήκη σημείων, ο δρομέας του ποντικιού έχει ένα μικρό «+» δίπλα στην καμπύλη, το οποίο υποδεικνύει ότι πατώντας θα προσθέσετε ένα νέο σημείο.
Όταν ο δρομέας του ποντικιού βρίσκεται κοντά σε ένα από τα σημεία της διαδρομής, το «+» μετατρέπεται σε σταυρό με βέλη, όπως το εργαλείο μετακίνησης. Στη συνέχεια, μπορείτε να μετακινήσετε το υπάρχον σημείο μονοπατιού.
Για να κλείσετε το μονοπάτι σας, πηγαίνετε με το ποντίκι στην κορυφή του σημείου στο οποίο θέλετε να συνδεθείτε και, στη συνέχεια Ctrl-πάτημα σε αυτό το σημείο. Όταν ολοκληρώσετε το σχεδιασμό του μονοπατιού σας, μπορείτε να πατήσετε στο Enter. Αυτό θα μετατρέψει το μονοπάτι σε Επιλογή. Μπορείτε επίσης να συνεχίσετε να προσθέτετε περισσότερα σημεία ή να αρχίσετε να αλλάζετε τις καμπύλες του μονοπατιού.
Για να επεξεργαστείτε τις καμπύλες του μονοπατιού σας, μετακινήστε τον δρομέα του ποντικιού κοντά σε ένα τμήμα γραμμής, αριστεροπατήστε και σύρετε το τμήμα της γραμμής. Συμβαίνουν δύο γεγονότα.
Το τμήμα της γραμμής λυγίζει και καμπυλώνεται καθώς τραβιέται.
Κάθε τμήμα γραμμής έχει ένα αρχικό σημείο και ένα τελικό σημείο που σημειώνονται με μικρά τετράγωνα ορθογώνια, που ονομάζονται λαβές. Μια «γραμμή κατεύθυνσης» τώρα προβάλλει από κάθε αρχικό σημείο για το τμήμα της γραμμής που μετακινήθηκε. Αυτή η γραμμή κατεύθυνσης έχει συνήθως διαφορετικό χρώμα από τις γραμμές του μονοπατιού.
Το τμήμα της καμπύλης γραμμής αφήνει ένα τελικό σημείο στην ίδια κατεύθυνση, που η «γραμμή κατεύθυνσης» αφήνει το αρχικό σημείο. Το μήκος της αυτής της γραμμής ελέγχει πόσο μακριά το τμήμα της γραμμής προβάλλει κατά μήκος της «γραμμής κατεύθυνσης» πριν να καμπυλώσει προς το άλλο σημείο του μονοπατιού.
Η λαβή στο τέλος κάθε «γραμμής κατεύθυνσης» μπορεί να συρθεί για να αλλάξει η κατεύθυνση και το μήκος της καμπύλης. Οι λαβές στο άλλο άκρο, όπου συνδέονται με τη διαδρομή, μπορούν να χρησιμοποιηθούν για να μετακινήσετε τη θέση αυτού του σημείου μονοπατιού.
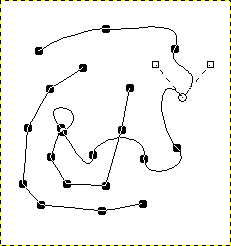
Σχήμα 7.11. Εμφάνιση του μονοπατιού, ενώ επεξεργάζεται

Εμφάνιση του μονοπατιού, ενώ επεξεργάζεται με το εργαλείο μονοπατιών.
Το μονοπάτι αποτελείται από δύο συστατικά με ευθεία και καμπύλα τμήματα. Μαύρα τετράγωνα είναι σημεία αγκίστρωσης, ο ανοιχτός κύκλος δείχνει την επιλεγμένη άγκυρα και τα δύο ανοιχτά τετράγωνα είναι οι συνδεμένες λαβές με την επιλεγμένη άγκυρα.