| Kapitola 12. Enrich my GIMP | ||
|---|---|---|

|
Část II. Ze zelenáče profesionálem |  |
| Kapitola 12. Enrich my GIMP | ||
|---|---|---|
|
|
Část II. Ze zelenáče profesionálem | |
Obsah
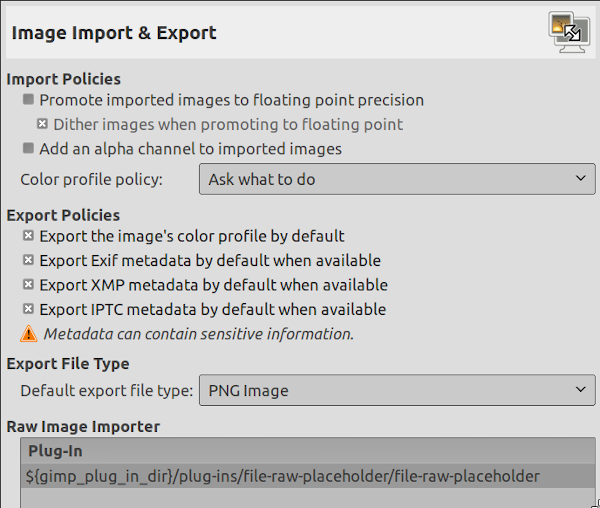
The preferences dialog can be accessed from the image menu-bar, through → . It lets you customize many aspects of the way GIMP works. The following sections detail the settings that you can customize, and what they affect.
Všechny předvolby jsou ukládány do souboru gimprc v uživatelském osobním GIMP adresáři. Jeho editací tak může pokročilý uživatel upřednostňující textové konfigurační soubory nastavovat vše ručně a přímo. Pokud pracujete na Linuxu (a doufáme, že ano), získáte technické informace o obsahu tohoto souboru příkazem man gimprc.
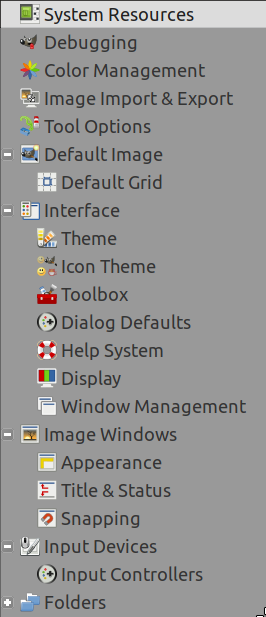
Obrázek 12.2. System Resources
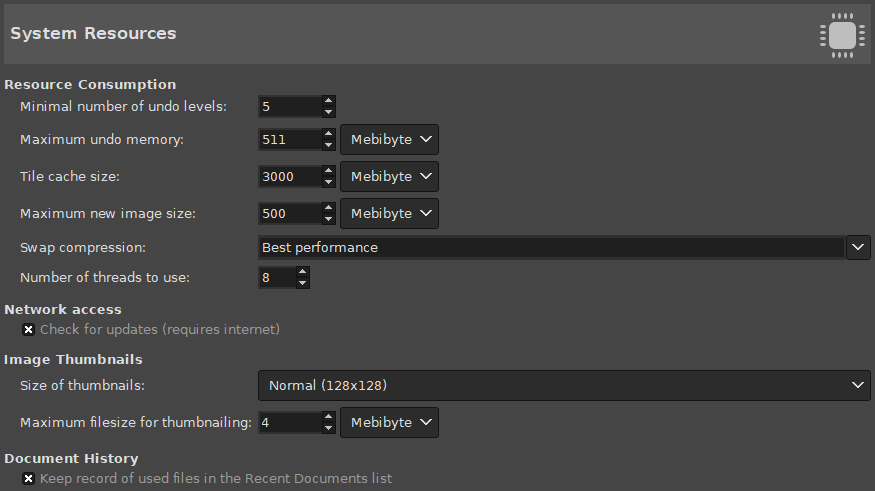
This page lets you customize the amount of system memory allocated for various purposes. It also allows you to set the size of thumbnail files that GIMP produces.
Spotřeba zdrojů
GIMP umožňuje vzít zpět většinu akcí, protože pro každý otevřený obrázek uchovává historii změn. Pro tuto historii je vyhrazeno určité množství paměti. Bez ohledu na paměť však GIMP umožňuje vracet určité minimální množství změn. Toto množství se nastavuje zde. Více o funkci Zpět se dozvíte v části Vracení zpět.
Toto je množství paměti vyhrazené pro historii změn každého obrázku. Pokud velikost historie překročí tuto hranici, jsou nejstarší záznamy zapomínány, pokud by to ovšem nezpůsobilo uložení menšího počtu záznamů, než jaký je nastaven ve volbě výše.
Toto je množství operační paměti vyhrazené pro obrazová data v Gimpu. Pokud GIMP potřebuje paměti více, začne ji odkládat na disk, což může způsobit nesmírné zpomalení. Tuto hodnotu můžete nastavit již při instalaci Gimpu, ale můžete ji také kdykoliv změnit zde. Více informací najdete v části Jak nastavit vyrovnávací paměť dlaždic.
Zde nastavený limit není absolutní. Pokud budete chtít vytvořit obrázek větší, než zde nastavený limit, budete požádáni o potvrzení vašeho úmyslu. Smyslem je zabránit nechtěnému vytvoření obrovského obrázku, což může způsobit pád Gimpu nebo jeho neúnosné zpomalení.
This sets the compression method used for tile data stored in the swap. Compression can both reduce the swap size, and increase its speed, by minimizing input and output. Values are best performance (the default), balanced, and best compression, or none to disable compression altogether.
Multi-threading allows making use of multiple cores for processing. Not all features make use of that for the moment. A point of interest is that multi-threading happens through GEGL processing, but also in GIMP core itself, for instance to separate painting from display.
Network Access
When this option is enabled, GIMP will regularly check at start-up if a new version is available. If there is, you will get an alert that you can update. Note that this option requires you to have an internet connection and for GIMP to be allowed access to the internet.
Miniatury obrázků
This options allows you to set the size of the thumbnails shown in the File Open dialog (and also saved for possible use by other programs). The options are „No thumbnails“, „Normal (128x128)“, and „Large (256x256)“.
Pokud je velikost souboru větší, než zde uvedená hodnota, nebude pro něj GIMP vytvářet náhled. Lze tak omezit vytváření náhledů z extrémně velkých obrázků, což by způsobilo velké zpomalení Gimpu.
Document History
When checked, files you have opened will be saved in the Document history. You can access the list of files with the Document history dialog from the image menu-bar : → → .
![[Poznámka]](images/note.png)
|
Poznámka |
|---|---|
|
This settings page is not available on Windows. |
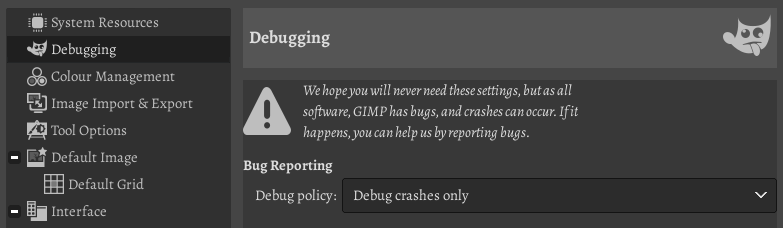
Debug Policy
The Debug Policy tells GIMP what you want to do if GIMP encounters a problem. You have four choices:
This is the most intrusive option. Usually only used when trying to find a specific bug. This starts the debugger for any kind of crash, error or warning.
Start debugging when GIMP encounters a crash or a critical error.
Only start debugging when GIMP encounters a crash.
Whatever happens, the debugger will never be started.
Effective debugging is only possible if you have gdb or lldb installed.
This page lets you customize GIMP color management.
Some of the options let you choose a color profile from a menu. If the desired profile is not present in the menu yet, you can add it by clicking on .
![[Tip]](images/tip.png)
|
Tip |
|---|---|
|
Files containing color profiles are easily recognizable by their
|
Using this option, you can decide how GIMP color management operates. There are three modes you can choose from:
No color management: choosing this shuts down color management in GIMP completely.
Color managed display: this enables GIMP color management and provides a fully corrected display of the images according to the given color profile for the display.
Soft-proofing: when choosing this option, you enable GIMP color management not only to apply the profile for the display, but also for the selected printer simulation profile. Doing so, you can preview the color results of a print with that printer.
|
|
Poznámka |
|---|---|
|
Please note, that GIMP color management is used to enhance the display of images and the embedding of profiles to image files only. More specifically, the options you choose in this dialog are not used for printing from within GIMP. This is because printing is a special task done by a printing engine that is not part of GIMP. |
Monitor profile
None: GIMP uses the colorimetric profile of your monitor.
Select color profile from disk: choose a profile that you have available on your computer.
Try to use the system monitor profile
When enabled, GIMP will try to use the display color profile supplied by the system. The configured monitor profile is then only used as a fallback.
Rendering intent
This option is about how colors are converted from the color space of your image to your display device. Four modes are available: „Perceptual“, „Relative colorimetric“, „Saturation“ and „ Absolute colorimetric“.
Relative colorimetric is usually the best choice (default). Unless you use a LUT monitor profile (most monitor profiles are matrix), choosing perceptual intent actually gives you relative colorimetric. See also Rendering Intent .
Use black point compensation
This option is checked by default. Do use black point compensation unless you have a reason not to.
Optimize image display for:
Two options: and . „Speed“ is activated by default. If not, image display might be better at the cost of speed.
Soft-proofing is a mechanism that allows you to see on your screen what printing on paper will look like. More in general, it is soft-proofing from the color space of your image to another color space (printer or other output device).
Soft-proofing profile
is the choice by default. The drop-down list offers the possibility of .
Rendering intent As above, four modes: „Perceptual“, „Relative colorimetric“, „Saturation“ and „ Absolute colorimetric“. Try them all and choose what looks the best.
Use black point compensation
Try with and without black point compensation and choose what looks best.
Optimize soft-proofing for:
Two options: and . „Speed“ is activated by default. If not, soft-proofing might be better at the cost of speed.
Mark out of gamut colors
When this box is checked, the soft-proofing will mark colors that can not be represented in the target color space. On the right there is a color button that you can click to open a color selector to choose the color you want to be used for marking out of gamut colors.
RGB profile
Default is „None“, which causes the built-in RGB profile to be used. You can select another RGB working space color profile from disk: it will be offered next to the built-in profile when a color profile can be chosen.
Grayscale profile
Default is „None“, which causes the built-in Grayscale profile to be used. You can select another Grayscale working space color profile from disk: it will be offered next to the built-in profile when a Grayscale profile can be chosen.
CMYK profile
Default is „None“. You can select a CMYK working space color profile from disk to convert RGB to CMYK.
File Open Behavior
Default is „Ask what to do“. You can also select „Keep embedded profile“ or „Convert to built-in sRGB or grayscale profile“ to indicate how to treat embedded color profiles when opening an image file.
|
|
Poznámka |
|---|---|
|
For more explanations:
Some online available color profiles:
|
Show advanced color options: advanced color options in filter dialogs are not visible when this option is not checked.
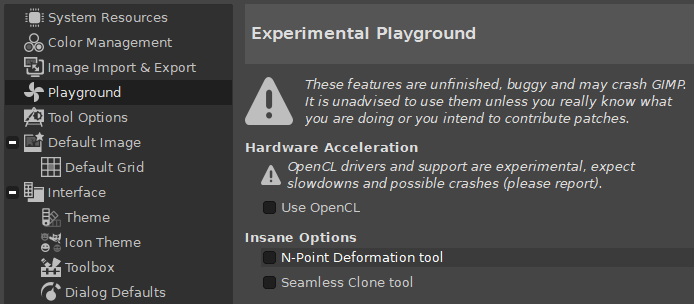
Hardware acceleration
The Playground settings are only available if you have explicitly started GIMP with the „--show-playground“ command line setting, or if you have previously enabled one of the experimental settings in Playground.
OpenCL is an acronym for Open Computing Language (see Wikipedia). This option tries to improve the processing speed of certain operations by using the GPU (graphic processing unit) instead of the CPU.
![[Varování]](images/warning.png)
|
Varování |
|---|---|
|
This is a very experimental feature that is known to crash often! Only enable this if you intend to work on improving it and don't forget that you enabled it. |
Insane Options - Experimental Tools
This tool lets you create a rubber-like deformation of the image using points.
This tool lets you seamlessly paste one image into another.
|
|
Varování |
|---|---|
|
These are experimental tools that are known to crash, cause slowdowns and not work as expected! Only enable this if you want to test it, or intend to work on improving it, and don't forget that you enabled it. |
Obrázek 12.7. Předvolby Volby nástrojů
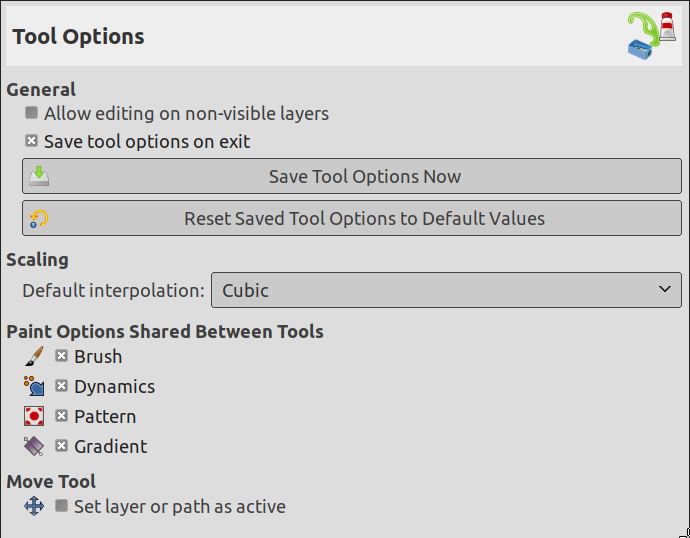
Tento dialog umožňuje nastavit několik aspektů chování nástrojů.
Všeobecné
You can edit layers with disabled visibility (the eye icon in the layer dock).
Self-explanatory
Self-explanatory
Self-explanatory
Změna velikosti
When you scale something, each pixel in the result is calculated by interpolating several pixels in the source. This option determines the default interpolation method: it can always be changed, though, in the Tool Options dialog.
There are five choices:
This is the fastest method, but it's quite crude: you should only consider using it if your machine is very seriously speed-impaired, or when you are designing pixelized images.
A simple form of interpolation which is good enough for most purposes.
This is the default choice, but also slower than Linear. In general this gives better results than Linear, but there are some cases where it can actually look worse.
This method performs a high quality interpolation. Use the NoHalo method when you downscale an image to less than a half of the original size.
This method performs a high quality interpolation. Use the LoHalo method when you do not reduce the size much (rotate, shear).
Možnosti kreslení sdílené mezi nástroji
Můžete se rozhodnout, zda změna stopy a dalších nastavení pro jeden nástroj zapříčiní odpovídající změnu pro všechny další nástroje, nebo zda má každý jednotlivý nástroj (tužka, štětec, sprej atd.) používat své vlastní nastavení a pamatovat si stopu atd., která byla naposledy nastavena u něj.
Move tool
You can decide here whether changing the current layer or path when using the move tool and without pressing any key.
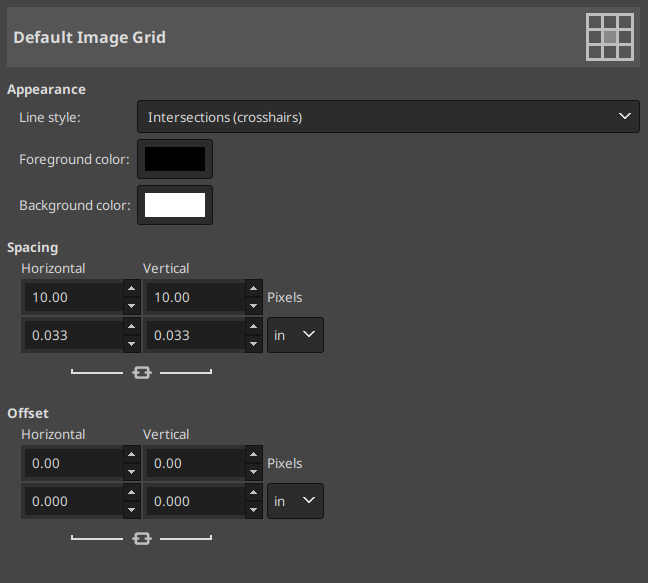
Tato stránka předvoleb umožňuje nastavit výchozí vlastnosti mřížky obrázku v Gimpu, jejíž zobrazování můžete zapínat a vypínat volbou → z nabídky obrázku. Nastavení se shodují s těmi dostupnými v dialogu Nastavit mřížku, který lze použít k přenastavení mřížky pro kterýkoliv obrázek volbou → z nabídky obrázku. Více informací o jednotlivých volbách najdete v části dialog Nastavit mřížku.
Obrázek 12.10. Dialog předvoleb pro uživatelské rozhraní
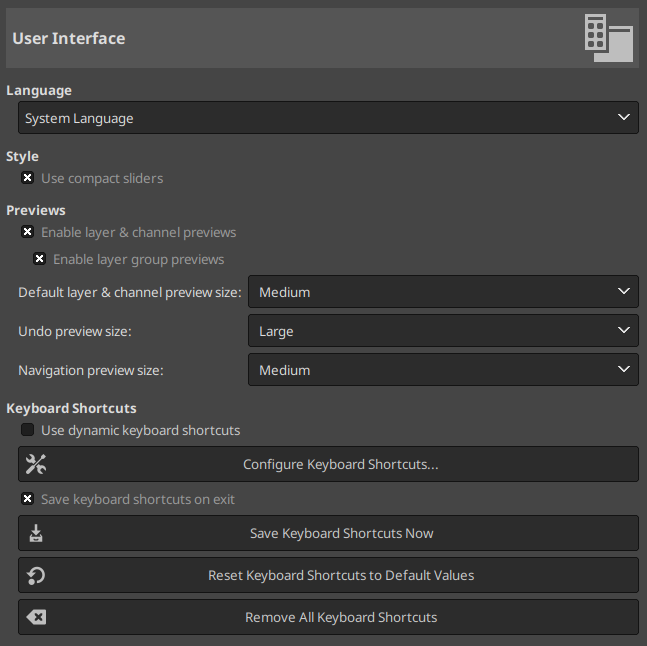
This page lets you customize language, layer/channel previews and keyboard shortcuts.
Options
The GIMP's default language is that of your system. You can select another language in the drop-down list. You have to start GIMP again to make this change effective. Please refer to 1.2 – „Jazykové verze“.
By default, GIMP shows miniature previews of the contents of layers and channels in several places, including the Layers dialog. If for some reason you would prefer to disable these, you can do it by unchecking Enable layer and channel previews and Enable layer group layers previews. If you do want previews to be shown, you can customize their sizes using the menus for Default layer and channel preview size and Navigation preview size.
You can also customize the Undo preview size and the Navigation preview size.
GIMP can give you the ability to create keyboard shortcuts (key combinations that activate a menu entry) dynamically, by pressing the keys while the pointer hovers over the desired menu entry. However, this capability is disabled by default, because it might lead novice users to accidentally overwrite the standard keyboard shortcuts. If you want to enable it, check Use dynamics keyboard shortcuts here. For more information see Creating Shortcuts to Menu Commands.
Pressing the button for Configure Keyboard Shortcuts brings up the Keyboard Shortcuts Dialog, which allows you to see all actions and assign or change their keyboard shortcuts.
If you change shortcuts, you probably want your changes to be available in future GIMP sessions. If not, uncheck Save keyboard shortcuts on exit. But remember that you have done this, or you may be frustrated later. If you don't want to save shortcuts on exit every session, you can save the current settings at any time using the Save Keyboard Shortcuts Now button, and they will be applied to future sessions. If you decide that you have made some bad decisions concerning shortcuts, you can reset them to their original state by pressing Reset Saved Keyboard Shortcuts to Default Values. You can also choose to Remove All Keyboard Shortcuts.
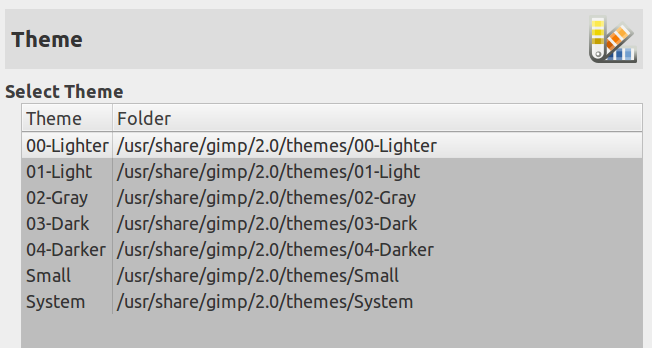
This page lets you select a theme, which determines many aspects of the appearance of the GIMP user interface. Clicking on a theme in the list causes it to be applied immediately, so it is easy to see the result and change your mind if you don't like it.
This page lets you select a theme for the icons of the GIMP user interface. Test them: you will see the result instantly in this preference dialog.
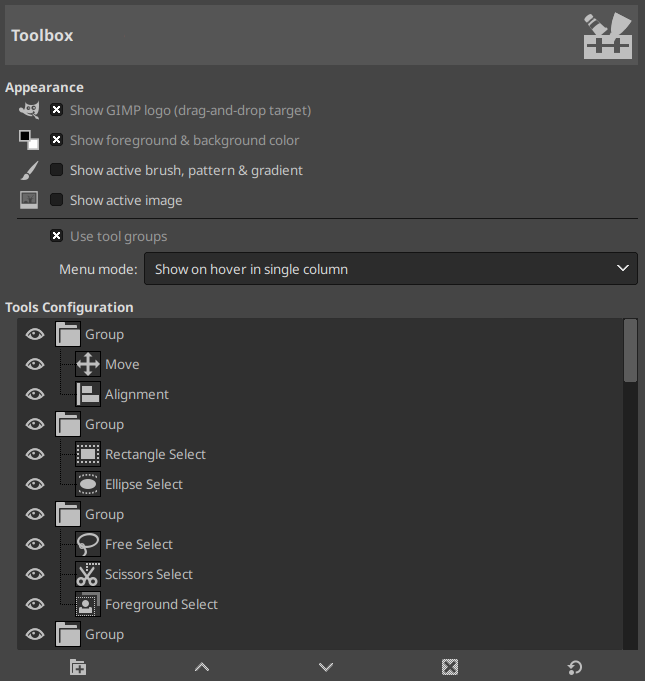
This page lets you customize the appearance of the Toolbox, by deciding whether the three „context information“ areas should be shown at the bottom.
Zobrazování
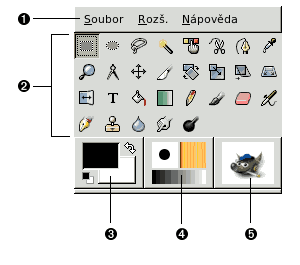
You can click-drag-and-drop an image from a file browser into this area to open it.
Controls whether the color area on the left (2) appears in the Toolbox.
Controls whether the area in the center (3), with the brush, pattern, and gradient icons, appears in the Toolbox.
Controls whether a preview of the currently active image appears on the right (4).
Since GIMP-2.10.18, tools can be grouped in the toolbox (see 1.2 – „Tool Icons“).
Tools configuration
In this list, tools with an eye are present in the Toolbox. By default, color tools have no eye: you can add them to the Toolbox by clicking the corresponding checkbox to create an eye.
Since GIMP-2.10.18, tools are grouped. You can:
Move groups by using drag-and-drop or the arrow buttons at the bottom of the dialog.
Create a new group by using the at the bottom of the dialog. This tool group is created empty.
Changes take effect immediately.
Obrázek 12.16. Help System Preferences
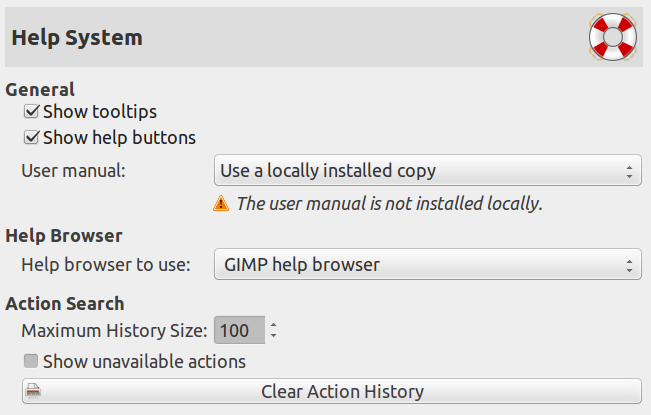
This page lets you customize the behavior of the GIMP help system.
Všeobecné
Tool tips are small help pop-ups that appear when the pointer hovers for a moment over some element of the interface, such as a button or icon. Sometimes they explain what the element does; sometimes they give you hints about non-obvious ways to use it. If you find them too distracting, you can disable them here by unchecking this option. We recommend that you leave them enabled unless you are a very advanced user.
This option controls whether the help buttons are shown on every tool dialog, which may be used alternatively to invoke the help system.
This drop-down list lets you select between Use a locally installed copy and Use the online version. See 12.2 – „Help“.
Prohlížeč nápovědy
GIMP Help is supplied in the form of HTML files, i.e., web pages. You can view them using either a special help browser that comes with GIMP, or a web browser of your choice. Here you choose which option to use. Because the help pages were carefully checked to make sure they work well with GIMP's browser, whereas other web browsers are somewhat variable in their support of features, the safer option is to use the internal browser; but really any modern web browser should be okay.
|
|
Poznámka |
|---|---|
|
Note that the GIMP help browser is not available on all platforms. If it is missing, this option is hidden and the standard web browser will be used to read the help pages. |
Action Search
Default value is 100 (0-1000) items in the history.
When this check-box is enabled, a search of actions will also return inactive actions.
Self-explanatory.
Obrázek 12.17. Předvolby zobrazování
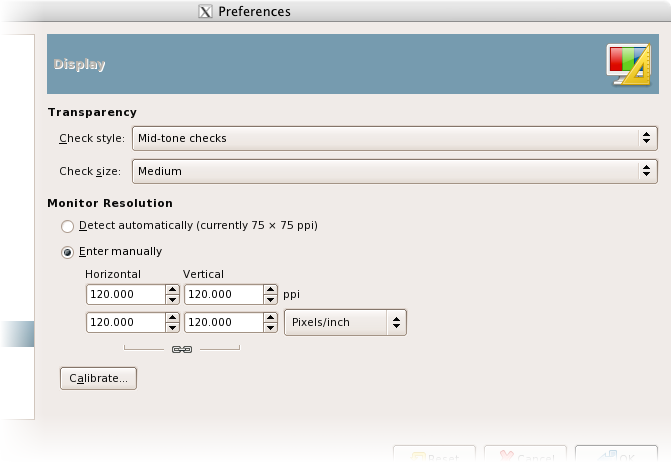
Tato stránka umožňuje nastavit způsob zobrazování průhledných částí obrázku a také zkalibrovat monitor pro přesné zobrazování rozměrů.
Transparency
Ve výchozím nastavení zobrazuje GIMP průhlednost jako šachovnici se středně tmavými poli. Zde lze nastavit jiné zbarvení šachovnice nebo jednolitou bílou, šedou či černou barvu.
Zde lze nastavit velikost polí šachovnice použité pro zobrazování průhlednosti.
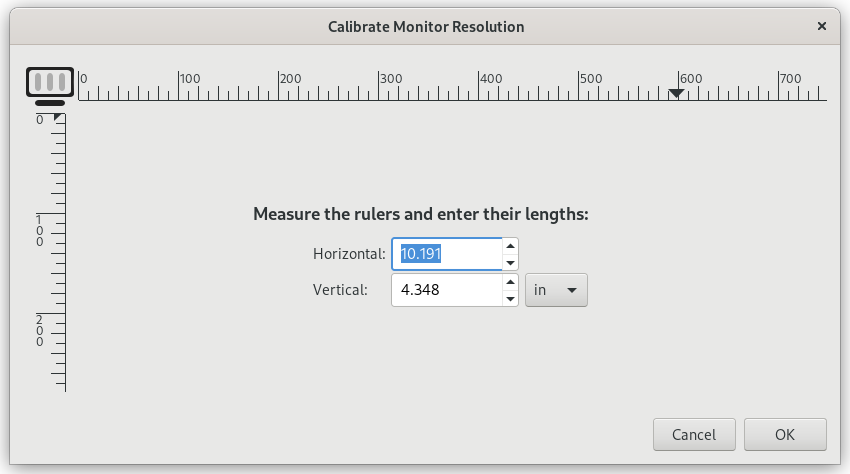
Rozlišení monitoru (v dpi) je poměr pixelů (ve vodorovném a svislém směru) k palcům. Můžete ho nastavit třemi způsoby:
Ze systému oken (nejjednodušší, ale nejspíš velice nepřesné).
Nastavit ručně.
Stisknout tlačítko Kalibrovat.
My monitor was impressively off when I tried the Calibrate Dialog. The „Calibrate Game“ is fun to play. You will need a soft ruler.
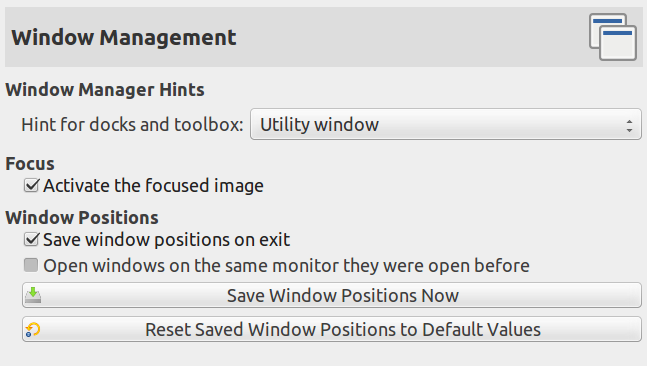
This page lets you customize the way windows are handled in GIMP. You should note that GIMP does not manipulate windows directly, instead it sends requests to the window manager (i.e., to Windows if you are running in Windows; to Mutter if you are running in a standard GNOME setup in Linux; etc). Because there are many window managers, and not all of them are well behaved, it cannot be guaranteed that the functions described here will actually work as described. However, if you are using a modern, standards-compliant window manager, they ought to.
Nápovědy správce oken
The choices you make here determine how the Toolbox, and the docks that hold dialogs, will be treated. You have three possibilities for them:
If you choose Normal Window, they will be treated like any other windows.
If you choose Utility Window, the reduce button in the title bar is absent and the docks will remain permanently on your screen.
If you choose Keep above, they will be kept in front of every other window at all times.
Note that changes you make here will not take effect until the next time you start GIMP.
Aktivace
Normally, when you focus an image window (usually indicated by a change in the color of the frame), it becomes the „active image“ for GIMP, and therefore the target for any image-related actions you perform. Some people, though, prefer to set up their window managers such that any window entered by the pointer is automatically focused. If you do this, you may find that it is inconvenient for focused images to automatically become active, and may be happier if you uncheck this option.
Polohy oken
Pokud je tato volba zaškrtnuta, uloží se automaticky při ukončení Gimpu polohy jeho oken, takže při příštím spuštění Gimpu se objeví stejná okna na stejných místech na obrazovce.
This button is only useful if „Save window positions on exit“ is unchecked. It allows you to set up your windows they way you like, click the button, and then have them come up in that arrangement each time you start GIMP.
Pokud uložené polohy oken nevyhovují, lze se vrátit k výchozím polohám jednoduchým kliknutím na toto tlačítko.
Obrázek 12.21. Všeobecné předvolby pro okna obrázku
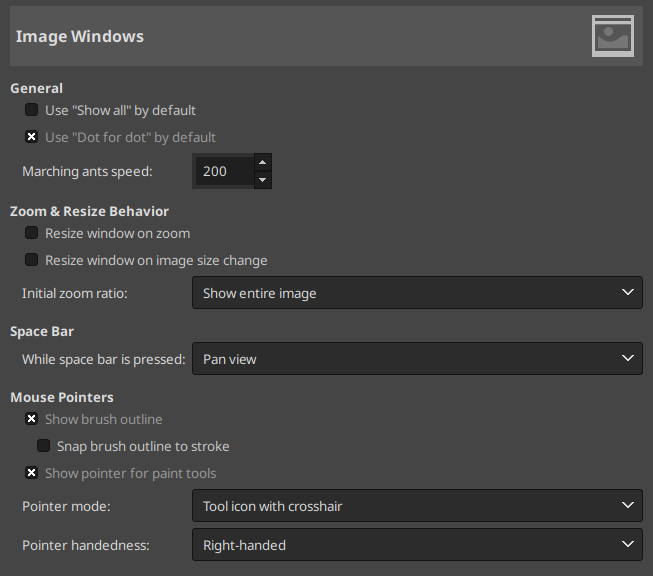
This page lets you customize several aspects of the behavior of image windows.
Všeobecné
Please refer to 5.3 – „Show All“ to understand this option.
Using „Dot for dot“ means that at 1:1 zoom, each pixel is the image is scaled to one pixel on the display. If „Dot for dot“ is not used, then the displayed image size is determined by the X and Y resolution of the image. See the Scale Image section for more information.
When you create a selection, the edge of it is shown as a dashed line with dashes that appear to move, marching slowly along the boundary: they are jokingly called „marching ants“. The smaller the value entered here, the faster the ants march (and consequently the more distracting they are!).
Chování přibližování a změny velikosti
Pokud je tato volba aktivní, mění se při změně přiblížení obrázku automaticky i velikost okna. Pokud aktivní není, zůstává velikost okna stejná bez ohledu na přibližování.
Pokud je tato volba aktivní, změní se automaticky velikost okna obrázku při každé změně velikosti obrázku, ať už ořezem nebo změnou velikosti. Není-li tato volba zaškrtnuta, velikost okna se v takovýchto situacích nemění.
Zde lze zvolit, zda se mají obrázky otvírat s přiblížením umožňujícím jejich pohodlné zobrazení na displeji, nebo zda se mají otevírat se 100% přiblížením. Pokud je zvolena druhá možnost a obrázek je přiliš veliký, bude po otevření viditelná jen jeho část (je ovšem samozřejmě možné prohlížet obrázek celý pomocí rolovacích lišt).
Kurzory myši
Pokud je tato volba aktivní, je při použití kreslícího nástroje zobrazován obrys aktivní stopy přímo v obrázku na místě kurzoru. Na pomalých počítačích to může způsobovat problémy chvilková zaseknutí Gimpu, proto je zde možné tuto volbu vypnout. Jinak je velmi užitečná, protože dává uživateli přesnou představu o oblasti ovlivněné nástrojem.
Pokud je tato volba aktivní, zobrazuje se nad obrázkem (kromě případného obrysu stopy) i klasický kurzor. Jeho typ je určen následující volbou.
Tato volba má vliv pouze, je-li zaškrtnuta volba Zobrazovat kurzor kreslícího nástroje. Zde lze volit mezi třemi typy kurzoru: Ikona nástroje zobrazuje kurzor v podobě malé ikony aktivního nástroje. Ikona nástroje s nitkovým křížem doplňuje kurzor o zaměřovací kříž označující střed. Pouze nitkový kříž zobrazuje pouze tento kříž, pro všechny nástroje stejný.
This option decides the direction of the pointer. The default is Right-handed. When Left-handed is chosen, the pointer is flipped horizontally.
Obrázek 12.22. Výchozí nastavení předvoleb Vzhled okna obrázku
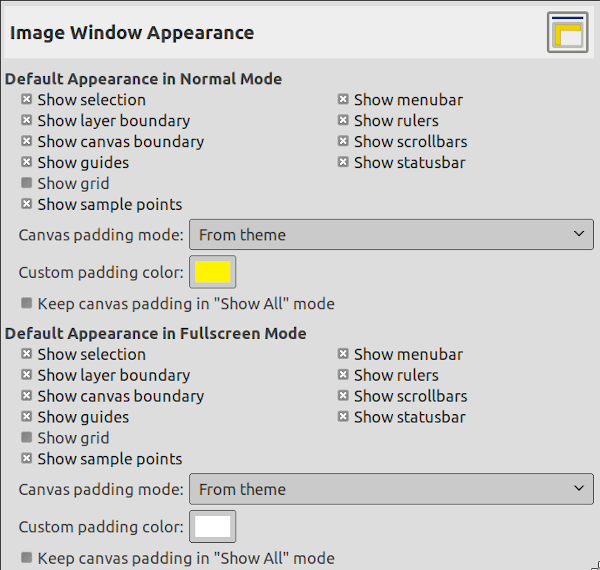
This page lets you customize the default appearance of image windows, for normal mode and for fullscreen mode. All of the settings here can be altered on an image-specific basis using entries in the View menu.
The only parts that may need further explanation are the ones related to padding. „Padding“ is the color shown around the edges of the image. You can choose among four colors for the padding color: to use the color specified by the current theme; to use the light or dark colors specified for checks, such as represent transparent parts of the image; or to use a custom color, which can be set using the color button for „Custom padding color“.
Keep canvas padding in Show All mode: in this mode (5.3 – „Show All“), you can see pixels outside the canvas. When this option is not checked, the area outside the canvas is filled with a checkerboard pattern, even if you have selected a custom padding color. When the option is checked, the canvas has the custom padding color.
Obrázek 12.23. Example
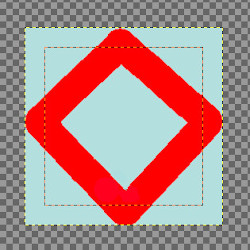
Padding color is yellow. „Keep canvas padding“ is not checked.

Padding color is yellow. „Keep canvas padding“ is checked.
Obrázek 12.24. Formát titulku a stavové lišty obrázku
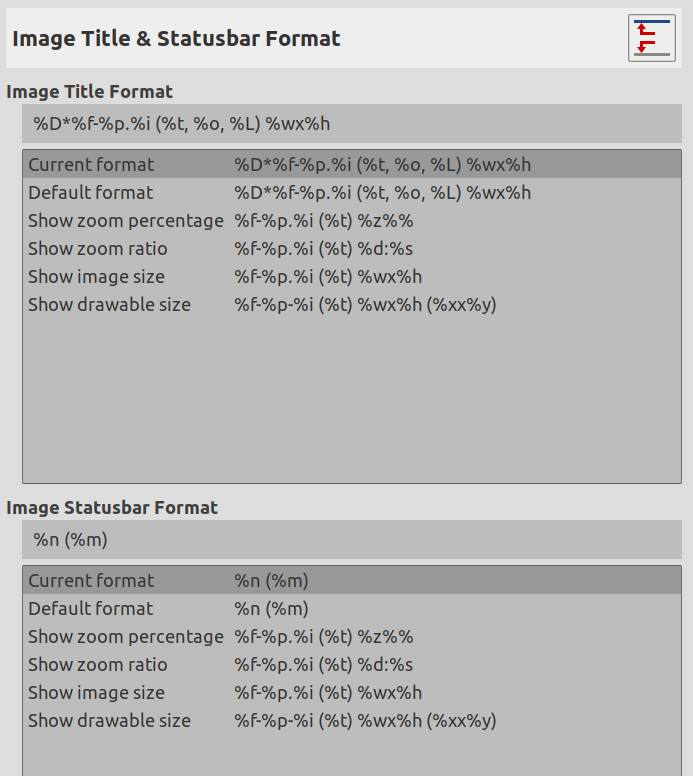
Na této kartě lze nastavit text titulku okna obrázku a jeho stavové lišty. Titulek by se měl zobrazovat nad obrázkem, záleží do ovšem na správci oken, není to proto zaručeno ve všech případech. Stavová lišta se zobrazuje pod obrázkem, na pravé straně. Více informací viz část Okno obrázku.
You can choose among several predesigned formats, or you can create one of your own, by writing a format string in the entry area. Here is how to understand a format string: anything you type is shown exactly as you type it, with the exception of variables, whose names all begin with „%“. Here is a list of the variables you can use:
| Proměnná | Meaning |
|---|---|
| %f | Bare filename of the image, or „Untitled“ |
| %F | Full path to file, or „Untitled“ |
| %p | Unikátní identifikační číslo (ID) obrázku |
| %i | Číslo pohledu, pokud je obrázek zobrazen vícekrát |
| %t | Typ obrázku (RGB, stupně šedi, indexovaný) |
| %z | Stupeň přiblížení v procentech |
| %s | Source scale factor (zoom level = %d/%s) FIXME |
| %d | Destination scale factor (zoom level = %d/%s) FIXME |
| %Dx | Pokud je obrázek nečistý, expanduje do x, jinak nic. |
| %Cx | Expanduje do x, pokud je obrázek čistý, jinak nic. |
| %l | Počet vrstev |
| %L | Počet vrstev (dlouhá forma) |
| %m | Paměť používaná obrázkem |
| %n | Jméno aktivní vrstvy či kanálu |
| %P | ID aktivní vrstvy či kanálu |
| %w | Šířka obrázku v pixelech |
| %W | Šířka obrázku ve fyzických jednotkách |
| %h | Výška obrázku v pixelech |
| %H | Výška obrázku ve fyzických jednotkách |
| %u | Značka jednotky (např. px pro pixely) |
| %U | Zkratka jednotky |
| %% | A literal „%“ symbol |
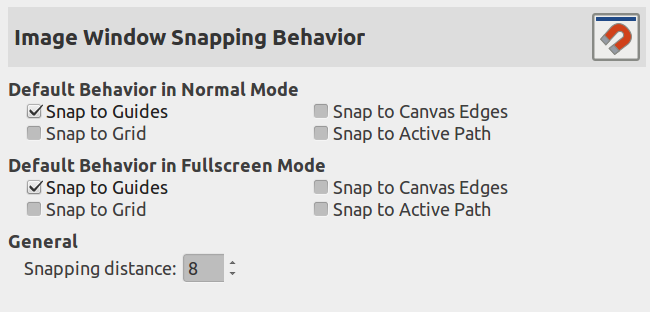
This page allows you to customize snapping in the image. Only Snap to Guides is activated by default. You can also check Snap to Grid, Snap to Canvas Edges and Snap to Active Path, in normal mode and fullscreen mode.
Snapping distance is the activation distance of snapping, in pixels. Default value is 8 pixels (1-255).
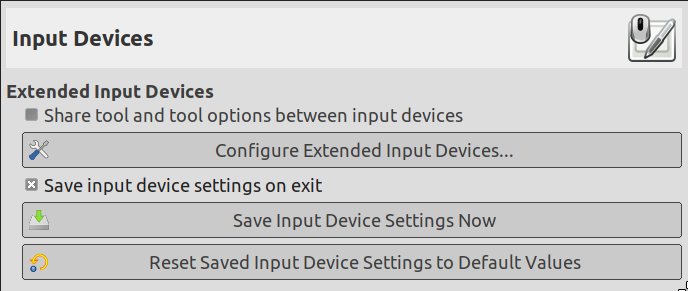
Rozšířená vstupní zařízení
When enabled, the same tool and tool options will be used for all input devices. No tool switching will occur when the input device changes.
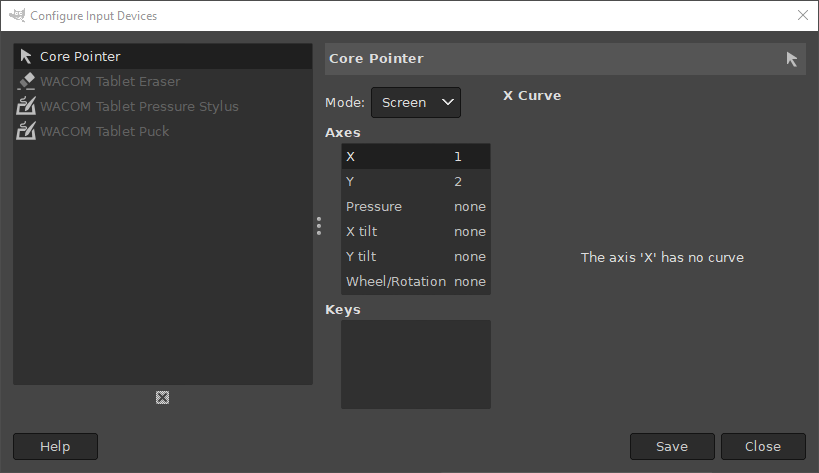
This large button allows you to set the devices associated with your computer: tablet, MIDI keyboard, etc. If you have a tablet, you will see a dialog like this:
When you check this box, GIMP remembers the tool, color, pattern, and brush you were using the last time you quit.
Self-explanatory.
Delete your settings and restore default settings.
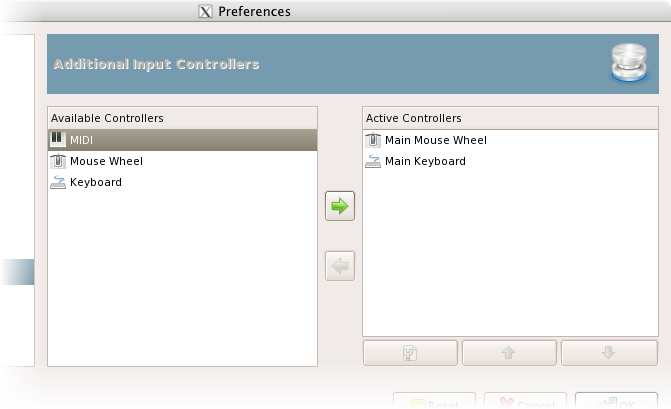
This dialog has two lists of additional input controllers: Available Controllers on the left, Active Controllers on the right. It is used to enable or disable an input device and configure it.
A click on an item will highlight it and you can move the controller from one list to the other by clicking on the respective arrow key. When you try to move a controller from the list of active controllers to the available controllers, a dialog pops up and you will have the choice of removing the controller or just disabling it.
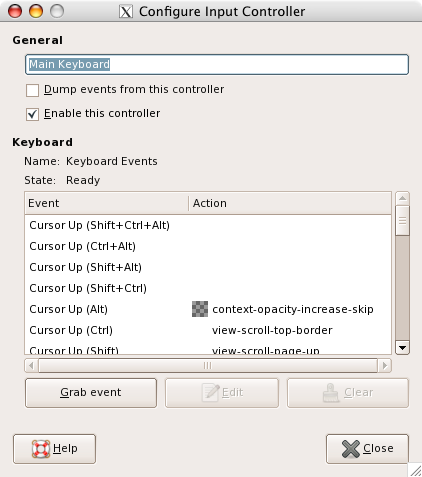
When you double click on a (typically active) controller or alternatively click on the Edit button at the bottom of the list, you can configure this controller in a dialog window:
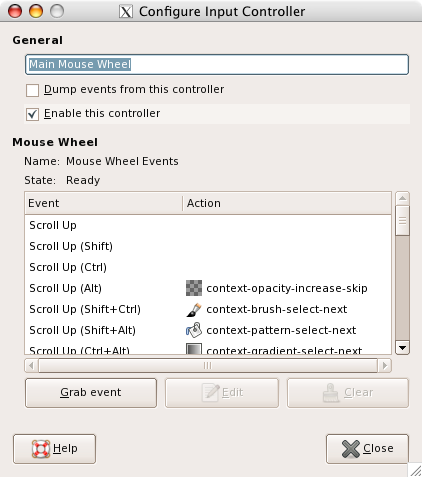
Main Mouse Wheel
This option must be checked if you want a print on the stdout of the events generated by the enabled controllers. If you want to see those event you should start GIMP from a terminal or making it to print the stdout to file by the shell redirection. The main use of this option is for debug.
This option must be checked if you want to add a new action to the mouse wheel.
In this window with scroll bars you have: on the left, the possible events concerning the mouse wheel, more or less associated with control keys; on the right, the action assigned to the event when it will happen. You have also two buttons, one to the selected event, the other to the action of the selected event.
Some actions are assigned to events yet. They seem to be examples, as they are not functional.
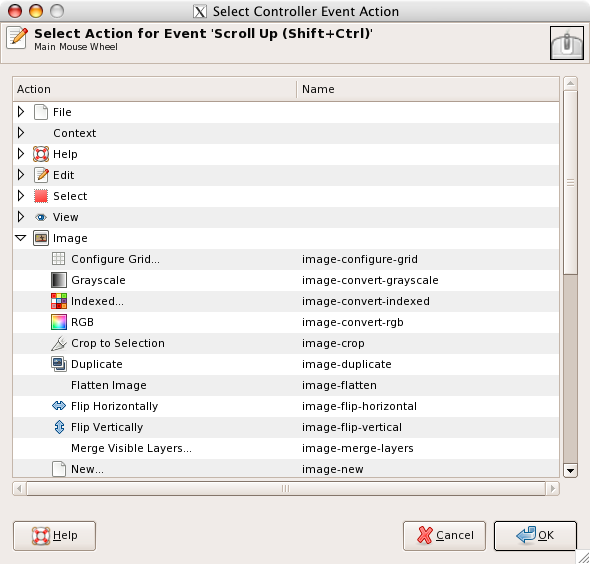
After selecting an event, if you click on the button, you open the following dialog:
If an action exists yet for this event, the window will open on this action. Else, the window will display the sections that order actions. Click on an action to select it.
Main Keyboard
|
|
Poznámka |
|---|---|
|
You will find an example of these notions in Creating a variable size brush . |
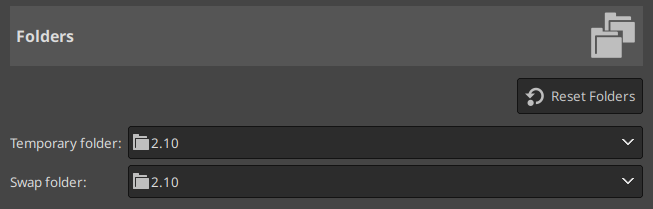
Na této kartě předvoleb lze nastavit umístění dvou důležitých adresářů používaných pro uchovávání dočasných souborů Gimpu. Dceřiné karty pak umožňují upravit umístění adresářů, ve kterých GIMP hledá své zdroje, například stopy (viz Adresáře s daty). Adresáře lze změnit přímou editací cesty nebo kliknutím na tlačítka vpravo a použitím dialogu pro výběr souborů.
Adresáře
Tento adresář se používá pro dočasné soubory, tj. soubory, které se automaticky vytváří k dočasnému uložení pracovních dat a jsou smazány ještě během stejného pracovního sezení s Gimpem. Není k tomu zapotřebí mnoho prostoru ani vysoký výkon. Ve výchozím nastavení se k tomuto účelu používá podadresář tmp uživatelského GIMP adresáře. Pokud je však disk plný nebo trpí vážnými výkonnostními problémy, lze použít jiný adresář, na jiném disku. Zvolený adresář musí existovat a uživatel do něj musí mít právo k zápisu, jinak se budou dít velmi ošklivé věci.
This is the folder used as a „memory bank“ when the total size of images and data open in GIMP exceeds the available RAM. If you work with very large images, or images with many layers, or have many images open at once, GIMP can potentially require hundreds of megabytes of swap space, so available disk space and performance are definitely things to think about for this folder. By default, it is set to your personal GIMP directory, but if you have another disk with more free space, or substantially better performance, you may see a significant benefit from moving your swap folder there. The directory must exist and be writable by you.
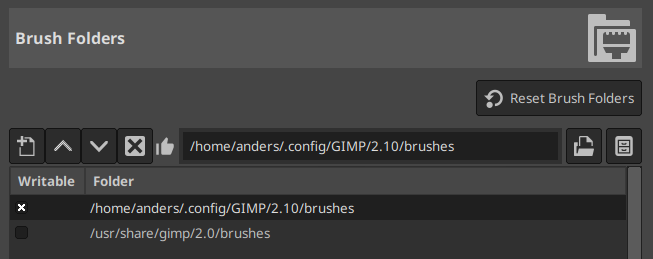
GIMP uses several types of resources – such as brushes, patterns, gradients, etc. – for which a basic set are supplied by GIMP when it is installed, and others can be created or downloaded by the user. For each such resource type, there is a Preference page that allows you to specify the search path: the set of directories from which items of the type in question are automatically loaded when GIMP starts. These pages all look very much the same: the page for brushes is shown above as an example.
By default, the search path consists of two folders: a system folder, where items that are included with GIMP are placed, and a personal folder, inside your personal GIMP directory, where items added by you should be placed. The system folder should not be marked as writable, and you should not try to alter its contents. The personal folder must be marked as writable or it is useless, because there is nothing inside it except what you put there.
Tlačítky v horní části dialogu můžete vyhledávací cestu upravovat.
Options
Pokud kliknete na některý z adresářů v seznamu, je vybrán pro další akci.
If you type the name of a folder in the entry space, or navigate to
it using the file chooser button
 on the right, and then click the left button, this will replace the
selected folder with the one you have specified. If nothing in the
list is selected, the folder will be added to the list.
on the right, and then click the left button, this will replace the
selected folder with the one you have specified. If nothing in the
list is selected, the folder will be added to the list.
The icon to the left of the text entry area will change when the folder you have specified does not exist. GIMP will not create it for you, so you should do this yourself. Depending on the icon-theme you use, the icon mentioned above will change from green to red, or from thumbs-up to thumbs-down, to notify you of a non-existent folder.
Klikáním na tlačítka se šipkami lze adresáře v seznamu přesouvat.
If you click on the button that shows the trash-can or X icon, depending on the icon theme used, the selected folder will be deleted from the list. Note that the folder itself is not affected; it is merely removed from the search path. Deleting the system folder is probably a bad idea, but nothing prevents you from doing it.