| 4.4. Diàleg de les plantilles | ||
|---|---|---|

|
4. Diàlegs relacionats amb la gestió de la imatge |  |
| 4.4. Diàleg de les plantilles | ||
|---|---|---|
|
|
4. Diàlegs relacionats amb la gestió de la imatge | |
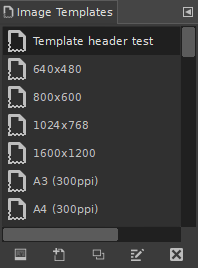
Les plantilles són paràmetres d'imatges predefinides que podeu utilitzar per crear ràpidament una nova imatge amb les dimensions, la resolució, etc. preferides. El GIMP inclou moltes plantilles instal·lades, però també podeu crear-ne de vostres. Quan creeu una imatge nova, podeu accedir a la llista de plantilles existents per triar-ne una i utilitzar-la com a base per a la vostra nova imatge. El diàleg «Plantilles» us permet gestionar-les.
El diàleg de les «Plantilles» és un diàleg acoblable; consulteu la secció Secció 2.3, «Diàlegs i acobladors» per a obtenir ajuda sobre el seu ús.
Podeu accedir-hi:
des del menú de la imatge: → → .
des del menú d'un altre diàleg acoblable i fent clic sobre  i seleccionant → .
Se selecciona una plantilla simplement fent clic en la seva icona. Fer clic dret fa aparèixer un menú local amb les mateixes funcions que els botons.
En el menú de la pestanya del diàleg de les «Plantilles», podeu triar entre i . En mode graella, les plantilles es mostren en una taula d'icones idèntiques (tret que s'hagi assignat una icona en particular, com es veurà més endavant). Només es mostra el nom de la plantilla seleccionada. En mode llista, les plantilles s'alineen verticalment; les icones són idèntiques i es mostren tots els noms.
En aquest menú de la pestanya, l'opció Previsualitza la mida permet canviar la mida de les icones.
![[Suggeriment]](images/tip.png)
|
Suggeriment |
|---|---|
|
Ctrl+F obre un camp de cerca. Consulteu Visualitza com a llista; Visualitza com a graella |
Els botons de la part inferior del diàleg permeten operar sobre les plantilles de diverses maneres:
 Crea una imatge nova a partir de la plantilla seleccionada
Fent clic en aquest botó es crea una nova imatge amb la configuració definida en la plantilla seleccionada.
Fent clic en aquest botó, s'obre el diàleg Plantilla nova, idèntic al diàleg Edita la plantilla, que veurem més a baix.
 Duplica la plantilla seleccionada
En fer clic en aquest botó, s'obre el diàleg Edita la plantilla que s'explica a continuació.
 Edita la plantilla seleccionada
En fer clic en aquest botó, s'obre el diàleg Edita la plantilla on podreu ajustar la configuració relacionada amb la imatge per a la plantilla seleccionada.
Això suprimirà la plantilla seleccionada després de demanar confirmació.
|
|
Suggeriment |
|---|---|
|
Cada plantilla es desa en un fitxer |
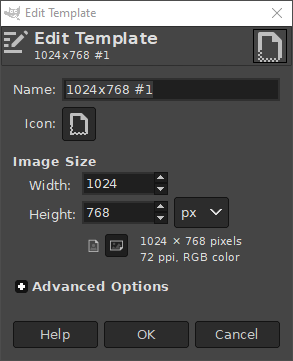
El diàleg us permet configurar les especificacions de la plantilla seleccionada.
Podeu accedir en aquest diàleg fent clic al botó que trobareu a sota del Diàleg Plantilles
Opcions
En aquest quadre de text, podreu modificar el nom de la plantilla.
En fer clic en aquesta icona, podreu seleccionar una icona diferent que es mostrarà davant del nom d'aquesta plantilla. La icona es pot triar des d'una llista d'icones predefinides, des d'un fitxer de l'ordinador o enganxant-la des del porta-retalls.
Ací s'ajusta l'amplada i l'alçada de la imatge nova. La unitat per defecte és el píxel, però es pot canviar a una altra unitat utilitzant el menú adjunt. Si ho feu, tingueu en compte que la mida resultant del píxel determinarà la resolució X i Y (que es pot canviar en les opcions avançades) i la configuració de «Punt a Punt», que es pot canviar en el menú .
Aquests botons commuten entre els modes Retrat i Paisatge. L'efecte és intercanviar els valors d'Amplada i Alçada. Si les resolucions X i Y són diferents (en opcions avançades), aleshores aquests valors també es poden intercanviar. A la dreta hi ha la mida de la imatge, la resolució i l'espai de color.
Opcions avançades
Les opcions avançades permeten canviar diversos paràmetres d'imatges addicionals.
Aquests valors entren en joc per a la impressió: no afecten la mida de la imatge en píxels, sinó que determinen la seva mida en el paper quan s'imprimeix. També poden afectar la manera en com la imatge es mostra en el monitor: si «Punt a punt» està desactivat en el menú , llavors, en una ampliació del 100%, el GIMP intentarà mostrar la imatge amb la mida i la resolució correcta. Però la visualització pot no ser exacta si no s'ha calibrat el monitor. Això es pot fer quan s'instal·la el GIMP o des de la pestanya de visualització en el diàleg preferències.
Podeu crear una nova imatge tant en RGB com en escala de grisos. Podeu crear una imatge indexada directament d'aquesta manera, però per descomptat res impedeix convertir la imatge a mode indexada després d'haver-la creada.
Podeu seleccionar la precisió que utilitzarà el GIMP per a aquesta imatge. Per a més informació, consulteu la documentació del menú Precisió.
Podeu seleccionar si voleu utilitzar Gamma perceptiva o llum lineal. Per a més informació, consulteu també la documentació del menú Precisió.
Quan estigui activat, la imatge es gestionarà pel color. Desactivar la gestió del color és equivalent a triar un perfil sRGB integrat.
Ací podeu seleccionar el perfil de color per a aquesta imatge. El predeterminat és el perfil de color sRGB integrat, però també podeu seleccionar el vostre propi perfil de color des d'un fitxer de l'ordinador.
Teniu cinc opcions per omplir la capa de fons de la nova imatge:
Color del primer pla, utilitza el color del primer pla del moment tal com es mostra a la Caixa d'eines.
Color de fons, utilitza el color de fons actual tal com es mostra a la Caixa d'eines.
Blanc, utilitza el blanc per a la capa del fons.
Transparència. Si s'escull aquesta opció, aleshores la capa del fons de la nova imatge es crearà amb un canal alfa; no en cas contrari. La capa del fons serà transparent.
Patró, utilitza el patró actiu en el moment de crear la imatge per omplir la capa del fons.
Ací podeu afegir un comentari predeterminat que s'adjuntarà a la imatge. En exportar aquesta imatge, també s'afegirà el comentari per als formats de fitxer que admeten comentaris. Encara podreu canviar aquest comentari al diàleg d'exportació.