| 4. Diàlegs relacionats amb la gestió de la imatge | ||
|---|---|---|

|
Capítol 15. Diàlegs |  |
| 4. Diàlegs relacionats amb la gestió de la imatge | ||
|---|---|---|
|
|
Capítol 15. Diàlegs | |
Les memòries intermèdies són una mena d'emmagatzematge temporal de dades d'imatge que es creen quan es retalla o copia part d'un dibuixable (una capa, una màscara de capa, etc.). Les ordres següents estan disponibles al menú , són per a desar una imatge a una memòria intermèdia:
→ → Aquesta ordre retalla la part seleccionada del dibuixable actual (normalment una capa) i el col·loca en una memòria intermèdia. Si no hi ha selecció, s'utilitzarà tot el dibuixable. Se us demanarà que doneu un nom a la memòria intermèdia. La imatge s'eliminarà de la selecció un cop fet això.
→ → Aquesta ordre copia la part seleccionada del dibuixable actual (normalment una capa) i el col·loca en una memòria intermèdia. Si no hi ha selecció, s'utilitzarà tot el dibuixable. Se us demanarà que doneu un nom a la memòria intermèdia.
→ → Aquesta ordre copia la part seleccionada de tots els dibuixables visibles i la col·loca en una memòria intermèdia. Si no hi ha selecció, s'utilitzarà la imatge sencera. Se us demanarà que doneu un nom al memòria intermèdia.
→ → Aquesta ordre del menú obre el Diàleg de memòria intermèdia. Per enganxar una memòria intermèdia, trieu un dels botons d'aquest diàleg o del menú contextual. Tots dos s'explicaran a continuació.
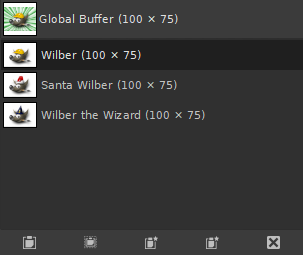
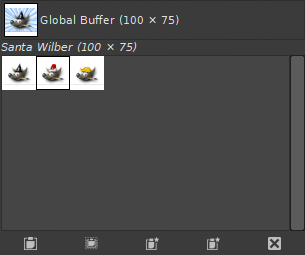
El diàleg de la «Memòria intermèdia» mostra el contingut de totes les memòries intermèdies existents, i permet operar amb elles de diverses maneres. També mostra, en la part superior, el contingut de la memòria intermèdia (el contingut del porta-retalls), però és només una mostra: no s'hi pot fer res. No hi ha cap límit amb el nombre de memòries intermèdies amb nom que podeu crear, excepte que consumirà una part de la memòria disponible de l'ordinador.
![[Atenció]](images/caution.png)
|
Atenció |
|---|---|
|
Les memòries intermèdies no es desen d'una sessió a una altra: desapareixeran quan tanqueu el GIMP. Només es pot desar el seu contingut enganxant-lo en les imatges. |
Aquest diàleg és un diàleg acoblable; mireu la secció Secció 2.3, «Diàlegs i acobladors» sobre el seu ús.
Podeu accedir-hi:
des del menú principal: → → ;
des del menú principal: → → ;
des del menú de la pestanya en qualsevol diàleg acoblable fent clic a  i seleccionant → .
En el menú , hi ha una llista de finestres separades que només existeix si almenys un diàleg roman obert. En aquest cas, podeu obrir el diàleg «Memòria intermèdia» des del menú de la imatge: → .
Fer clic sobre una memòria intermèdia fa que sigui activa, per exemple, la que s'utilitzarà amb l'ordre enganxa del menú contextual de les memòries intermèdies o amb els botons de baix del diàleg. En fer un doble clic sobre una memòria intermèdia, el seu contingut s'enganxarà en la imatge activa com una selecció flotant; és una drecera de l'ordre «Enganxa la memòria intermèdia».
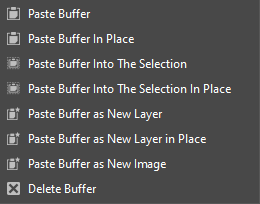
A baix del diàleg hi ha cinc botons. Les operacions que realitzen són accessibles des del menú de la memòria intermèdia que s'obté fent clic dret sobre la memòria intermèdia activa.
En el menú de la pestanya del diàleg de la «memòria intermèdia», es pot triar entre i . En mode graella, les memòries intermèdies es dipositen en una taula rectangular. En mode llista s'alineen verticalment, cada fila mostra una miniatura dels continguts de la memòria intermèdia, el nom, i les dimensions en píxels.
![[Suggeriment]](images/tip.png)
|
Suggeriment |
|---|---|
|
Ctrl+F obriu un camp de cerca. Mireu Visualitza com a llista; Visualitza com a graella |
Es pot canviar la mida de les previsualitzacions de la memòria intermèdia en el diàleg utilitzant el submenú «Previsualitza la mida» del diàleg en el menú de la pestanya.
En la part inferior del diàleg hi trobareu uns quants botons:
Aquesta ordre enganxa el contingut de la memòria intermèdia seleccionada en la imatge activa, com una selecció flotant. L'única diferència amb l'ordre Enganxa és que utilitza la memòria intermèdia seleccionada en lloc de la memòria intermèdia del porta-retalls general del GIMP.
La tecla Maj premuda enganxa la memòria intermèdia a la seva ubicació original.
Aquesta ordre enganxa el contingut de la memòria intermèdia seleccionada en la selecció de la imatge activa, com una selecció flotant. L'única diferència entre aquesta i l'ordre ordinària Enganxa-ho dins la selecció és que utilitza la memòria intermèdia seleccionada en lloc de la memòria intermèdia del porta-retalls general del GIMP.
La tecla Maj premuda enganxa la memòria intermèdia en la selecció activa, a la seva ubicació original.
Aquesta ordre crea una nova capa en la imatge activa fora del contingut de la memòria intermèdia seleccionada. L'única diferència entre aquesta i l'ordre ordinària Enganxa com a imatge nova és que utilitza la memòria intermèdia seleccionada en lloc del contingut de la memòria intermèdia del porta-retalls global.
Amb la tecla Maj premuda, es crea la capa a la ubicació original de la memòria intermèdia.
Aquesta ordre crea una nova imatge d'una sola capa fora del contingut de la memòria intermèdia seleccionada. L'única diferència amb l'ordre Enganxa com a nou és que utilitza la memòria intermèdia seleccionada en lloc del contingut de la memòria intermèdia del porta-retalls.
Aquesta ordre elimina la memòria intermèdia seleccionada, sense demanar confirmació. No es pot eliminar la memòria intermèdia global.