| 4.4. Dialogvindauget «Biletmalar» | ||
|---|---|---|

|
4. Dialogvindauge relaterte til bilethandsaminga |  |
| 4.4. Dialogvindauget «Biletmalar» | ||
|---|---|---|
|
|
4. Dialogvindauge relaterte til bilethandsaminga | |
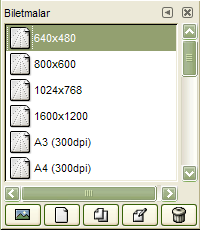
Malar er førehandsdefinerte biletinnstillingar som du kan bruka til å raskt laga eit nytt bilete med dei dimensjonane, oppløysninga osv. som du likar. GIMP kjem med mange installerte malar, men du kan også laga dine eigne. Når du opprettar eit nytt bilete, kan du få tilgang til lista over malar dpm finst frå før for å velja ein som skal brukast som base for det nye biletet. Du kan administrera desse malane i dialogvindauget «Malar».
Vindauget «Malar» er eit dokkpanel som kan limast inn i andre dialogvindauge. Sjå nærare om dette i Del 2.3, «Dialogvindauge og dokkpanel».
Du har tilgang til det:
frå biletmenyen via → → .
frå fanemenyen i kva dokkpanel som helst ved å klikka på fana  og velja → .
Du vel ein mal ved å klikka på ikonet. Dersom du høgreklikkar på ikonet, kjem det opp ein meny med dei same funksjonane som for knappane nedst i dialogvindauget.
I fanemenyen for «biletmalar» kan du velja mellom og . Dersom du ikkje har gjeve malane bestemte ikon (sjå nedanfor korleis du gjer det), vil tabellforma visa ei oppstilling med likeforma ikon. Øvst i vindauget finn du namnet på den valde malen. Dersom du i staden vel listeform, som er den vanlege, vert malane lista opp under kvarandre med ikon og namn.
Frå fanemenyen kan du også bruka menyoppføringa Storleik på førehandsvisinga for å visa ikona i eit høveleg format.
![[Tips]](images/tip.png)
|
Tips |
|---|---|
|
tastekombinasjonen Ctrl + F i ei liste vil opne eit søkefelt. Sjå Vis som liste/rutenett |
Desse knappane gjev deg høve til å utføre ein del operajonar på biletmalane:
 Opprett eit nytt bilete frå den valde malen
Klikk på denne knappen for å opna eit nytt bilete med dei same innstillingane som er definerte i den valde malen.
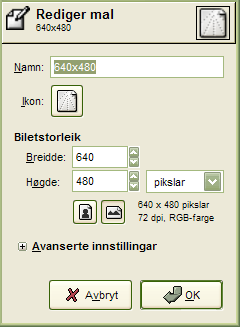
Klikk på denne knappen for å opna dialogvindauget ny mal. Dette er det same dialogvindauget som vert brukt for å redigera malen, som er vist nedanfor.
 Kopier den valde malen
Trykk på denne knappen for å opna dialogvindauget for å redigera malen. Dette er forklart nedanfor.
 Rediger den valde malen
Klikk på denne knappen for å opna dialogvindauget Rediger malder du kan justera dei biletrelaterte innstillingane for den valde malen.
Dette slettar den valde malen etter å ha bede om stadfesting.
|
|
Tips |
|---|---|
|
Alle malane er lagra i ei |
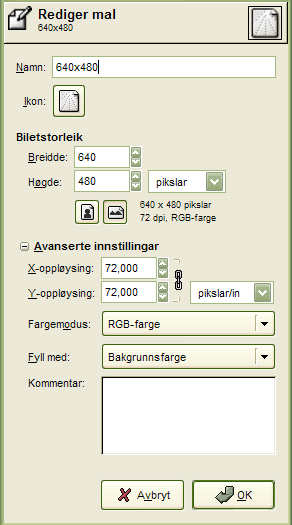
Dette dialogvindauget gjev deg høve til å endra alle innstillingane i den valde malen.
Du har tilgang til dette dialogvindauget frå knappen nedst i dialogvindauget for malar.
Innstillingar
Her kan du endra namnet for malen.
Du kan velja eit anna ikon som skal visast framføre namnet på malen ved å klikka på dette ikonet. Du kan henta ikonet frå ei liste over førehandsdefinerte ikon, frå ei fil i datamaskinen eller ved å lima inn frå utklippstavla.
Her skriv du inn høgd og breidd for det nye biletet. Til vanleg vert desse målt i pikslar, men du kan byta til ei anna måleeining om ønskjeleg frå nedtrekksmenyen. Dersom du gjer dette, må du vera klar over at storleiken i pikslane vert bestemt også ut frå X- og Y-oppløysinga. Denne kan du eventuelt endra i «Avanserte innstillingar». Samstundes bør du også setja i -menyen.
Denne knappen vekslar mellom ståande eller liggjande modus. Det som skjer er at verdiane for Breidd og Høgd vert bytte om. Dersom biletet er sett opp med ulike verdiar for X- og Y-oppløysing, vert også desse verdiane bytte om. Til høgre for desse knappane er det lista opp høgd, breidd, oppløysing og fargemodell brukt i det aktuelle biletet.
Avanserte innstillingar
I dei avanserte vala kan du endra fleire tilleggsinnstillingar for biletet.
Desse innstillingane er helst tenkt brukte dersom du skal skriva ut biletet. Innstillingane endrar ikkje storleiken på bilete i pikslar, men bestemmer kor stort biletet vert på papiret når det vert trykt. Innstillingane kan også påverka korleis biletet vert vist på skjermen. Dersom «Punkt for punkt» er slått av i -menyen og visinga er sett til 100% forstørring i den same menyen, vil GIMP prøva å visa biletet på skjermen i naturleg storleik rekna ut frå pikselverdiane og oppløysinga. Dette under føresetnad av at biletskjermen er korrekt kalibrert. Dersom denne kalibreringa ikkje vart gjort då GIMP vart installert, kan du gjera det frå dialogvindaugetSkjerm i menyen Innstillingar.
Her kan du berre velja mellom RGB eller gråskala. Skulle du ha ønskje om andre fargemodellar, må du omforma til ønskt modell etter at du har laga biletet.
Du kan velja presisjonen GIMP skal bruka på dette biletet. Sjå menydokumentasjonen for Presisjon.
Du kan velja å bruka Perseptuell gamma eller lineært lys. Sjå menydokumentasjonen for Presisjon for meir informasjon.
Når denne er slått på, vert biletet fargestyrt. Slår du av fargestyringa er det det same som å velja ein innebygd sRGB-profil.
Her vel du fargeprofilen for biletet. Standard er den innebygde sRGB-profilen, men du kan også velja din eigen profil frå ei fil i datamaskinen.
Du har fire val for kva slag farge bakgrunnslaget i det nye biletet skal fyllast med:
Forgrunnsfarge er den fargen som er vist som forgrunnsfarge i verktøykassa.
Bakgrunnsfarge er den fargen som er vist som bakgrunnsfarge i verktøykassa.
Kvit, brukar kvit på bakgrunnslaget.
Gjennomsikt. Bakgrunnslaget i det nye biletet vert laga med alfakanal. Bagrunnslaget vert gjennomsiktig.
Mønster, brukar det gjeldande mønsteret for å fylla bakgrunnslaget.
Du kan leggja til ein standard merknad som vert teken opp i biletet. Når biletet vert eksportert, vert merknaden også lagt til i filformat som støttar merknadar. Du kan endra merknaden i dialogvindauget for eksport.