| 2.2. Der Dialog „Kanäle“ | ||
|---|---|---|

|
2. Bildaufbau-bezogene Dialoge |  |
| 2.2. Der Dialog „Kanäle“ | ||
|---|---|---|
|
|
2. Bildaufbau-bezogene Dialoge | |
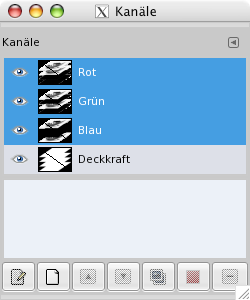
Der Kanaldialog dient der Verwaltung der Kanäle. Der Dialog ist in zwei Bereiche aufgeteilt. Der obere Bereich zeigt die Farbkanäle des jeweiligen Bildes, der untere die angelegten Auswahlmasken.
Color channels apply to the image and not to a specific layer. Basically, three primary colors are necessary to render all the wide range of natural colors. As other digital software, GIMP uses Red, Green, and Blue as primary colors. The first and primary channels display the Red, Green, and Blue values of each pixel in your image.
Next to the channel name is a thumbnail displaying a grayscale representation of each channel, where white is 100% and black is 0% of the primary color. Alternatively, if your image is not a colored but a Grayscale image, there is only one primary channel called Gray. For an Indexed image with a fixed number of known colors there is also only one primary channel called Indexed.
Then there is an optional channel called Alpha. This channel displays transparency values of each pixel in your image (See Alpha Channel in Glossary). In front of this channel is a thumbnail displaying a grayscale representation of the transparency where white is opaque and visible, and black is transparent and invisible. If you create your image without transparency then the Alpha channel is not present, but you can add it from the Layers dialog menu. Also, if you have more than one layer in your image, GIMP automatically creates an Alpha channel.
![[Anmerkung]](images/note.png)
|
Anmerkung |
|---|---|
|
GIMP unterstützt noch keine CMYK- und YUV-Farbmodelle. |
Abbildung 15.11. Bildkomposition durch die Farbkanäle
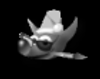
Rot-Kanal
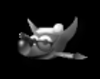
Grün-Kanal
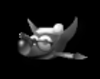
Blau-Kanal

Alphakanal
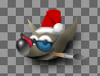
Alle Kanäle
Das rechte Beispielbild besteht aus den vier Kanälen auf der linken Seite (Rot, Grün, Blau und Alpha). Hervorzuheben ist hier die rote Nikolausmütze des Wilber. Diese ist nur im roten Kanal sichtbar. In den anderen Kanälen taucht sie nicht auf.
Der Dialog „Kanäle“ ist dockbar. Informationen hierzu finden Sie im Abschnitt Abschnitt 2.3, „Docks und Dialoge“.
Er kann auf verschiedene Arten aufgerufen werden:
aus dem Bildmenü: → → ,
indem Sie in einem anderen Dialog den Befehl → im Menü unter dem Knopf  auswählen;
Falls ein geöffnetes Dialogfenster „Kanäle“ existiert (z.B. durch Lösen des entsprechenden Reiters), können Sie es aus dem Bildmenü heraus anheben: → .
The channels at the top are the color channels and the optional Alpha channel. They are always organized in the same order and they cannot be removed. In the middle are two lock buttons, that show the lock status for the currently selected channel in the bottom area. The bottom area shows a list of selection masks. Every channel appears in the list with its attributes, including a thumbnail and its name. A right-click in a channel list entry opens the channel context menu.
Above the list of selection mask channels are two check boxes that show the lock attributes state of the currently selected mask channel.
The paintbrush icon shows whether „lock pixels“ is enabled (highlighted) for the current channel. When this is enabled, the channel is locked for any action that changes the pixels, meaning there will be no changes done to this channel.
The cross-with-arrows icon shows whether „lock position and size“ is enabled (highlighted) for the current channel. When this is enabled, the channel is locked for any action that changes the position or size.
Jeder Kanal hat drei Attribute, die ähnlich wie die Ebenenattribute verwendet werden können:

 Sichtbarkeit des Kanals
Standardmäßig ist jeder Kanal und somit jeder Farbanteil eines Bildes für den Benutzer sichtbar. Um die Sichtbarkeit eines Kanals zu verändern, genügt ein Linksklick auf das Augensymbol. Hierdurch wird der entsprechenden Farbanteil des Bildes ausgeblendet, und das Augensymbol verschwindet aus der Spalte. Durch wiederholtes Klicken in den Leerraum wird der Farbanteil des Kanals im Bild wieder sichtbar.
 Kanäle verketten
The channels representing selection masks (in the lower part of the channel list) may be grouped using the button with the „chain“ symbol. All channels that have the chain enabled will be affected in the same way by operations applied to any one of them.
Primary color channels (the default channels in the upper part of the channel list) may be grouped too. By default, all color channels (and the alpha channel) are selected, their list entries are highlighted. Operations will be performed on all channels. By clicking on a channel list entry you can deactivate this channel. Operations like colorizing a layer will then be applied to the selected („grouped“) channels only. Clicking on the deactivated list entry will activate the channel again.
A small preview icon represents the effect of the channel. This preview can be enlarged by holding down the left mouse button on it.
The name of the channel, which must be unique within the image. Double-clicking on the name of a selection mask channel will allow you to edit it. The names of the primary channels (Red, Green, Blue, Alpha) can not be changed. Double-clicking on the preview icon will open a dialog where you can set all channel attributes.
![[Achtung]](images/caution.png)
|
Achtung |
|---|---|
|
Activated channels appear highlighted in the dialog. If you click on a channel in the list you toggle activation of the corresponding channel. Disabling a color channel red, blue, or green has severe consequences. For instance if you disable the blue channel, all pixels from now on added to the image will not have a blue component, and so a white pixel will have the yellow complementary color. |
Below the channel list is a set of buttons allowing you to perform some basic operations on channel list.
This creates a new channel. A dialog will open where you can set the Channel name, the Color tag, the channel attributes and lock attributes, and finally the Opacity and color used for the mask in the image window. A click on the color button displays the GIMP color selector where you can change the mask color. If you press the Shift key while clicking the button, the New Channel Dialog will not be opened. Instead the new channel will be created with the same settings as used previously. This new channel is a channel mask (a selection mask) applied over the image. See Selection Mask
Only available for selection masks: here you can move the channel up in the list. Press Shift key to move the channel to the top of the list.
This moves the channel down in the list. Press the Shift key to move the channel to the bottom of the list.
 Kanal duplizieren
This allows you to create a copy of the active channel. The name of the new channel is suffixed with a number.
![[Tipp]](images/tip.png)
|
Tipp |
|---|---|
|
Farbkanäle und der Alphakanal aus dem oberen Bereich des Dialogs können ebenfalls dupliziert werden. |
 Replace the Selection with this Channel
Here you can transform the channel to become a selection. By default the selection derived from a channel replaces the active selection. You can change this by using control keys.
Shift: the selection derived from a channel is added to the active selection. The final selection is merged from both.
Ctrl: the final selection is the subtraction of the selection derived from a channel from the active selection.
Shift+Ctrl: the final selection is the intersection of the selection derived from a channel with the active one. Only the selected parts common to both are kept.
Only available for selection masks: this allows you to delete the active channel.
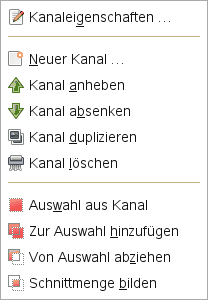
You can get the channel context menu by right clicking on a channel. Several of the operations on channels are also available through buttons at the bottom of the channels list. Those operations are documented there.
Die Hilfe für diese Menüeinträge finden Sie in Edit Channel Attributes....
Only available for selection masks. Here you can change the Channel name, the Color tag, the channel attributes and lock attributes, and finally the Opacity and color used for the mask in the image window. A click on the color button displays the GIMP color selector where you can change the mask color.
Only available for selection masks. This allows you to assign a color tag to a channel. If you have a lot of channels this can make it easier to identify them by giving related channels the same color tag. To remove the color tag choose None.
The selection derived from a channel replaces the previously active selection.
The selection derived from a channel is added to the active selection. The final selection is merged from both.
The final selection is the subtraction of the selection derived from a channel from the active selection.
The final selection is the intersection of the selection derived from a channel with the active one. Only the selected parts common to both are kept.
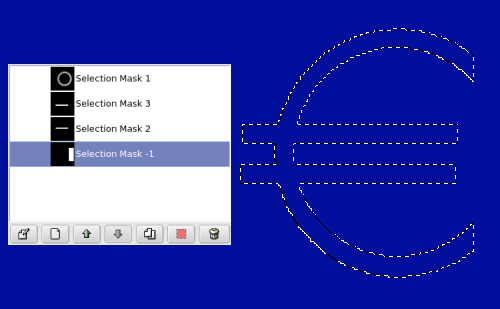
Kanäle können benutzt werden, um Auswahlen zu speichern und wieder herzustellen. Im Kanaldialog sehen Sie ein ein kleines Vorschaubild, das den Kanal repräsentiert. Mit Auswahlmasken können Sie Auswahlen graphisch als Kanal darstellen, wobei weiße Pixel für „ausgewählt“ und schwarze Pixel für „nicht ausgewählt“ stehen. Graue Pixel stellen „teilweise ausgewählte“ Bereich dar. Solche Pixel finden Sie insbesondere bei ausgeblendeten Auswahlen, wo sie einen sanften Übergang von „ausgewählt“ zu „nicht ausgewählt“ bilden. Das ist wichtig, wenn es gilt, den häßlichen Treppeneffekt beim Füllen oder Löschen einer Auswahl zu verhindern.
Es gibt mehrere Möglichkeiten, eine Auswahlmaske zu initialisieren:
Aus dem Bildmenü unter → , falls eine Auswahl existiert.
In the image window the bottom-left button creates a Quick Mask; the content will be initialized with the active selection.
Wenn Sie im Kanaldialog einen Neuen Kanal erstellen (durch Klicken auf den entsprechenden Knopf oder über das Kontextmenü). Die Auswahlmaske erscheint dann im Kanaldialog als „Neuer Kanal“ (bzw. „Neuer Kanal#n“). Den Namen können Sie über die im Kontextmenü oder durch einen Doppelklick auf den Kanal ändern.
Once the channel is initialized, selected (highlighted in blue), visible
(eye-icon in the dialog), and displayed as you want (color and opacity
attributes), you can start to work with all the paint tools. The colors
used are important. If you paint with some color other than white, gray,
or black, the color Value (luminosity) will be used to define a gray
(medium, light, or dark). When your mask is painted, you can transform
it to a selection by clicking on the
button (Channel to
Selection) or from the
context menu.
Benutzen Sie die Farbe Weiß, um die erstellte Auswahl zu vergrößern, und die Farbe Schwarz, um die Auswahl zu verkleinern. Indem Sie nur diese beiden Farben benutzen, können Sie eine Auswahl mit harten Kanten erzeugen, d.h. das Ende der Auswahl wird durch die schwarze Farbe beziehungsweise die laufenden Ameisen gekennzeichnet.
|
|
Achtung |
|---|---|
|
Solange die Auswahlmaske aktiviert ist (gekennzeichnet durch das gesetzte Augensymbol des Kanals), haben die eingesetzten Werkzeuge nur auf die Auswahlmaske einen Effekt. |
Eine Schnellmaske (engl. Quick Mask) ist eine besondere Form der Auswahlmaske und wird vorrangig dafür genutzt, um schnell neue Auswahlen mit einem Pinselwerkzeug zu erstellen. So lassen sich vor allem sehr feine und auf ein Bildobjekt angepasste Auswahlen erstellen, wo die primären Auswahlwerkzeuge an Ihre Grenzen stoßen.
Die Schnellmaske können Sie auf verschiedene Weisen aktivieren:
Aus dem Bildmenü unter → .
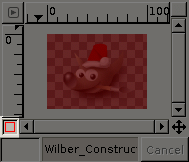
Durch einen Mausklick auf den Knopf, der sich in der linken unteren Ecke des Bildfensters befindet (siehe Bildschirmfoto oben).
Über das Tastenkürzel: Umschalt+Q.
Die Schnellmaske wird durch einen Klick auf den Knopf in der linken unteren Ecke des Bildfensters aktiviert. Standardmäßig wird das Bild nun rötlich eingefärbt, welches die Maske präsentiert. Ist eine Auswahl vor Aktivieren der Schnellmaske aktiv, so wird die bestehende Auswahl als durchscheinender Bildbestandteil sichtbar, während der Rand in einem durchscheinenden rot erscheint. Wenn keine Auswahl aktiv ist, so wird das gesamte Bild in einem durchscheinenden rot dargestellt. Die Schnellmaske wird mit einem weiteren Klick auf den linken unteren Knopf beendet.
Klicken Sie im Kanaldialog zweimal auf den Namen oder das Vorschaubild, um die Attribute einer Schnellmaske zu bearbeiten. Dort werden Deckkraft und Füllfarbe festgelegt. Die Maske kann wie bei allen Auswahlmasken mit einem Klick auf das Augensymbol vor der Schnellmaske verborgen oder angezeigt werden.
Um eine neue Auswahl über die Schnellmaske anzulegen, benutzen Sie einfach ein Pinselwerkzeug ihrer Wahl. Benutzen Sie die Farbe Weiß, um die neue Auswahl zu erstellen. Sie werden merken, dass die Deckkraft des rötlichen Farbtons der Schnellmaske durch das Malen im Bild entfernt wird. Wenn Sie Schwarz als Malfarbe benutzen, wird die Auswahl entfernt. Kennzeichnend ist hier wiederum, dass der rötliche Farbton der Schnellmaske das Bild füllt. Nach dem Bearbeiten des Bildes beenden Sie den Modus „Schnellmaske“ mit einem weiteren Klick auf den linken unteren Knopf. Dann werden die vorgenommenen Änderungen in diesem Modus in eine Auswahl konvertiert. Außerdem wird die Schnellmaske aus der Kanalliste entfernt.
Die Idee der Schnellmaske ist es, mit den Malwerkzeugen „schnell“ eine Auswahl zu bearbeiten, ohne sich Gedanken über Auswahlmasken und ihre Verwaltung machen zu müssen. Eine Schnellmaske ist eine gute Wahl, wenn Sie ein Objekt in einem Bild isolieren wollen. Wenn die Auswahl erstellt ist, müssen Sie sie gegebenenfalls invertieren und dann nur noch löschen.
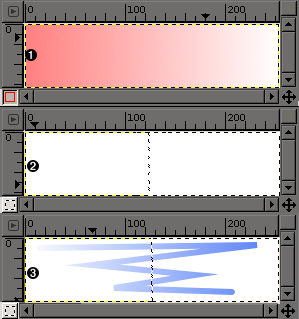
Beschreibung
Ansicht des Bildfensters bei eingeschalteter Schnellmaske: Zur Verdeutlichung, wie Grautöne in einer Schnellmaske eingesetzt werden können, wurde ein Farbverlauf auf die Schnellmaske angewendet. Der Farbverlauf verläuft von Schwarz (links) nach Weiß (rechts).
Das Bildfenster bei ausgeschalteter Schnellmaske. Die mit der Schnellmaske erstellte Auswahl befindet sich scheinbar nur in der rechten Hälfte des Bildes (siehe die „laufenden Ameisen“). Das liegt daran, dass die Auswahlgrenze (50% Deckkraft) in der Mitte des Farbverlaufs verläuft.
Und tatsächlich: Wenn man jetzt einen Pinselstrich ausführt, erkennt man am Pinselstrich, wie die Bildbereiche entsprechend den Farben des Farbverlaufs ausgewählt werden, von überhaupt nicht ausgewählt (ganz links) bis vollständig ausgewählt (ganz rechts).
After the QuickMask Button is pressed, the command generates a temporary 8-bit (0-255) channel, on which the progressive selection work is stored. If a selection is already present the mask is initialized with the content of the selection. Once QuickMask has been activated, the image is covered by a red semi-transparent veil. This one represents the non-selected pixels. Any paint tool can be used to create the selection on the QuickMask. They should use only grayscale color, conforming the channel properties, white enabling to define the future selected place. The selection will be displayed as soon as the QuickMask will be toggled but its temporary channel will not be available anymore.
|
|
Tipp |
|---|---|
|
Um eine mit einer „Schnellmaske“ angelegte Auswahl in einen Kanal zu speichern, steht Ihnen der Befehl → im Menü des Bildfensters zur Verfügung. |
Öffnen Sie ein schon vorhandenes Bild oder legen Sie ein neues Bild an.
Aktivieren Sie die „Schnellmaske“, indem Sie auf den Knopf klicken, der sich im Bildfenster links unten befindet. Bei einer vorhandener Auswahl wird die Schnellmaske mit der bestehenden Auswahl initialisiert.
Wählen Sie ein Malwerkzeug und verwenden Sie es mit Graustufenfarben in der Schnellmaske.
Deaktivieren Sie die „Schnellmaske“, indem Sie wieder auf den Knopf klicken, der sich links unten im Bildfenster befindet.