| 2.3. Kontūrų dialogas | ||
|---|---|---|

|
2. Su paveikslėlių struktūra susiję dialogai |  |
| 2.3. Kontūrų dialogas | ||
|---|---|---|
|
|
2. Su paveikslėlių struktūra susiję dialogai | |
Kontūrų dialogas yra naudojamas valdyti kontūrus, leidžiant juos sukurti, ištrinti, išsaugoti, konvertuoti į ir iš pažymėjimų, ir t. t.
The „Paths“ dialog is used to manage paths, allowing you to create or delete them, save them, convert them to and from selections, etc.
The „Paths“ dialog is a dockable dialog; see the section Skyrius 2.3, „Dialogai ir dokai“ for help on manipulating it.
You can access it:
from the image menu: → → .
from the Tab menu in any dockable dialog by clicking on
 and selecting
→ ,
and selecting
→ ,
In the menu, there is a list of detached windows which exists only if at least one dialog remains open. In this case, you can raise the „Paths“ dialog from the image-menu: → .
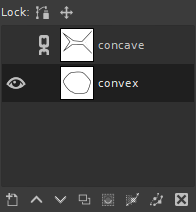
Kiekvienas kontūras priklauso vienam paveikslėliui: kontūrai yra paveikslėlių komponentai, kaip ir sluoksniai. Kontūrų dialoge yra dabartiniam aktyviam paveikslėliui priklausantčių kontūrų sąrašas: perjungus paveikslėlį dialoge bus rodomas to paveikslėlio kontūrų sąrašas. Jeigu doke „Sluoksniai, kanalai ir kontūrai“ yra įtaisytas Kontūrų dialogas, doko viršuje esančiame Paveikslėlių meniu galite matyti aktyvaus paveikslėlio pavadinimą. (Jeigu ne, Paveikslėlių meniu doke galite pridėti Kortelės meniu pasirinkę „Rodyti paveikslėlio meniu“.)
If you are familiar with the Layers dialog, you have a head start, because the Paths dialog is in several ways similar.
At the top, there are two „Lock“ icons:
A „path“ icon tells us whether editing the current path is locked (disabled) or not. Clicking the icon toggles between enabled and disabled.
![[Pastaba]](images/note.png)
|
Pastaba |
|---|---|
|
Until GIMP 2.10.32 this was called Lock Path Strokes. That name was considered ambiguous, because the term strokes is also used for stroking lines along a path, which this option does not change. |
A „cross with arrows“ icon tells us whether the current path position is locked (disabled) or not. When the path position is locked, the path can't be moved. Clicking the icon toggles between enabled and disabled.
The Paths dialog itself shows a list of all paths that exist in the image, with four items for each path:

 Kontūro matomumas
An „open eye“ icon if the path is visible, or a blank space if it is not. „Visible“ means that a trace of the path is drawn on the image display. The path is not actually shown in the image pixel data unless it has been stroked or otherwise rendered. Clicking in the eye-symbol-space toggles the visibility of the path.
 Grandininiai kontūrai
Akies simbolio vietos dešinėje yra rodomas „grandinės“ simbolis, jeigu kontūras yra užrakintas transformavimui, arba jis nerodomas, jeigu kontūras nėra užrakintas transformavimui. „Užrakintas transformavimui“ reiškia, kad suformuojamas elementų (sluoksnių, kanalų ir t. t.), kurie pritaikius vienam iš jų transformavimo operaciją yra taip pat transformuojami visi, rinkinį. Spustelėjus grandinės simbolio vietą perjungiama kontūro užrakinimo transformavimui būseną.
Maža peržiūros piktograma, rodanti kontūro eskizą. Jeigu šią piktogramą spustelėsite ir vilksite į paveikslėlį, tame paveikslėlyje bus sukurta šio kontūro kopija.
The name of the path, which must be unique within the image. Double-clicking on the name will allow you to edit it. If the name you create already exists, a number will be appended (e.g., „#1“) to make it unique.
Jeigu sąrašas yra ne tuščias, bet kuriuo metu vienas iš jame esančių elementų yra paveikslėlio aktyviu kontūru, kuris bus veikiamas jūsų atliekamų operacijų, naudojantis dialogo meniu arba apačioje esančiais mygtukais: sąraše aktyvus kontūras yra paryškintas. Spustelėjus bet kurį šių įrašų jis bus padarytas aktyviu kontūrus.
Dešiniuoju pelės mygtuku spustelėjus bet kurį sąrašo įrašą parodomas Kontūrų meniu. Kontūrų meniu taip pat galite pasiekti dialogo Kortelės meniu.
Vusu Kontūrų dialogo apačioje esantys mygtukai atitinka Kontūrų meniu (pasiekiamo dešiniuoju pelės mygtuku spustelėjus kontūrų sąrašo įrašą) įrašus, tačiau kai kurie iš jų turi papildomas parinktis, prieinamas mygtuko spustelėjimo metu laikant nuspaudus modifikavimo klavišus.
See New Path. Holding down Shift makes a new (empty) path with the last used values, without opening the New Path dialog.
See Raise Path. Holding down Shift moves the path to the top of the list.
See Lower Path. Holding down Shift moves the path to the bottom of the list.
Žiūrėkite Sukurti kontūro kopiją.
Konvertuoja kontūrą į pažymėjimą; išsamesnį paaiškinimą galite rasti sekcijoje Kontūras į pažymėjimą . Naujo pažymėjimo sąveikos su esamu pažymėjimu būdą galite nurodyti naudodami modifikavimo klavišus:
| Modifikatoriai | Veiksmas |
|---|---|
| Nėra | Pakeisti esamą pažymėjimą |
| Shift | Pridėti prie pažymėjimo |
| Ctrl | Atimti iš pažymėjimo |
| Shift+Ctrl | Sankirta su pažymėjimu. |
Holding down Shift brings up the Advanced Options dialog, which probably is only useful to GIMP developers.
See Stroke Path. Holding down Shift strokes the path based on the last used values without opening the Stroke Path dialog.
Delete Path deletes the currently selected path.
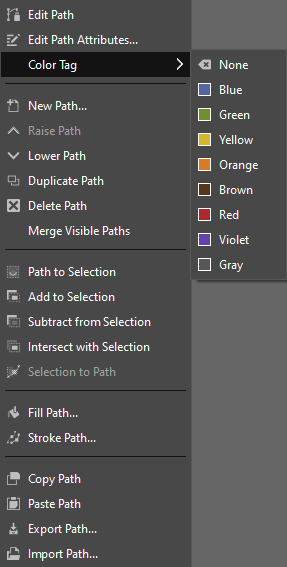
Kontūrų meniu galima gauti dešiniuoju pelės mygtuku spustelėjus Kontūrų dialoge esančiame sąraše esantį kontūro įrašą arba Kontūrų dialogo Kortelės meniu pasirinkus viršutinį įrašą („Kontūrų meniu“). Šis meniu suteikia prieigą prie daugumos kontūrus veikiančių operacijų.
Edit Path is an alternative way to activate the Paths tool, used for creating and manipulating paths. It can also be activated from the Toolbox, or by using the keyboard shortcut B.
Pasirinkus Keisti kontūro savybes atveriamas mažas dialogas, leidžiantis pakeisti kontūro pavadinimą. Tą taip pat galite padaryti du kartus spustelėję Kontūrų dialoge esančiame sąraše esantį pavadinimą.
Color Tag brings up a sub menu, similar to the one in the Layers Dialog, that allows you to select a color tag for the selected path.
Pasirinkus Naujas kontūras sukuriamas naujas kontūras, įtraukiamas į Kontūrų dialoge esantį sąrašą ir padaromas aktyviu paveikslėlio kontūru. Parodomas dialogas, kuriame galite nurodyti kontūro pavadinimą. Naujas kontūras sukuriamas be prieraišų taškų, todėl prieš galint jį naudoti reikia Kontūrų įrankiu juos sukurti.
Pasirinkus Pakelti kontūrą kontūras Kontūrų dialoge esančiame sąraše perkeliamas vienu lygiu aukščiau. Kontūro pozicija sąraše neturi jokio funkcinės svarbos, todėl ši funkcija yra tik dėl patogumo.
Pasirinkus Nuleisti kontūrą kontūras Kontūrų dialoge esančiame sąraše nuleidžiamas vienu lygiu. Kontūro pozicija sąraše neturi jokio funkcinės svarbos, todėl ši funkcija yra tik dėl patogumo.
Duplicate Path creates a copy of the active path, assigns it a unique name, adds it to the list in the Paths dialog, and makes it the active path for the image. The copy will be visible only if the original path was visible.
Ištrinti kontūrą ištrina dabartinį pasirinktą kontūrą.
Pasirinkus Sujungti matomus kontūrus pasirenkami visi paveikslėlyje matomi kontūrai (t. y. visi, šalia kurių Kontūrų dialoge rodomas „atmerktos akies“ simbolis, ir paverčia juos vieno kontūro komponentais. Tai gali būti patogu, jeigu norite juos visus apvesti tuo pačiu būdu, ir t. t.
These commands all convert the active path into a selection, and then combine it with the existing selection in the specified ways. (Path to Selection discards the existing selection and replaces it with one formed from the path.) If necessary, any unclosed components of the path are closed by connecting the last anchor point to the first anchor point with a straight line. The „marching ants“ for the resulting selection should closely follow the path, but don't expect the correspondence to be perfect.
Šią operaciją galite pasiekti keliais būdais:
Paveikslėlio meniu juostoje: →
Kontūrų dialogo meniu: .
From the Selection to Path button
 at the bottom of the Paths dialog.
Selection to Path creates a new path from the image's selection. In most cases the resulting path will closely follow the „marching ants“ of the selection, but the correspondence will not usually be perfect.
Converting a two-dimensional selection mask into a
one-dimensional path involves some rather tricky algorithms:
you can alter the way it is done using the
Advanced Options, which are accessed by
holding down the Shift key while pressing
the Selection to Path button
at the bottom of the Paths dialog. This brings up the Advanced
Options dialog, which allows you to set 20 different options
and variables, all with cryptic names. The Advanced Options
are really intended for developers only, and help with them
goes beyond the scope of this documentation. Generally
speaking, Selection to Path will do
what you expect it to, and you don't need to worry about how
it is done (unless you want to).
Šią operaciją galite pasiekti keliais būdais:
From an the main menu, as →
From the Paths dialog menu, as .
From the Fill Path button in the Tool Options for the Paths tool.
Fill Path fills all areas delimited by the path with the current foreground color or currently selected pattern. See the section about Fill Path for more information.
Šią operaciją galite pasiekti keliais būdais:
Paveikslėlio meniu juostoje: →
Kontūrų dialogo meniu: .
From the Paint along the path button
 at the bottom of the Paths dialog.
From the Stroke Path button in the Tool Options for the Paths tool.
Stroke Path renders the active path on the active layer of the image, permitting a wide variety of line styles and stroking options. See the sections about Stroke Path and Stroking for more information.
Kopijuoti kontūrą nukopijuoja aktyvų kontūrą į Kontūrų iškarpinę, leidžiant jums įdėti jį į kitą paveikslėlį.
![[Patarimas]](images/tip.png)
|
Patarimas |
|---|---|
|
Jūs taip pat galite kontūrą nukopijuoti ir įdėti nuvilkdami jo piktogramą iš Kontūrų įrankio į paskirties paveikslėlį. |
|
|
Pastaba |
|---|---|
|
When you copy a path to an image, it is not visible. You have to make it visible in the Paths dialog. |
Įdėti kontūrą sukuria naują kontūrą iš Kontūrų iškarpinės turinio, įtraukia jį į Kontūrų dialoge esantį sąrašą ir padaro paveikslėlio aktyviu kontūru. Jeigu anksčiau į iškarpinę nebuvo nukopijuotas joks kontūras, šis meniu įrašas bus neaktyvuojamas.
Eksportuoti kontūrą leidžia jums išsaugoti kontūrą į failą: parodomas failų išsaugojimo dialogas, leidžiantis nurodyti failo pavadinimą ir vietą. Vėliau galite šį kontūrą pridėti bet kuriame GIMP paveikslėlyje naudodami komandą Importuoti kontūrą. Kontūrai yra išsaugomi SVG formatu: tai reiškia, kad vektorinės grafikos programos, pvz., Sodipodi arba Inkscape taip pat galės importuoti jūsų išsaugotus kontūrus. Informaciją apie SVG failus ir kaip jie yra susiję su GIMP kontūrais galite rasti sekcijoje Kontūrai.
Import Path creates a new path from an SVG file: it pops up a file chooser dialog that allows you to navigate to the file. See the Paths section for information on SVG files and how they relate to GIMP paths.