| 4.4. テンプレートダイアログ | ||
|---|---|---|

|
4. 画像管理に関連するダイアログ |  |
| 4.4. テンプレートダイアログ | ||
|---|---|---|
|
|
4. 画像管理に関連するダイアログ | |
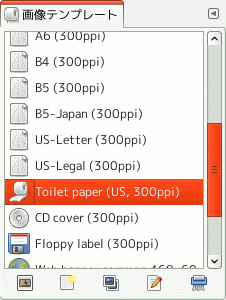
Templates are pre-defined image settings that you can use to quickly create a new image with your preferred dimensions, resolution etc. GIMP comes with a lot of templates installed, but you can also create your own. When you create a new image, you can access the list of existing templates to choose one to be used as base for your new image. The 「Templates」 dialog allows you to manage these templates.
「テンプレート」ダイアログはドッキング可能です。 その扱い方については 「ダイアログとその合体」 の節をご覧ください。
呼び出し方はつぎのとおりです。
画像ウィンドウのメニューより → →
任意のドッキング可能なダイアログのボタンアイコン  をクリックすると出てくるタブメニューより →
You select a template by clicking on its icon. Right clicking reveals a local menu that offers the same functions as the buttons.
「テンプレート」ダイアログのタブメニューで と を切り替えられます。 「並べて表示」を選ぶとテンプレートはその種類を表わすようなアイコンが升目状に整列します。 (後で述べるように、 追加したテンプレートに適切なアイコンをつけていなければここで混乱するはめになります。) 選ばれたテンプレートの名前と大きさが一覧表より上に表示されます。 「一覧で表示」を選ぶとテンプレートは縦に列挙されます。 アイコンがその内容の目印になることでしょう。 それぞれの名前も併記されます。
タブメニューには サブメニューがあって、 ここでアイコンの大きさを好みに調節できます。
![[ヒント]](images/tip.png)
|
ヒント |
|---|---|
|
「一覧で表示」の場合キーボードショートカット Ctrl+F で検索窓が現れます。 一覧表ダイアログの検索窓 をご覧ください。 |
ダイアログの底部にはテンプレートにいろいろな操作ができるボタンが並びます。
 選択したテンプレートで新しい画像を生成
Clicking on this button creates a new image with the settings defined in the selected template.
このアイコンボタンをクリックすると、 「新規テンプレート」ダイアログが開かれます。 使い方は後述する テンプレートの編集 ダイアログと同じです。
 選択したテンプレートを複製
Clicking on this button opens the Edit Template dialog that is documented next.
 選択したテンプレートを編集
Clicking on this button opens the Edit Template dialog where you can adjust the image related settings for the selected template.
This deletes the selected template after asking for confirmation.
|
|
ヒント |
|---|---|
|
Every template is stored in a |
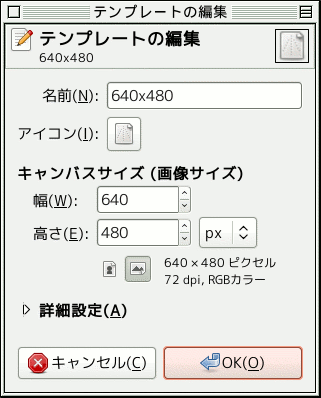
This dialog allows you to change the settings of the selected template.
You can access this dialog by clicking on the button at the bottom of the Templates Dialog
オプション
In this text box, you can modify the name of the template.
By clicking on this icon, you can select a different icon that will be shown in front of the name of this template. The icon can be picked from a list of pre-defined icons, from a file on your computer, or by pasting from the clipboard.
Here you set the width and height of the new image. The default units are pixels, but you can switch to another unit using the adjoining menu. If you do, note that the resulting pixel size will be determined by the X and Y resolution (which you can change in the Advanced Options), and by the setting of 「Dot for Dot」, which you can change in the menu.
These buttons toggle between Portrait and Landscape mode. Their effect is to exchange the values for Width and Height. If the X and Y resolutions are different (in Advanced Options), then these values are also exchanged. On the right, image size, image resolution and color space are displayed.
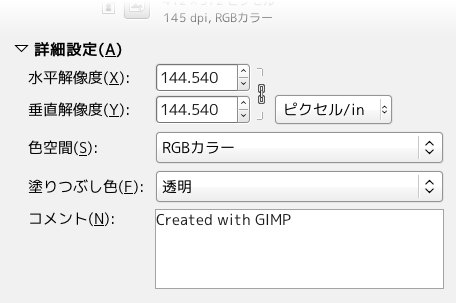
詳細設定
The advanced options let you change several additional image settings.
この 2 つの値は主にプリンターで印刷するときに関わってきます。 画像の画素数は変わりませんが、 印刷物の絵の大きさに違いが出ます。 コンピューター画面で表示される画像の大きさも、 画像ウィンドウのメニューで → を無効にしたうえで、 表示倍率を等倍にすると、 GIMP は画面上の画素の大きさと解像度を考慮して実物大になるよう調節します。 ただしモニター画面のキャリブレーション測定が済んでいない場合は画面表示は不正確です。 測定作業は GIMP の導入時にできますが、 あとからでも 設定 ダイアログの「ディスプレイ」のページでディスプレイ画面の実測調整や測定ができます。
新しい画像は RGB モードかグレースケールモードで作成できます。 新規作成の場合にはインデックス付きカラーの直接指定はできないことになっていますが、 もちろん作成後にインデックス付きに変換するのならば構いません。
You can select the precision that GIMP will use for this image. For more information see the Precision menu documentation.
You can select whether to use Perceptual gamma, or linear light. For more information see also the Precision menu documentation.
When enabled, the image will be color managed. Disabling color management is equivalent to choosing a built-in sRGB profile.
Here you can select the color profile for this image. The default is the built-in sRGB color profile, but you can also select your own color profile from a file on your computer.
You have five choices for filling the new image's background layer:
Foreground color, uses the current foreground color as shown in the Toolbox.
Background color, uses the current background color as shown in the Toolbox.
White, uses white for the background layer.
Transparency. If this option is chosen, then the Background layer in the new image will be created with an alpha channel; otherwise not. The background layer will be transparent.
Pattern, uses the active pattern at the time of creating the image to fill the background layer.
You can add a default comment here that will be attached to the image. When exporting this image, the comment will be added too for file formats that support comments. You will still be able to change this comment in the export dialog.