| 4.8. Perfila (Màscara de desenfocament) | ||
|---|---|---|

|
4. Filtres de millora |  |
| 4.8. Perfila (Màscara de desenfocament) | ||
|---|---|---|
|
|
4. Filtres de millora | |
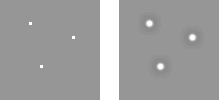
Figura 17.44. Exemple d'aplicació del filtre Perfila

Imatge original
Filtre «Realça les vores» aplicat
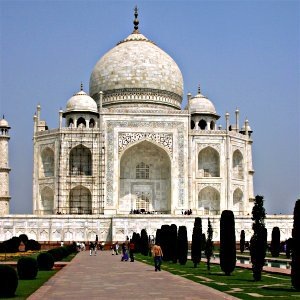
La majoria de les imatges digitalitzades necessiten sovint una correcció de la nitidesa. És a causa del procés de digitalització que s'ha de retallar la contínua pujada de color en punts amb colors lleugerament diferents: els elements més fins de la freqüència de mostratge es calcularan en una mitjana de color uniforme. Les vores nítides es representen una mica borroses. El mateix fenomen apareix quan s'imprimeixen punts de colors sobre paper.
El filtre Perfila (el nom antic era Màscara de desenfocament) perfila les vores dels elements sense augmentar el soroll ni les marques. És el rei dels filtres afilats.
![[Suggeriment]](images/tip.png)
|
Suggeriment |
|---|---|
|
Algunes càmeres digitals i alguns escàners ofereixen fer nítides les vostres imatges. Es recomana desactivar aquesta funció i utilitzar els filtres del GIMP. D'aquesta manera mantindreu el control de la nitidesa de les vostres imatges. |
To prevent color distortion while sharpening, you can Decompose your image to HSV and work only on Value. Go to → → . Make sure the Decompose to Layers box is checked. Choose HSV and click OK. You will get a new gray-level image with three layers, one for Hue, one for Saturation, and one for Value. (Close the original image so you won't get confused). Select the Value layer and apply your sharpening to it. When you are done, with that same layer selected, reverse the process by using Compose. Go to → → . Again choose HSV and click OK. You will get back your original image except that it will have been sharpened in the Value component.
![[Nota]](images/note.png)
|
Nota |
|---|---|
|
Aquestes opcions es descriuen a Secció 2, «Característiques comunes». |
El lliscador i la casella d'entrada (0.0-1500.0) permeten establir el nombre de píxels en cada costat de la vora, que es veuran afectats per la nitidesa. És millor sempre fer nítida una imatge en la resolució final.
Aquest lliscador i la casella d'entrada (0.0-300.0) permeten ajustar la força del filtre.
Aquest lliscador i la casella d'entrada (0.0-1.0) permeten fixar la diferència mínima dels valors del píxel que indica una vora on s'ha d'aplicar la nitidesa. Així podreu protegir de nitidesa les zones de transició tonal suau i evitar la creació de marques a la cara, al cel o a la superfície de l'aigua.
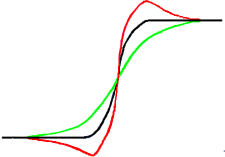
Utilitzar una màscara d'enfocament per a fer nítida una imatge pot semblar estrany. Aquí hi ha l'explicació:
Imagineu-vos una imatge amb un contrast en algun lloc. La corba de la intensitat dels píxels d'una línia que passa a través del contrast, mostrarà un augment pronunciat de la intensitat. Es veurà esglaonat si el contrast és perfectament nítid (blau), es veurà com una S si és difús (groc).

Ara hi ha una imatge amb una mica de difuminat que es vol fer més nítida (corba negra). Si apliquem una mica més de difuminat, la variació d'intensitat serà més gradual (corba verda).
Restem la diferència entre la intensitat del difuminat (corba verda) i la intensitat de la imatge original (corba negra) a la intensitat de la imatge original (corba negra). Obtenim la corba vermella, que és més brusca: el contrast i la nitidesa augmenten. QED.
La màscara de desenfoc es va utilitzar en la fotografia de plata. Primer es fa una còpia per contacte del negatiu original sobre una pel·lícula, col·locant una fina placa de vidre entre els dos, que produirà una còpia desenfocada a causa de la difusió de la llum. A continuació es posen les dues pel·lícules a l'ampliadora per a reproduir-les en paper. Les zones fosques de la pel·lícula positiva desenfocada, oposades a les zones clares del negatiu original, evitaran que la llum passi i així se sostraurà de la llum que travessa la pel·lícula original.
En les fotografies digitals, amb el GIMP, passareu per les següents etapes:
Obriu la vostra imatge i dupliqueu-la →
En la còpia, dupliqueu la capa → , a continuació, desplegueu el menú Filtres i apliqueu → a la capa duplicada amb l'opció IIR amb radi 5.
En el diàleg de les capes de la imatge duplicada, canvieu el mode de fusió a «Sostreu», feu clic dret en el menú i seleccioneu «Fusiona cap avall».
Feu clic i arrossegueu l'única capa obtinguda dins la imatge original, on apareix com una capa nova.
Canvieu el mode de fusió en aquest diàleg de la capa «Addició».
Heus ací. El filtre «Emmascara les parts borroses» fa el mateix.
Al principi de la corba, podeu veure una depressió. Si el desenfocament és important, aquesta depressió és molt profunda; el resultat de la sostracció pot ser negatiu, i una banda de color complementari apareixerà a la vora del contrast, o un halo negre al voltant d'un estel sobre un fons més clar d'una nebulosa (efecte d'ull negre).