| 5.2. パス | ||
|---|---|---|

|
5. その他のツール |  |
| 5.2. パス | ||
|---|---|---|
|
|
5. その他のツール | |
パスツールはベジエ曲線と呼ばれる複合した選択をつくるのに使用でき、 なげなわツールにいくぶん似てはいますがこちらはベクトル式曲線を作成・操作する能力のすべてがあります。 このツールで曲線が描けるとともに、 その曲線に基づいて描画が行なえますし、 保存はもちろん他形式への/からの転換もできます。 パスを使って幾何学図形を作ることもできます。 パスのために パスダイアログ が用意されています。
このツールを起用する方法はつぎのいずれかです。
In the main menu through → .
By clicking the tool icon:
 in the Toolbox.
By using the B keyboard shortcut.
![[注記]](images/note.png)
|
注記 |
|---|---|
|
これらのキー修飾についてはヘルプメッセージが画像ウィンドウの底部にあるステータスバー (状態表示区画) に随時表示されます。 |
このキーには脈絡に沿ってさまざまな機能が付与されます。 詳細はツールオプションをご覧ください。
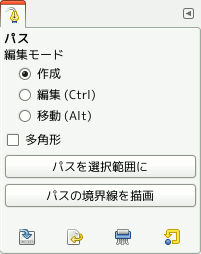
パスツールの作業モードは 作成、 編集、 移動 の 3 種類に分かれます。 Ctrl キーを押すと作成モードから編集モードに切り替わります。 Alt (あるいは Ctrl+Alt ) を押すと作成モードから移動モードに切り替わります。
一般的にはこのツールを起用すると、 そのツールオプションがツールボックスの下に繋げられたウィンドウ上に現れます。 そのようなウィンドウが見あたらないときは、 画像ウィンドウのメニューより → → と辿れば今使っているツールのツールオプションウィンドウが開きます。
このツールの既定モードは 作成 です。 つぎつぎと画像上をクリックしてパスを描いてゆきます。 置かれたコントロールポイントはクリックしてドラッグすれば移動できます。 各コントロールポイントの間にあるのが分節です。

打たれた番号は 2 つの分節からなる直線パスを描く順序である。
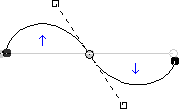
曲がった分節を作るにはただその分節をドラッグするか新たなアンカーをドラッグすればよい。 青の矢印で曲がるところを指し示した。 2 つの小さなハンドルが出現したので、 あとはそれをドラッグしても曲線を曲げ直せる。
![[ヒント]](images/tip.png)
|
ヒント |
|---|---|
|
曲線を手早く閉じるには Ctrl キーを押しながら最初に置いたアンカーをクリックします。 旧版の GIMP では閉じたパスの内側をクリックすると選択範囲に変換されてしまいましたが、 今ではツールオプションの ボタンや パスダイアログ の |
|
|
ヒント |
|---|---|
|
初期設定ではハンドルを 2 つもつと対称的に動作します。 ハンドルを個別に操作するときは一旦マウスボタンを放します。 Shift キーを押しながらの操作なら再びハンドルは点対称に動きます。 |
Several functions are available in Design mode:
Inserting a new node: When you press Ctrl and hover the mouse pointer over the existing path, the mouse pointer changes to the '+' sign. Clicking will create a new path node in the hovered point of the path.
Moving one or several nodes: On a node, the mouse pointer becomes a 4-arrows cross. You can click and drag it. You can select several nodes by Shift and click and move them by click and drag. Pressing Ctrl+Alt allows to move all the path, as a selection.
Modifying handles: You have to Edit a node first. A handle appears. Drag it to bend the curve. Pressing Shift toggles to symmetric handles.
Modify segment: When the mouse pointer moves over a segment, it turns to a 4-arrows cross. Click and drag it to bend the segment. As soon as you move it, handles appear at both ends of the segment. Pressing the Shift key toggles to symmetric handles.
Adding a new subpath: When you press Shift and hover the mouse pointer outside the existing path, the mouse pointer starts displaying a square. Clicking will start a subpath that isn't connected to other curves, but is considered a part of the path.
Edit performs functions which are not available in Design mode. With this mode, you can work only on the existing path. When the mouse pointer is not on the path, the pointer changes to a small crossed circle and you can not do any path editing.
2 つの終端アンカーを繋ぐ分節を追加 - パスの終端アンカーをクリックして活性化します。 マウスポインターには小さな連結のしるし (重なった 2 つの円) がつきます。 もう一方の終端アンカーをクリックすると両者は連結されます。 閉じていない成分を繋ぎ合わせる用途に向いています。
Remove a segment from a path: While pressing Shift+Ctrl key combination, point to a segment. The mouse pointer turns to a "-" sign. Click to delete the segment.
Add a node to a path: point to a segment. Pointer turns to "+"". Click where you want to place the new control point.
Remove a node: While pressing Shift+Ctrl key combination, point to a node. Pointer turns to "-"". Click to delete the node.
アンカーにハンドルを追加 - アンカーの上ではマウスポインターの右上に小さな四方矢印がつきます。 アンカーをクリックすると、 ハンドルが (削除されていなければ) 現れます。 もしひとつだけだったり全く無かった場合はアンカーをドラッグすればハンドルが現れます。アンカーには 2 つまでハンドルがつけられます。 ハンドルがひとつだけの場合には Shift キーを押しながらそのハンドルをドラッグすればもう一方のハンドルが点対称の位置に現れます。
Remove a handle from a node: While pressing Shift+Ctrl key combination, point to a handle. The pointer doesn't turn to the expected "-"" and remains a hand. Click to delete the handle.
![[注意]](images/caution.png)
|
注意 |
|---|---|
|
There is no warning before removing a node, segment or a handle. |
移動 モードでは 1 面のパスのひとつもしくは複数の成分を移動できます。 そのままパスをクリックしてドラッグしてください。
If you have several components, only the selected one is moved. If you click and drag outside the path, all components are moved. Pressing the Shift key toggles between moving all components and selected components only.
このオプションを指定すると描ける分節は直線のみになります。 ハンドルは使えません。 分節をドラッグすると変形しないで移動をします。
This button allows creation of a selection that is based on the path in its present state. This selection is marked with the usual "marching ants". Note that the path is still present: the current tool is still the path tool and you can modify this path without modifying the selection that has become independent. If you change tools, the path becomes invisible, but it persists in the Paths dialog and you can re-activate it.
閉じていないパスを変換した場合は、 各成分ごとに始点と終点が直線で結ばれて閉じられます。
As the help pop-up tells, pressing Shift when clicking on the button will add the new selection to an already existing one. Pressing Ctrl will subtract the selection from the pre-existing selection, and the Shift+Ctrl key combination will intersect the two selections.
This lets you fill an enclosed path with a solid color or pattern.
See 「パスの境界線を描画...」 and 「 パス 」.
「パス」 についての概念もお読みください。