| 4.4. Diálogo de plantillas | ||
|---|---|---|

|
4. Diálogos relativos a la gestión de la imagen |  |
| 4.4. Diálogo de plantillas | ||
|---|---|---|
|
|
4. Diálogos relativos a la gestión de la imagen | |
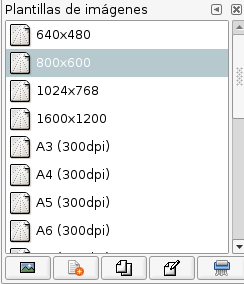
Las plantillas son configuraciones de imagen predefinidas que puede usar para crear rápidamente una imagen nueva con sus dimensiones, resolución, etc. preferidas. GIMP viene con muchas plantillas instaladas, pero también puede crear las suyas propias. Cuando crea una imagen nueva, puede acceder a la lista de plantillas existentes para elegir una que se utilizará como base para su imagen nueva. El cuadro de diálogo “Plantillas” le permite administrar estas plantillas.
El diálogo de “Plantillas” es un diálogo empotrable; consulte la Sección 2.3, “Diálogos y empotrables” para obtener ayuda sobre su uso.
Puede acceder:
desde el menú de la imagen: → → .
desde el menú de pestaña en cualquier diálogo pulsando sobre  y seleccionando → .
Para seleccionar una plantilla pulse sobre su icono. Pulsar con el botón derecho hace aparecer un menú local con las mismas funciones que los botones.
En el menú de pestaña del diálogo de “Plantillas”, puede elegir entre y . En modo rejilla, las plantillas se depositan en una tabla rectangular de iconos idénticos (a menos que le dé un icono en particular, como se verá más tarde). Solo se muestra el nombre de la plantilla seleccionada. En modo lista, se alinean verticalmente; los iconos son idénticos; se muestran todos los nombres.
En este menú de pestaña, la opción Tamaño de la vista previa permite cambiar el tamaño de los iconos.
![[Sugerencia]](images/tip.png)
|
Sugerencia |
|---|---|
|
Ctrl+F en una vista de lista abre un campo de búsqueda. Consulte la Ver como lista; Ver como rejilla |
Los botones de la parte inferior del diálogo permiten operar sobre las plantillas de varias maneras:
 Crear una imagen nueva desde la plantilla seleccionada
Pulsando sobre este botón se crea una imagen nueva con la configuración definida en la plantilla seleccionada.
Pulsando sobre este botón se abre el diálogo Plantilla nueva, idéntico al diálogo «Editar plantilla», que veremos más abajo.
 Duplicar la plantilla seleccionada
Pulsando sobre este botón se abre el diálogo «Editar plantilla» que se documenta a continuación.
 Editar la plantilla seleccionada
Al pulsar sobre este botón se abre el diálogo Editar plantilla donde puede ajustar la configuración relacionada con la imagen para la plantilla seleccionada.
Esto elimina la plantilla seleccionada después de solicitar confirmación.
|
|
Sugerencia |
|---|---|
|
Cada plantilla se guarda en un archivo |
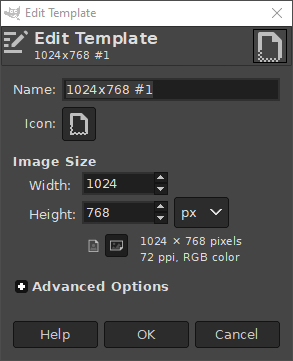
El diálogo le permite cambiar la configuración de la plantilla seleccionada.
Puede acceder a este diálogo pulsando sobre el botón en la parte inferior del diálogo plantillas
Opciones
En este cuadro de texto, puede modificar el nombre de la plantilla.
Al pulsar en este icono, puede seleccionar un icono diferente que se mostrará delante del nombre de esta plantilla. El icono se puede elegir de una lista de iconos predefinidos, de un archivo en su equipo o pegándolo desde el portapapeles.
Aquí puede ajustar la anchura y la altura de la imagen nueva. La unidad predeterminada es el píxel, pero puede cambiar a otra unidad, usando el menú adjunto. Si lo hace, tenga en cuenta que el tamaño resultante del píxel lo determinará la resolución X e Y (que puede cambiar en las opciones avanzadas) y la configuración de “Punto por punto”, que puede cambiar en el menú .
Estos botones alternan entre el modo vertical y horizontal. Su efecto es intercambiar los valores de la anchura y la altura. Si las resoluciones X e Y son diferentes (en opciones avanzadas), entonces estos valores se intercambian también. A la derecha se muestran el tamaño de la imagen, la resolución de la imagen y el espacio de color.
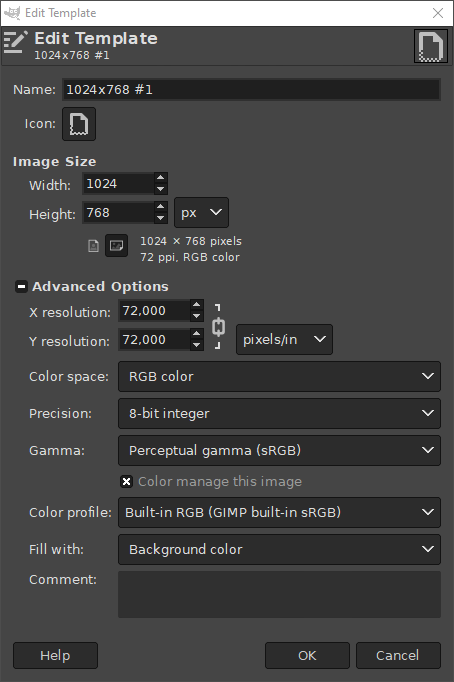
Opciones avanzadas
Las opciones avanzadas le permiten cambiar varias configuraciones de imagen adicionales.
Estos valores entran en juego principalmente en relación a la impresión: no afectan al tamaño de la imagen en píxeles, pero determinan su tamaño en el papel cuando se imprime. También pueden afectar a la manera en que la imagen se muestra en el monitor: si “Punto por punto” está desactivado en el menú , entonces a una ampliación de 100%, GIMP intenta mostrar la imagen en el monitor en el tamaño físico correcto, calculado a partir de las dimensiones del píxel y la resolución. La muestra puede no ser exacta, a menos que se haya calibrado el monitor. Esto se puede hacer cuando se instala GIMP o desde la pestaña visualización en el diálogo de preferencias.
Puede crear la imagen nueva tanto como una imagen RGB, o como una imagen en escala de grises. Puede crear una imagen indexada directamente de esta manera, pero desde luego nada le impide convertir la imagen a indexada después de haberla creado.
Puede seleccionar la precisión que GIMP utilizará para esta imagen. Para obtener más información, consulte la documentación del menú Precisión.
Puede seleccionar si desea utilizar Gama de percepción o luz lineal. Para obtener más información, consulte también la documentación del menú Precisión.
Cuando esta activado, la imagen se gestionará en color. Desactivar la gestión del color equivale a elegir un perfil sRGB integrado.
Aquí puede seleccionar el perfil de color para esta imagen. El valor predeterminado es el perfil de color sRGB integrado, pero también puede seleccionar su propio perfil de color desde un archivo en su equipo.
Tiene cinco opciones para rellenar la capa de fondo de la imagen nueva:
Color de primer plano, utiliza el color de primer plano actual como se muestra en la Caja de herramientas.
Color de fondo, utiliza el color de fondo actual como se muestra en la Caja de herramientas.
Blanco, utiliza blanco para la capa de fondo.
Transparencia. Si se elige esta opción, se creará la capa de fondo en la imagen nueva con un canal alfa; si no, no. La capa de fondo será transparente.
Patrón, utiliza el patrón activo al momento de crear la imagen para rellenar la capa de fondo.
Puede añadir un comentario predeterminado aquí que se adjuntará a la imagen. Al exportar esta imagen, el comentario también se añadirá para los formatos de archivo que admitan comentarios. Aún podrá cambiar este comentario en el cuadro de diálogo de exportación.