| 3.3. Diálogo de pinceles MyPaint | ||
|---|---|---|

|
3. Diálogos relacionados con el contenido de la imagen |  |
| 3.3. Diálogo de pinceles MyPaint | ||
|---|---|---|
|
|
3. Diálogos relacionados con el contenido de la imagen | |
El diálogo de “Pinceles MyPaint” se usa para seleccionar un pincel MyPaint, para usarlo con alguna de las herramientas de pintura: consulte la sección sobre la herramienta pinceles MyPaint para obtener más información sobre los pinceles MyPaint y su uso en GIMP. El diálogo también le da acceso a varias funciones para manipular los pinceles. Puede seleccionar un pincel pulsando sobre él en la lista: se mostrará en el área Opciones de herramienta de la caja de herramientas cuando el pincel MyPaint es la herramienta activa.
El diálogo de “Pinceles MyPaint” es un diálogo acoplable. Consulte la sección sobre diálogos acoplables para obtener ayuda sobre cómo manejarlos.
Puede acceder:
Desde un menú de la imagen: → → .
Desde el menú de pestaña de cualquier diálogo acoplable pulsando sobre  y seleccionando → .
Desde el cuadro de diálogo Opciones de herramienta para cualquiera de las herramientas de pintura, al pulsar en el botón del icono Pincel MyPaint, aparece una ventana emergente con una funcionalidad similar que le permite elegir rápidamente un pincel de la lista; Si pulsa en el botón presente en la parte inferior derecha de la ventana emergente, abre el cuadro de diálogo real del pincel MyPaint.
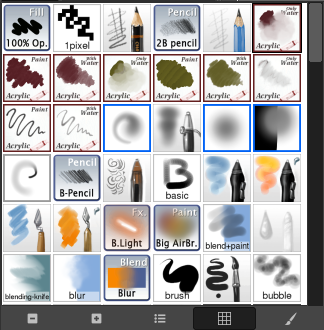
El diálogo “Pinceles” simplificado
Esta ventana tiene cinco botones, explicadas con claridad en la ayuda emergente:
Vistas previas más pequeñas
Vistas previas más grandes
Ver como lista
Ver como rejilla
Abrir el cuadro de diálogo de selección de pincel MyPaint
Tenga en cuenta que, dependiendo de sus preferencias, un pincel seleccionado con el emergente sólo se puede aplicar a la herramienta activa, no a las otras herramientas de pintura. Consulte la sección Opciones de herramientas en preferencias para obtener más información.
En el menú de pestaña, puede elegir entre y . En la vista de rejilla, las formas de los pinceles se colocan en una disposición rectangular, así es fácil ver muchas a la vez y encontrar la que busca. En la vista de lista, las formas se disponen verticalmente en una lista, con sus nombres al lado.
En el menú de pestaña, la opción Tamaño de vista previa le permite adaptar el tamaño de la vista previa de su pincel a su enlace.
En la parte superior del cuadro de diálogo aparece un cuadro de filtro donde puede filtrar los pinceles MyPaint que se muestran según sus etiquetas; y el nombre del pincel seleccionado actualmente.
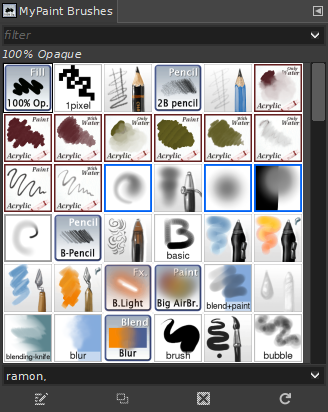
En el centro aparece una vista en cuadrícula de todos los pinceles disponibles. El pincel seleccionado aparece destacado. Debajo de la cuadrícula hay un cuadro que muestra las etiquetas asignadas al pincel seleccionado.
En su mayoría, el diálogo trabaja de la misma manera en el modo de lista que en el modo de cuadrícula, con la siguiente excepción: el nombre del pincel actual no se muestra en la parte superior.
Cuando pulsa en la vista previa de un pincel, éste se convierte en el pincel actual y se selecciona en las Opciones de la Herramienta Pincel de MyPaint. También puede pulsar en los botones de la parte inferior del cuadro de diálogo para realizar varias acciones.
Puede utilizar etiquetas para reorganizar la visualización de los pinceles MyPaint. Consulte Sección 3.7, “Etiquetado”.
En la parte inferior del cuadro de diálogo encontrará los siguientes botones:
Actualmente, esto siempre está desactivado ya que GIMP no admite la edición de pinceles MyPaint. Esta también es la razón por la que no hay un botón para crear un pincel nuevo.
Este botón también está siempre desactivado.
Esta opción siempre está desactivada por lo que he visto.
Si añade pinceles a su carpeta personal MyPaint brushes o a cualquier otra carpeta que se encuentre en la ruta de búsqueda de pinceles MyPaint, este botón hace que la lista se actualice, para que las entradas nuevas se encuentren disponibles en el diálogo.
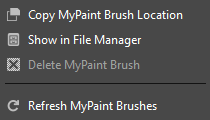
Algunas de las funciones realizadas por estos botones también se puede acceder en el menú emergente del diálogo, activado pulsando con el botón derecho en cualquier lugar de la rejilla/lista de pincel o eligiendo el elemento superior, , en el menú de pestañas del diálogo.
Al pulsar el botón derecho del ratón en una vista previa del pincel se abre un menú contextual. La mayoría de los comandos de este submenú se describen con los Botones, excepto los siguientes.