| 5. Mit Pfaden arbeiten | ||
|---|---|---|

|
Kapitel 7. Mit GIMP malen |  |
| 5. Mit Pfaden arbeiten | ||
|---|---|---|
|
|
Kapitel 7. Mit GIMP malen | |
Paths are curves (known as Bézier-curves). Paths are easy to learn and use in GIMP. To understand their concepts and mechanism, look at the glossary Bézier-curve or Wikipedia [WKPD-BEZIER]. The Paths tool is very powerful, allowing you to design complex shapes. When designing a shape, you first use the Paths tool in GIMP to create a path. After that you usually stroke or fill the path.
Im GIMP-Sprachgebrauch bedeutet »Pfad nachziehen«, einen bestimmten Stil auf den Pfad anzuwenden (Farbe, Breite, Muster, …).
A path can be used in several ways:
Einen geschlossenen Pfad in eine Auswahl umwandeln.
Einen offenen oder geschlossenen Pfad nachziehen, das heißt, den Pfad in unterschiedlichsten Weisen auf dem Bild nachzuzeichnen. Der Pfad bildet dabei ein unterstützendes Element zum Malen von kurvigen Linien.
A path can be filled with a color or pattern. If the path is not closed, it will try to figure out the shape and then fill it. However, this will not work if the path is a straight line.
Abbildung 7.10. Illustration of four different paths
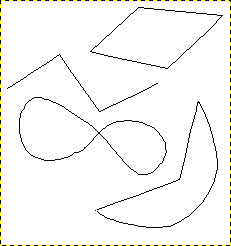
Vier beispielhafte Darstellungen von Pfaden in GIMP: geschlossen und polygonal, offen und polygonal, geschlossen und kurvig, Mix aus geraden und kurvigen Segmenten.
Fangen Sie damit an, eine Vorlage in der gewünschten Form zu entwerfen, die Sie dann später auf verschiedene Weisen verändern können. Wie das geht, finden Sie unter Abschnitt 5.2, „Pfade“ beschrieben. Wählen Sie dazu das Pfadwerkzeug mit einer der nachfolgenden Methoden:
Use → from the menu.
Über das entsprechende Symbol  im Werkzeugfenster.
Mit der Taste B.
When the Paths tool is selected, the mouse cursor changes into a crosshair with a curve by default. The actual shape depends on your mouse pointer mode setting. Make sure that the Paths Edit Mode in Tool Options is set to Design.
Left click in the image to create the first point of the path. Move the mouse to a new point and left click to create another point linked to the previous point. Although you can create as many points as you desire, you only need two points to learn about Paths.
While adding points, the mouse cursor has a little „+“ next to the curve, which indicates that clicking will add a new point.
When the mouse cursor is close to one of the path points, the „+“ changes into a cross with arrows; like the move tool. You can then move the existing path point.
To close your path, go with the mouse on top of the point you want to connect to, and then Ctrl-click that point. When you are done designing your path, you can click Enter. This will turn the path into a Selection. You can also keep adding more points, or start changing the curves of the path.
To edit the curves of your path, move the mouse cursor close to a line segment, left-click and drag the line segment. Two events occur.
Die Linie wird mit dem Mauszeiger in die Bewegungsrichtung gedehnt.
Each line segment has two start points and end points marked by little square rectangles, these are called handles. A „direction line“ now projects from each start point for the line segment that was moved. This direction line usually has a different color than the lines of the path.
The curved line segment leaves an end point in the same direction that the „direction line“ leaves the start point. The length of this line controls how far the line segment projects along the „direction line“ before curving towards the other path point.
The handle at the end of each „direction line“ can be dragged to change the direction and length of the curve. The handles on the other end, where they connect to the path, can be used to move the position of that path point.
Abbildung 7.11. Ein Pfad in Bearbeitung
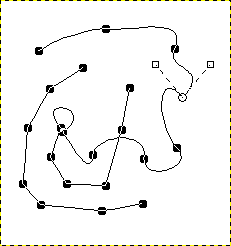
Appearance of a path while it is manipulated using the Paths tool.
Der Pfad besteht aus zwei Komponenten mit geraden und gekrümmten Segmenten. Die schwarzen Quadrate sind Ankerpunkte, der offene Kreis zeigt den ausgewählten Ankerpunkt an, und die beiden offenen Quadrate sind die zwei Griffpunkte, die jeweils zum Anker (als Endpunkt) der Kurven auf beiden Seiten gehören.

