| 3. Paint Tools | ||
|---|---|---|

|
14장. 도구 |  |
| 3. Paint Tools | ||
|---|---|---|
|
|
14장. 도구 | |
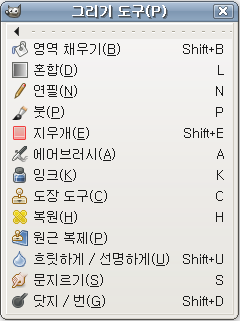
The GIMP Toolbox includes thirteen “paint tools”, all grouped together at the bottom (in the default arrangement).
등은 직관적으로 붓으로 "칠을 하는" 도구처럼 동작합니다. 하지만 다른 붓 도구들은 약간씩 다른 방식으로 동작합니다.
연필,
칠하기붓,
에어브러시,
잉크 도구
behave like the intuitive notion of “painting” with a brush. Pencil, Paintbrush, and Airbrush are called “basic painting tools” or brush tools.
The other tools use a brush to modify an image in some way rather than paint on it:
채우기 도구는 일정 영역을 색이나 무늬로 채웁니다.
그라디언트 도구는 일정 영역을 그라디언트로 채웁니다.
지우개 도구는 지우는 동작을 합니다.
도장 도구는 무늬나 이미지를 복사합니다.
원근 복제 도구는 원근법을 적용하여 복사합니다.
복원 도구는 작은 결함등을 교정합니다.
흐릿하게/선명하게 도구는 이미지의 일부를 흐릿하게 하거나 선명하게 만듭니다.
문지르기 도구는 손으로 문지른 듯한 효과를 냅니다.
닷지/번 도구는 이미지의 일부를 밝거나 어둡게 만듭니다.
The advantages of using GIMP with a tablet instead of a mouse probably show up more clearly for brush tools than anywhere else: the gain in fine control is invaluable. These tools also have special “Pressure sensitivity” options that are only usable with a tablet.
In addition to the more common “hands-on” method, it is possible to apply paint tools in an automated way, by creating a selection or path and then “stroking” it. You can choose to stroke with any of the paint tools, including nonstandard ones such as the Eraser, Smudge tool, etc., and any options you set for the tool will be applied. See the section on Stroking for more information.
Holding down the Ctrl key has a special effect on every paint tool. For the Pencil, Paintbrush, Airbrush, Ink, and Eraser, it switches them into “color picker” mode, so that clicking on an image pixel causes GIMP's foreground to be set to the active layer's color at that point (or, for the Eraser, GIMP's background color). For the Clone tool, the Ctrl key switches it into a mode where clicking sets the reference point for copying. For the Convolve tool, the Ctrl key switches between blur and sharpen modes; for the Dodge/Burn tool, it switches between dodging and burning.
Holding down the Shift key has the same effect on most paint tools: it places the tool into straight line mode. To create a straight line with any of the paint tools, first click on the starting point, then press the Shift key. As long as you hold it down, you will see a thin line connecting the previously clicked point with the current pointer location. If you click again, while continuing to hold down the Shift key, a straight line will be rendered. You can continue this process to create a series of connected line segments.
Holding down both keys puts the tool into constrained straight line mode. This is similar to the effect of the Shift key alone, except that the orientation of the line is constrained to the nearest multiple of 15 degrees. Use this if you want to create perfect horizontal, vertical, or diagonal lines.
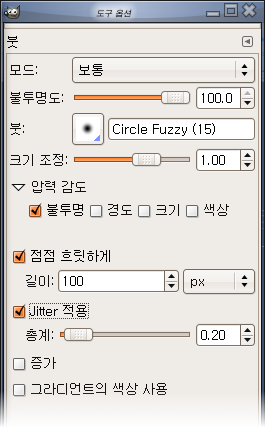
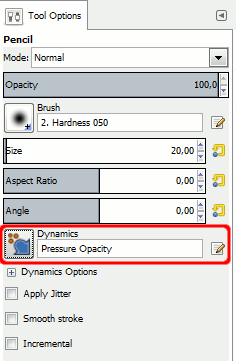
Many tool options are shared by several paint tools: these are described here. Options that apply only to one specific tool, or to a small number of tools, are described in the sections devoted to those tools.
The Mode drop-down list provides a selection of paint application modes. As with the opacity, the easiest way to understand what the Mode setting does is to imagine that the paint is actually applied to a layer above the layer you are working on, with the layer combination mode in the Layers dialog set to the selected mode. You can obtain a great variety of special effects in this way. The Mode option is only usable for tools that can be thought of as adding color to the image: the Pencil, Paintbrush, Airbrush, Ink, and Clone tools. For the other paint tools, the option appears for the sake of consistency but is always grayed out. A list of modes can be found in 2절. “레이어 모드”.
In this list, some modes are particular and are described below.
The Opacity slider sets the transparency level for the brush operation. To understand how it works, imagine that instead of altering the active layer, the tool creates a transparent layer above the active layer and acts on that layer. Changing Opacity in the Tool Options has the same effect that changing opacity in the Layers dialog would have in the latter situation. It controls the “strength” of all paint tools, not just those that paint on the active layer. In the case of the Eraser, this can come across as a bit confusing: it works out that the higher the “opacity” is, the more transparency you get.
The brush determines how much of the image is affected by the tool, and how it is affected, when you trace out a brushstroke with the pointer. GIMP allows you to use several different types of brushes, which are described in the Brushes section. The same brush choices are available for all paint tools except the Ink tool, which uses a unique type of procedurally generated brush. The colors of a brush only come into play for tools where they are meaningful: the Pencil, Paintbrush, and Airbrush tools. For the other paint tools, only the intensity distribution of a brush is relevant.
This option lets you to modify precisely the size of the brush. You can use the arrow keys to vary by ±0.01 or the Page-Up and Page-Down keys to vary by ±1.00. You can obtain the same result if you have correctly set your mouse-wheel in the Preferences. See How to vary the size of a brush
This determines the ratio between the height and the width of the brush. The slider is scaled from -20.00 to 20.00 with the default value set to 0.00. A negative value from 0.00 to -20 will narrow the height of the brush while a positive value between 0.00 and 20.00 indicates the narrowing rate of the width of the brush.
This option makes the brush turn round its center. This is visible if the brush is not circular or made from a rotated figure.
Brush dynamics let you map different brush parameters to several input dynamics. They are mostly used with graphic tablets, but some of them are also usable with a mouse.
You can read more about dynamics in Dynamics
When stroking paths and selections using a paint tool there is a an option to select “Emulate brush dynamics”. That means that when you stoke, brush pressure and velocity are varying along the length of the stroke. Pressure starts with zero, ramps up to full pressure and then ramps down again to no pressure. Velocity starts from zero and ramps up to full speed by the end of the stroke.
These options are described in Dynamics Options
You know “spacing” in brush strokes: strokes are made of successive brush marks which, when they are very near, seem to draw a continuous line. Here, instead of being aligned brush marks are scattered over a distance you can set with the slider.
Jitter is also available in the Paint Dynamic Editor where you can connect jitter to the behavior of the brush.
This option doesn't affect the rendering of the brush stroke but its “shape”. It takes away the wobbles of the line you are drawing. It makes drawing with a mouse easier.
When this option is checked, two setting areas appear, Quality and Weight. You can change the default values to adapt them to your skill.
High weight values rigidifies the brush stroke.
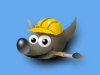
그림 14.43. “Smooth Stroke” example
Trying to draw a straight line and a sine curve with the mouse. 1 : option unchecked 2 : default values 3 : maximum values
The incremental checkbox does not seems to work as everyone expect. If it is deactivated (the default value) the maximum effect of a single stroke is determined by the opacity set in the opacity slider. If the opacity is set to less than 100, moving the brush over the same spot will increase the opacity if the brush is lifted in the meantime. Painting over with the same stroke has no such effect. If Incremental is active the brush will paint with full opacity independent of the slider's setting. This option is available for all paint tools except those which have a “rate” control, which automatically implies an incremental effect. See also 2절. “레이어 모드”.
The following examples demonstrate some of GIMP's paint modes:
모든 그리기 도구에 불투명도를 조절할 수 있습니다. 여기서는 투명하게 칠을 하는 것이 아니라 칠을 적용할 확률을 결정하는 것입니다. 이것을 통해 붓자국이나 채우기에 다양한 무늬를 적용할 수 있습니다.
그림 14.45. 분해 모드로 그리기

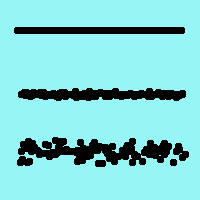
이 이미지는 알파 채널이 없는 배경 레이어만 있습니다. 배경 레이어의 색은 하늘색이며, 연필 도구로 그린 불투명도 100%, 50%, 25% 의 줄 세 개가 있습니다. 각 불투명도에 따라 전경색의 픽셀를이 붓자국 모양대로 흩어져 있음을 알 수 있습니다.
이 모드는 레이어의 투명한 영역에만 칠을 합니다. 불투명도가 낮을수록 더 많은 칠이 적용이 됩니다. 따라서 완전하게 불투명한 영역은 아무런 효과를 주지 못하고 완전하게 투명한 영역은 일반 모드와 같은 효과를 줍니다. 그리고 레이어의 알파 채널이 잠겨 있을 경우에는 아무런 효과를 주지 못합니다.
위 예제의 경우, 최상단 레이어에 윌버 이미지가 있고, 그 주변은 전부 투명합니다. 그리고 아래쪽 레이어는 밝은 파란색으로 채워져 있습니다. 채우기 도구의 전체 선택 채우기 옵션을 체크하고 전체 레이어를 선택한 뒤, 채우기 도구를 사용했습니다. 채우기 도구에서 무늬를 사용할 수도 있습니다.
The next image (below) has two layers. The upper layer is active. Three brushtrokes with pencil, red color at 100%, 50%, 25%: only transparent or semi-transparent pixels of the layer are painted.
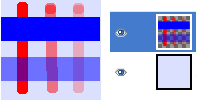
그림 14.48. Example for layer mode “Color erase”
Wilber over a blue background layer

White foreground color erased
이 모드는 전경색을 일부분 투명하게 만드는 모드로, 붓자국이 있는 영역에 적용된 색상을 알파로 필터와 비슷하게 동작합니다. 이 모드는 알파 채널이 있는 레이어에서만 정상적으로 동작하며, 알파 채널이 없을 경우 일반 모드와 동일하게 동작합니다.
위 예제 이미지에서는 채우기 도구를 이용해 흰색으로 채운 결과 윌버의 흰색 부분이 모두 사라지고 파란 바탕색이 보이게 되었습니다.
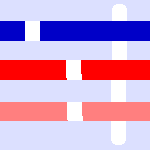
This image below has only one layer, the background layer. Background color is sky blue. Three brushtrokes with pencil:
정확히 파란색이 칠해진 영역에서는 파란색 부분만 지워졌습니다.
정확히 빨간색이 칠해진 영역에서는 투명도에 관계없이 빨간색만 지워졌습니다. 지워진 영역은 투명하게 됩니다.
배경 레이어의 색상인 하늘색 영역에서는 하늘색 부분만 지워졌습니다.
Advanced users may be interested to know that paint tools actually operate at a sub-pixel level, in order to avoid producing jagged-looking results. One consequence of this is that even if you work with a hard-edged brush, such as one of the Circle brushes, pixels on the edge of the brushstroke will only be partially affected. If you need to have all-or-nothing effects (which may be necessary for getting a good selection, or for cutting and pasting, or for operating pixel-by-pixel at a high zoom level), use the Pencil tool, which makes all brushes perfectly hard and disables sub-pixel anti-aliasing.