| 6. 붓 | ||
|---|---|---|

|
7장. 김프로 그리기 |  |
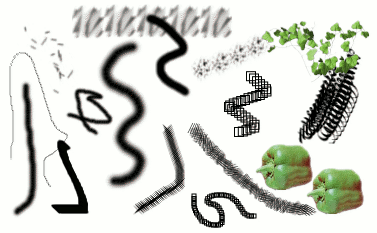
그림 7.15. 붓 스트로크 예제

A number of examples of brushstrokes painted using different brushes from the set supplied with GIMP. All were painted using the Paintbrush tool.
A brush is a pixmap or set of pixmaps used for painting. GIMP includes a set of 10 “paint tools”, which not only perform operations that you would normally think of as painting, but also operations such as erasing, copying, smudging, lightening or darkening, etc. All of the paint tools, except the ink tool, use the same set of brushes. The brush pixmaps represent the marks that are made by single “touches” of the brush to the image. A brush stroke, usually made by moving the pointer across the image with the mouse button held down, produces a series of marks spaced along the trajectory, in a way specified by the characteristics of the brush and the paint tool being used.
Brushes can be selected by clicking on an icon in the Brushes dialog. GIMP's current brush is shown in the Brush/Pattern/Gradient area of the Toolbox. Clicking on the brush symbol there is one way of activating the Brushes dialog.
When you install GIMP, it comes with a number of basic brushes, plus a few bizarre ones that serve mainly to give you examples of what is possible (i. e., the "green pepper" brush in the illustration). You can also create new brushes, or download them and install them so that GIMP will recognize them.
GIMP can use several different types of brushes. All of them, however, are used in the same way, and for most purposes you don't need to worry about the differences when you paint with them. Here are the available types of brushes:
Most of the brushes supplied with GIMP fall into this category. They are represented in the Brushes dialog by grayscale pixmaps. When you paint using them, the current foreground color (as shown in the Color Area of the Toolbox) is substituted for black, and the pixmap shown in the brushes dialog represents the mark that the brush makes on the image.
To create such a brush: Create a small image in gray levels using zoom. Save it with the .gbr extension. Click on Refresh button in the Brush Dialog to get it in preview without it being necessary to restart GIMP.
이 항목의 붓들은 붓 도구 대화 상자에 색상 이미지로 표현됩니다. 이러한 붓을 이용해 칠을 하면, 전경색이 아닌 붓 도구 대화 상자에 나타난 색으로 칠해집니다. 그 외의 동작은 일반 붓과 같습니다.
To create such a brush: Create a small RGBA image. For this, open New Image, select RGB for image type and Transparent for fill type. Draw your image and and firs save it as a .xcf file to keep its properties. Then save it in .gbr format. Click on the Refresh button in Brush Dialog to get your brush without it being necessary to restart GIMP.
![[작은 정보]](images/tip.png)
|
작은 정보 |
|---|---|
|
선택을 복사하거나 잘라넣기를 하면, 선택의 내용은 클립보드로 복사가 되며, 붓 대화 상자의 첫번째 칸에 표시됩니다. 이를 붓처럼 칠하기 등의 작업에 이용할 수도 있습니다. |
Brushes in this category can make more than one kind of mark on an image. They are indicated by small red triangles at the lower right corner of the brush symbol in the Brushes dialog. They are sometimes called "animated brushes" because the marks change as you trace out a brushstroke. In principle, image hose brushes can be very sophisticated, especially if you use a tablet, changing shape as a function of pressure, angle, etc. These possibilities have never really been exploited, however; and the ones supplied with GIMP are relatively simple (but still quite useful).
움직이는 붓을 만드는 예는 움직이는 붓에서 찾아볼 수 있습니다.
이 붓은 붓 편집기를 이용해 만듭니다. 붓 편집기는 간단한 인터페이스로 다양한 모양의 붓을 만들 수 있는 프로그램입니다. 파라매트릭 붓의 주요한 특징은 크기조정이 가능하다 라는 점입니다. 김프 2.2에서는 에서 키 압력이나 마우스 휠의 움직임에 따라 파라매트릭 붓의 크기를 조정할 수 있도록 설정할 수 있습니다.
최신 버전의 김프에서는 모든 붓의 크기를 조절할 수 있습니다. 모든 그리기 도구의 옵션 상자에 현재 붓의 크기를 조절할 수 있는 조절막대가 있습니다. 마우스 휠을 이용해 이미지창에서 바로 붓 크기를 변경할 수 있습니다. 이에 대한 자세한 사항은 붓 크기 조절하기 를 참조하십시오.
In addition to the brush pixmap, each GIMP brush has one other important property: the brush Spacing. This represents the distance between consecutive brush-marks when a continuous brushstroke is painted. Each brush has an assigned default value for this, which can be modified using the Brushes dialog.