| 3. Su paveikslėlio turiniu susiję dialogai | ||
|---|---|---|

|
Skyrius 15. Dialogs |  |
Spalvų dialogas leidžia valdyti ir pasirinkti naujas spalvas. Jį sudaro penkios atskiros dalys: GIMP, CMYK, Trikampis, Akvarelė ir Gamos. Taip pat jame yra pipetės įrankis, kuriuo galite pasirinkti bet kurioje ekrano vietoje esančią spalvą.
The dialog called from the FG/BG area in the toolbox is a bit different compared to the one called from the image menu:
the sliders are permanently visible instead of selected from the scale menu,
twelve buttons show the last used colors. You may choose a color by clicking on one of these buttons or add the current FG or BG color to this history list.
This dialog works either on the foreground or the background color.
The „Colors“ dialog is a dockable dialog; see the section Skyrius 2.3, „Dialogai ir dokai“ for help on manipulating it.
You can access it:
from an image menu: → → ;
from the Tab menu in any dockable dialog by clicking on
 and selecting
→ ,
įrankinėje: spustelėkite dabartinę Priekinio plano arba Fono spalvą.
In the menu, there is a list of detached windows which exists only if at least one dialog remains open. In this case, you can raise the „Colors“ dialog from the image-menu: → .
Programos GIMP spalvų parinkikliu galite pasirinkti spalvą spustelėdami dešiniame krašte esančią vienmatę juostą, tada kairėje esančią dvimatę sritį. Vienmatė juosta gali koduoti bet kurį spalvos parametrą: H, S, V, R, G arba B, atsižvelgiant į atitinkamą paspaustą mygtuką. Tada dvimatė sritis koduoja du papildomųjų spalvų parametrus.
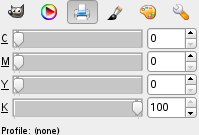
Pav. 15.27. Ši pasirinktis rodo pikselio Žalsvai mėlyną (Cyan), Rausvai raudoną (Magenta), Geltoną, Juodą ir Alfa reikšmes kaip procentus.

Šį parinkiklį galite atverti spustelėję spausdintuvo piktogramą. CMYK rodinys suteikia galimybę valdyti CMYK spalvų modelio spalvas.
Trikampis parinkiklis yra sudarytas iš chromatinio apskritimo, leidžiančio pasirinkti Atspalvį spustelint ir velkant mažą apskritimą, ir trikampio, kuriame taip pat yra mažas apskritimas, leidžiantis keisti Sodrumą ir Reikšmę.
Šį spalvos parinkiklį simbolizuoja teptukas. Šio parinkiklio funkcijos veiksena šiek tiek skiriasi nuo iki dabar pateiktų modelių. Principas yra toks: reikia pakeisti dabartinę priekinio plano spalvą spustelint stačiakampio formos paletę. Pavyzdžiui, jeigu dabartinė priekinio plano spalva yra balta, spustelėjus raudonos spalvos sritį, ji pakeičiama į rausvą. Pakartotinai spustelėjus poveikis sustiprėja. Slankikliu, esančiu spalvų paletės dešinėje, galite nustatyti spalvų kiekį kiekvieną kartą spustelint. Kuo didesnė slankiklio nurodyta reikšmė, tuo daugiau spalvos spustelint paimama.
Šis spalvų parinkiklis parodo dabartinės paletės spalvų sąrašą. Šis sąrašas yra panašus į Paletčių rengyklės spalvų sąrašą. Spustelėdami spalvų ekrane spalvas galite nustatyti programos GIMP priekinio plano arba fono spalvas. Taip pat galite naudodami rodyklių klavišus judėti spalvų sąraše.
Šis parinkiklis rodo visuotinį R, G, B kanalų ir H, S, V reikšmių vaizdą, pateiktą slankikliuose.
The color picker has a completely different behavior, than the color picker tool. Instead of picking the colors from the active image, you're able to pick colors from the entire screen.
The downside is that you get colors after they got processed by the full system color stack, in particular color management. It means that the resulting color values may end up different from ones returned by the color picker tool when picking over the canvas. It is up to you to make an informed choice of which color picker to use.
Žr. HTML notacija. Taip pat galite naudoti CSS raktažodžius; įveskite pirmą spalvos raidę ir bus parodytas spalvų su jų raktažodžiais sąrašas:
Right-clicking in the HTML Notation text box opens a context menu that allows you to edit your notation, particularly to paste a complex notation you have copied elsewhere. This menu leads to various Input Methods that allow you to use foreign characters, and to the possibility to Insert Unicode Control Characters. This is a vast field, beyond this help. Please see [UNICODE].
Right up you find a symbol, consisting of two arrows, with which you can exchange the foreground and background color. At the bottom left of the dialog, just below the foreground color block, you find a switching surface with two small, one black and the other white, partially overlapping squares. If you click on these, the front and background color are put back to black and white respectively.