| 3.6. Palečių dialogas | ||
|---|---|---|

|
3. Su paveikslėlio turiniu susiję dialogai |  |
| 3.6. Palečių dialogas | ||
|---|---|---|
|
|
3. Su paveikslėlio turiniu susiję dialogai | |
Paletė yra atskirų spalvų rinkinys, be jokios konkrečios tvarkos. Daugiau informacijos apie paletes ir kaip jas galima sukurti bei naudoti rasite sekcijoje Paletės.
The „Palettes“ dialog is used to select a palette, by clicking on it in a list or grid view. A few dozen more or less randomly chosen palettes are supplied with GIMP, and you can easily add new palettes of your own. The „Palettes“ dialog also give you access to several operations for creating new palettes or manipulating the ones that already exist.
![[Pastaba]](images/note.png)
|
Pastaba |
|---|---|
|
The „Palettes“ dialog is not the same thing as the Index Palette dialog, which is used to manipulate the colormaps of indexed images. |
The „Palettes“ dialog is a dockable dialog; see the section Skyrius 2.3, „Dialogai ir dokai“ for help on manipulating it.
You can access it:
from the image menu: → → ;
from the Tab menu in any dockable dialog by clicking on
 and selecting
→ .
and selecting
→ .
Spustelėjus dialoge esančią paletę ši paletė pasirenkama ir atveriama Palečių rengyklė, leidžianti nustatyti programos GIMP priekinio plano arba fono spalvas spustelint spalvas paletės ekrane. Paletę taip pat galite pasirinkti nauodami rodyklių klavišus.
Du kartus spustelėjus paletės pavadinimą (sąrašo rodinio veiksenoje) galite redaguoti jos pavadinimą. Atminkite, kad galite keisti tik savo pačių pridėtų palečių pavadinimus, o ne tų, kurios yra platinamos su programa GIMP. Jeigu pakeisite pavadinimą, kurio neleidžiama pakeisti, jis bus atstatytas atgal į ankstesnįjį vos tik paspausite klavišą Enter arba žymikliu suaktyvinsite ką nors kitą.
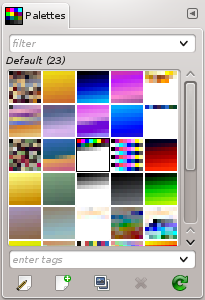
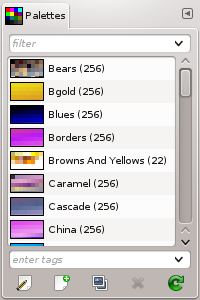
Kortelės meniu galite pasirinkti tarp ir . Tinklelio veiksenoje paletės yra išdėstytos stačiakampiame masyve, tokiu būdu vienu metu jų matoma daug ir lengva rasti norimą. Sąrašo veiksenoje (numatytoje) paletės yra išdėstytos vertikaliai sąraše, šalie kiekvienos parašytas pavadinimas.
The option Preview Size allows you to adapt the size of color cell previews to your liking.
You can use tags to reorganize the palettes display. See Skyrius 3.7, „Tagging“.
The buttons of the Palettes Dialog
Below the palettes view, at the bottom of the dialog window, there are several buttons:
 Edit this palette
This button brings up the Skyrius 3.6.4, „Palečių rengyklė“.
For more information on this button please refer to Nauja paletė.
 Duplicate this palette
For more information on this button please refer to Sukurti paletės kopiją.
For more information on this button please refer to Ištrinti paletę.
 Refresh palettes
For more information on this button please refer to Atnaujinti paletes.
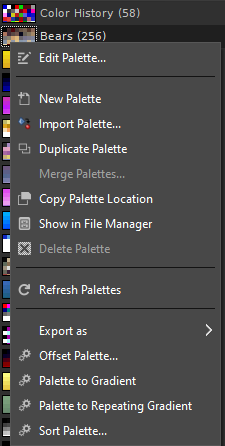
The „Palettes“ context menu can be accessed by right-clicking
in the Palettes dialog, or by choosing the top item from the dialog Tab
menu
().
|
|
Pastaba |
|---|---|
|
Some of the listed menu entries are installation-dependent, which need version 2 of the Python interpreter to be installed for GIMP 2.10. This includes at the time of writing: Offset Palette..., Palette to Gradient, Palette to Repeating Gradient and Sort Palette.... |
„Edit Palette“ is an alternative way of activating
the
Palette Editor:
it can also be activated by double-clicking on a palette in the
Palettes dialog, or by pressing the „Edit Palette“
button at the bottom of the dialog.
Mygtukas „Nauja paletė“ sukuria naują, bevardę paletę, kurioje nėra jokių spalvų įrašų, ir atveria Palečių rengyklę, kad galėtumėte paletėje pridėti spalvas. Rezultatas bus automatiškai išsaugotas jūsų asmeniame aplanke palettes, kai užversite programą GIMP, kad paletė būtų prieinama Palečių dialoge kituose seansuose.
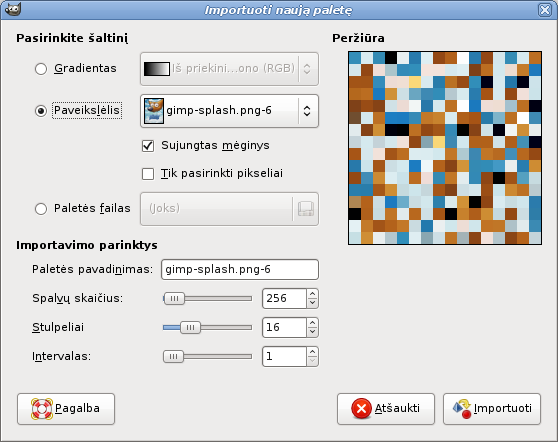
„Import Palette“ allows you to create a new palette from the colors in a gradient, an image or a palette file. Choosing it brings up the „Import Palette“ dialog, which gives you the following options:
|
|
Pastaba |
|---|---|
|
Former versions of GIMP had a „Save palette“ command. It no longer exists. To save the palette of an image, indexed or not, you must import it from the image. |
You can import a palette either from any of GIMP's
gradients (choosing one from the adjoining menu), or from
any of the currently open images (chosen from the adjoining
menu). You can also import a RIFF palette
file (with extension .pal), of the
type used by several Microsoft Windows applications.
Two options concerning image as source, available for RGB images only:
Sujungtas mėginys: kai ši parinktis pažymėta, spalvos paimamos iš visų matomų sluoksnių. Jeigu nepažymėta, pikseliai parenkami tik aktyvaus sluoksnio pikseliai, netgi nematomi.
Tik pasirinkti pikseliai: kaip galima suprasti iš pavadinimo, pasirenkami tik pažymėtos srities pikseliai, aktyviame arba visuose matomuose sluoksniuose, atsižvelgiant į ankstesnę parinktį.
Čia galite nurodyti naujos paletės pavadinimą. Jeigu jūsų pasirinktą pavadinimą jau naudoja kita paletė, prie šio pavadinimo bus pridėtas numeris (pvz., „#1“).
Čia galite nurodyti spalvų paletėje skaičių. Numatytoji parinktis yra 256, kuri pasirinkte dėl trijų priežasčių: 1) kiekviename gradiente yra 256 skirtingos spalvos; 2) GIF failai gali būti daugiausiai 256 spalvų; 3) programos GIMP indeksuotuose paveikslėliuose yra daugiausiai 256 skirtingos spalvos. Tačiau čia galite naudoti bet kokį pageidaujamą skaičių: GIMP bandys sukurti paletę išdėstant nurodytą skaičių spalvų tolygiai gradiento arba paveikslėlio spalvų rėžyje.
Čia galite nurodyti paletės stulpelių skaičių. Šis parametras įtakoja tik paletės rodymo būdą, tačiau neturi jokio poveikio paletės naudojimui.
Netgi nustačius Spalvų skaičių į didžiausią galimą, spalvų skaičius paletėje negali viršyti 10000. RGB paveikslėliuose yra žymiai daugiau spalvų. Intervalas turėtų leisti grupuoti panašias spalvas apie vidurkį, taigi ir gauti geresnę paletę. Šios problemos nėra 256 spalvų indeksuotuose paveikslėliuose: Intervalas iki 1 leidžia pasirinkti 256 spalvas (ši parinktis yra daugiau nei 256 spalvų paletėse yra išjungta taip pat).
Importuota paletė bus įtraukta į Palečių dialogą ir automatiškai išsaugota jūsų asmeniniame aplanke palettes, kad būtų prieinama kituose seansuose.
Spustelėjus mygtuką Sukurti paletės kopiją sukuriama nauja paletė nukopijuojant dabar pasirinktą paletę ir atveriama Palečių rengyklė, kad galėtumėte pakeisti paletę. Užvėrus programą GIMP rezultatas bus automatiškai išsaugotas jūsų asmeniniame aplanke palettes, kad paletė kitų seansų metu būtų prieiname Palečių dialoge.
Currently this operation is not implemented, and the menu entry will always be disabled.
This command allows you to copy the palette file location to the clipboard. You can then paste it in a text editor.
Show in File Manager opens the location of the palette file in the default File Manager on your system.
Delete Palette removes the palette from the „Palettes “dialog, and deletes the disk file in which it is stored. Before it acts, it asks you confirm that you really want to do these things. Note that you cannot remove any of the palettes that are supplied with GIMP, only palettes you have added yourself.
Spustelėjus mygtuką Atnaujinti paletes perskenuojami visi jūsų palečių paieškos kelyje nurodyti aplankai, o naujai rastos paletės įtraukiamos į sąrašą Palečių dialoge. Tai gali būti naudinga jeigu gavote palečių failus iš išorinio šaltinio, nukopijavote jas į vieną iš savo palečių aplankų, ir norite, kad jos būtų prieinamos dabartiniame seanse.
The submenu gives several choices to export the current palette in external formats. At this time, exporting to the following formats is supported: , , , , and . Each of these will open a dialog where you can enter a filename and choose a folder where the exported file will be stored.
Ši komanda atveria dialogo langą:
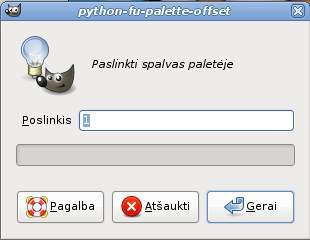
Ši komanda paima paskutinę paletės spalvą ir padeda ją pirmoje vietoje. Parametras Poslinkis leidžia nurodyti kiek kartų reikia atlikti šį veiksmą.
With negative „Offsets“ colors are put from the first position to the end of the colors list.
Pav. 15.60. „Paslinkti paletę“ pavyzdžiai
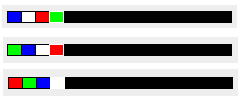
Iš viršaus į apačią: originali paletė, Poslinkis = 1, Poslinkis = 2.
With this command, all the colors of the palette are used to form the current gradient which is saved in the Gradient Dialog. The created gradient is build with segments just as much as the number of colors on the given palette.
This command creates a repeating gradient, using all the colors of the palette. This gradient appears in the Gradient Dialog and becomes the current gradient. The gradient is created with segments one more than the number of colors on the given palette. The left side color at the leftmost segment will be the same color on the right side at the rightmost segment.
Pav. 15.61. „Paletė į pasikartojantį gradientą“ pavyzdžiai
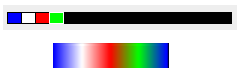
Iš viršaus į apačią: originali paletė, šia komanda sukurtas gradientas.
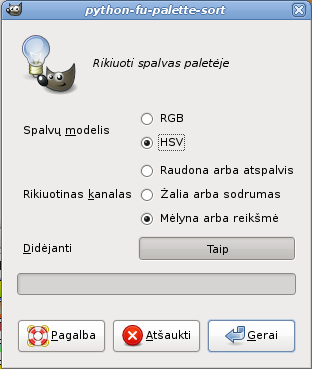
This command opens a dialog window which allows you to sort the colors of the palette according to certain criteria. If the palette is read only a new palette will be created that is sorted based on your settings.
Another way of sorting a palette is by using the sorting options of the Rearrange Colormap dialog.
Several settings of this dialog are not well understood. We would welcome contributions from anyone that knows how to improve this documentation.
Selections: This option determines how the palette is going to be sorted. How to use this has not been well documented by its original author. We advise to leave it at the default All.
Slice expression: This option affects how the palette is sorted when Slice/Array was chosen above in Selections. Documentation taken from the code:
Leaving this empty, or entering : selects
all items.
:4, or :4 makes
a 4-row selection out of all colors (length auto-determined).
:1,4 selects the first 4 colors.
:,4 selects rows of 4 colors (number of
rows auto-determined).
:4,4 selects 4 rows of 4 colors.
4: selects a single row of all colors
after 4, inclusive.
4:,4 selects rows of 4 colors, starting
at 4 (number of rows auto-determined).
4:4,4 selects 4 rows of 4 colors (16
colors total), beginning at index 4.
4 is illegal (ambiguous).
Channel to Sort: This option determines based on what type of color channel the sorting will happen.
Ascending: This option determines if the sorting needs to be ascending (Yes) or descending (No). Clicking the button changes between yes and no.
Secondary Channel to Sort: This option determines the secondary color channel for sorting in case the first channel sort returns equal values.
Ascending: This option determines if the sorting needs to be ascending (Yes) or descending (No). Clicking the button changes between yes and no.
Quantization: Undocumented for now.
Partitioning channel: This option is also used to determine how to sort.
Partitioning quantization: This option is used in conjunction with the previous one.
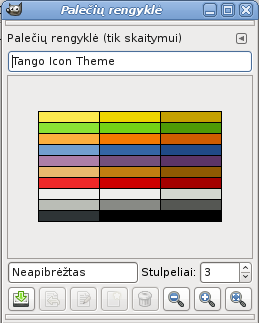
Palečių rengyklė yra naudojama pagrinde dėl dviejų priežasčių: pirma, nustatyti GIMP priekinio plano arba fono spalvas (kaip parodyta įrankinės spalvų srityje) į pasirinktas paletės spalvas; antra, pakeisti paletę. Palečių rengyklę galite aktyvuoti bet kuriai Palečių dialoge esančiai paletei, tačiau negalite keisti tik tas paletes, kurias sukūrėte patys, bet ne su programa GIMP platinamas paletes. (Tačiau galite sukurti bet kokios paletės kopiją ir tada redaguoti tą naujai sukurtą kopiją.) Jeigu pakeisite paletę, jūsų darbo rezultatas bus automatiškai išsaugotas, kai užversite GIMP.
The Palette Editor is only accessible from the Palettes dialog: you
can activate it by double-clicking on a palette, or by pressing the
„Edit Palette“ button at the bottom, or by choosing
„Edit Palette“ from the „Palettes“ Menu.
Palečių rengyklė yra įtaisomas dialogas; informaciją kaip jį galite valdyti rasite sekcijoje Dialogai ir prijungimas.
Jeigu spustelėsite spalvos laukelį paletės ekrane, programos GIMP priekinio plano spalva bus nustatyta į tą pasirinktą spalvą: tą galite matyti įrankinės spalvų srityje. Jeigu spustelėdami laikysite paspaudę klavišą Ctrl, programos GIMP fono spalva bus nustatyta į pasirinktą spalvą.
Jeigu paletė yra pasirinktinė paletė, du kartus spustelėjus spalvą ne tik nustatoma priekinio plano spalva, bet ir atveriama spalvų rengyklė, leidžianti pakeisti pasirinktą paletės įrašą.
Dešiniuoju pelės mygtuku spustelėjus paletės rodymo sritį parodomas Palečių rengyklės meniu. Jo funkcijos pagrinde yra tokios pat kaip ir dialogo apačioje esančių mygtukų.
Below the palette display area, at the left, appears a text entry area that shows the name of the selected color (or „Untitled “ if it does not have one). This information has no functional significance, and is present only to serve you as a memory aid.
Pavadinimo įrašo dešinėje yra suktukas, leidžiantis nustatyti stulpelių, naudojamų rodyti paletę, skaičių. Tai įtakoja tik rodymą, ne paletės veikimą. Jeigu reikšmė yra nustatyta į 0, bus naudojama numatytoji reikšmė.
Dialogo apačioje yra eilė mygtukų, kurių dauguma sutampa su Palečių rengyklės meniu įrašu, prieinamu dešiniuoju pelės mygtuku spustelėjus paletės rodymo sritį. Štai šie mygtukai:
 Išsaugoti
This button causes the palette to be saved in your personal
palettes folder. It
would be saved automatically when GIMP exits
in any case, but you might want to use this button if you are
concerned that GIMP might crash in the
meantime.
 Atstatyti
Ši operacija dar neįgyvendinta.
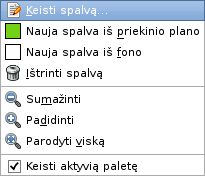
Keisti spalvą
Parodoma spalvų rengyklė, leidžianti pakeisti spalvą. Jeigu paletė yra viena ir jums jos neleidžiama keisti, šis mygtukas bus neaktyvus. Žiūrėkite žemiau
For more information on this button please refer to below.
For more information on this button please refer to below.
 Zoom Out
For more information on this button please refer to below.
 Pritraukti
For more information on this button please refer to below.
 Zoom All
For more information on this button please refer to below.
Paletės rengyklės meniu galite pasiekti dešiniuoju pelės mygtuku spustelėję paletės ekraną Paletės rengyklėje arba dialogo Kortelės meniu pasirinkę viršutinį įrašą. Jame esančias operacijas taip pat galima įvykdyti naudojant Pelečių rengyklės apačioje esančius mygtukus.
„Edit Color“ brings up a color editor that allows you to modify the color of the selected palette entry. If the palette is one that you are not allowed to edit (that is, one supplied by GIMP when it is installed), then the menu entry will be insensitive.
Šios komandos sukuria naują paletės įrašą, naudojant programos GIMP dabartinę priekinio plano spalvą (kaip parodyta įrankinės spalvų srityje) arba dabartinę fono spalvą.
„Delete Color“ removes the selected color entry from the palette. If the palette is one that you are not allowed to edit, then the menu entry will be insensitive.
„Zoom Out“ reduces the vertical scale of the entries in the palette display.
„Zoom In“ increases the vertical scale of the entries in the palette display.
„Parodyti viską“ pakeičia vertikalų paletės įrašų dydį taip, kad visa paletė tilptų rodymo srityje.
Kai ši parinktis pažymėta (numatytoji), jūs galite redaguoti kitą paletę ją spustelėdami „Palečių“ dialoge.