| 8.25. Μονοφωνικός μείκτης | ||
|---|---|---|

|
8. Το μενού «Χρώματα» |  |
| 8.25. Μονοφωνικός μείκτης | ||
|---|---|---|
|
|
8. Το μενού «Χρώματα» | |
Σχήμα 16.197. Με εφαρμοσμένο μονό μείκτη
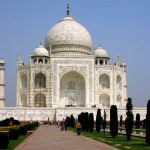
Αρχική εικόνα
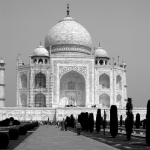
Με εφαρμοσμένη την εντολή «Μονός μείκτης» με προκαθορισμένες επιλογές.
![[Σημείωση]](images/note.png)
|
Σημείωση |
|---|---|
|
Αυτή η εντολή δεν δουλεύει σε εικόνες γκρίζας κλίμακας. Εάν η εικόνα είναι γκρίζας κλίμακας, η είσοδος μενού είναι ανενεργή. |
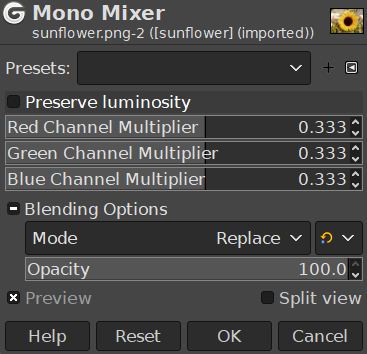
Μπορείτε να βρείτε αυτήν την εντολή στο μενού παραθύρου εικόνας στο → → .
Οι «Προεπιλογές» είναι ένα συνηθισμένο γνώρισμα για πολλές εντολές χρωμάτων. Μπορείτε να βρείτε την περιγραφή τους στο Τμήμα 8.1.1, «Κοινά γνωρίσματα χρωμάτων».
Η ανάμειξη μπορεί να οδηγήσει σε μια εικόνα όπου ορισμένα από τα χρώματα είναι πολύ ανοιχτά. Αυτή η επιλογή μειώνει τη σχετική λαμπρότητα (luminosity) των χρωματικών καναλιών, διατηρώντας παράλληλα μια καλή οπτική αναλογία μεταξύ τους. Έτσι, μπορείτε να αλλάξετε τη σχετική βαρύτητα των χρωμάτων χωρίς να αλλάξετε τη συνολική σχετική λαμπρότητα (luminosity).
Με εφαρμοσμένο τον συντελεστή σε κάθε κανάλι. Οι τιμές κυμαίνονται από -5,000 έως 5,000. Επειδή οι προεπιλεγμένες τιμές είναι ίσες στα τρία κανάλια, η εικόνα γίνεται αχνή.
Αυτά τα κοινά γνωρίσματα περιγράφονται στο Τμήμα 8.1.1, «Κοινά γνωρίσματα χρωμάτων».
Όταν αυτό το φίλτρο είναι ανοικτό, η προεπισκόπηση της εικόνας μετατρέπεται σε κλίμακα του γκρι, αλλά η εικόνα εξακολουθεί να είναι εικόνα RGB με τρία κανάλια, μέχρι να πατηθεί το πλήκτρο Εντάξει.
Σχήμα 16.199. Κόκκινο: 100%, πράσινο: 50%, γαλάζιο: 0%. Με διατήρηση της σχετικής λαμπρότητας (Luminosity) ανεπίλεκτη.

Σε κάθε τετράγωνο, τα εικονοστοιχεία έχουν μετατραπεί σε στάθμη του γκρι ίσης τιμής με το κόκκινο κανάλι στην αρχική εικόνα (Το παρασκήνιο έχει βαφτεί με ροζ κατόπιν για να κάνει όλα τα τετράγωνα ορατά).
Ακολουθεί ο τρόπος με τον οποίο λειτουργεί η Διατήρηση σχετικής λαμπρότητας (Luminosity) στη μονόχρωμη κατάσταση: «Για παράδειγμα, υποθέστε ότι τα ρυθμιστικά ήταν Κόκκινο:75%, Πράσινο:75%, Γαλάζιο:0%. Με απενεργοποιημένο το Διατήρηση σχετικής λαμπρότητας (Luminosity) η εικόνα που προκύπτει θα ήταν 75%+75%+0% =150%, πολύ φωτεινή πράγματι. Ένα εικονοστοιχείο με τιμή, ας πούμε, R,G,B=127,100,80 θα αντιστοιχούσε σε 127*0,75+100*0,75+80*0=170 για κάθε κανάλι. Με ενεργοποιημένο το Διατήρηση σχετικής λαμπρότητας (Luminosity), τα ρυθμιστικά θα κλιμακώνονται έτσι ώστε να αθροίζονται πάντα στο 100%. Σε αυτό το παράδειγμα, αυτή η τιμή κλίμακας είναι 1/(75%+75%+0%) ή 0,667. Έτσι, οι τιμές των εικονοστοιχείων θα είναι περίπου 113. Η επιλογή Διατήρηση σχετικής λαμπρότητας απλώς διασφαλίζει ότι οι τιμές κλίμακας από τα ρυθμιστικά προσθέτουν πάντα το 100%. Φυσικά, παράξενα πράγματα συμβαίνουν όταν κάποιο από τα ρυθμιστικά έχει μεγάλες αρνητικές τιμές.» (από τον ίδιο τον συγγραφέα του πρόσθετου).
|
|
Σημείωση |
|---|---|
|
Ποιο κανάλι πρέπει να τροποποιήσετε; Αυτό εξαρτάται από το τι θέλετε να κάνετε. Κατ 'αρχήν, το κόκκινο κανάλι ταιριάζει καλά στις τροποποιήσεις αντίθεσης. Το πράσινο κανάλι είναι καλά προσαρμοσμένο στις αλλαγές λεπτομερειών και το γαλάζιο κανάλι σε θόρυβο, αλλαγές κόκκων. Μπορείτε να χρησιμοποιήσετε την εντολή Αποσύνθεση. |