| 5. Kurver | ||
|---|---|---|

|
Kapitel 7. Male med GIMP |  |
| 5. Kurver | ||
|---|---|---|
|
|
Kapitel 7. Male med GIMP | |
Paths are curves (known as Bézier-curves). Paths are easy to learn and use in GIMP. To understand their concepts and mechanism, look at the glossary Bézier-curve or Wikipedia [WKPD-BEZIER]. The Paths tool is very powerful, allowing you to design complex shapes. When designing a shape, you first use the Paths tool in GIMP to create a path. After that you usually stroke or fill the path.
I GIMP betyder udtrykket “Optegn kurve”, at man påfører kurven en specifik stil (farve, bredde, mønster osv.).
En kurve kan bruges på mange måder:
Du kan konvertere en lukket kurve til en markering.
Enhver kurve, såvel åben som lukket, kan optegnes, dvs. males på billedet på en række forskellige måder.
En kurve kan udfyldes med en farve eller et mønster. Hvis kurven ikke er lukket, vil den forsøge at finde ud af formen og derefter udfylde den. Dette virker dog ikke, hvis kurven er en lige linje.
Figur 7.10. Eksempel på fire forskellige kurver
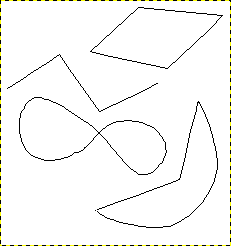
Fire eksempler på GIMP-kurver: en lukket polygonal, en åben polygonal, en lukket og buet samt en lukket med en blanding af buede og rette stykker.
Begynd med at tegne omridset af din kurve; omridset kan ændres senere (se værktøjet Kurver). Vælg derefter værktøjet kurver med en af følgende metoder:
Brug → i menuen.
Klik på det relevante ikon  i værktøjskassen.
Brug genvejstasten B.
Når værktøjet Kurver er valgt, ændres musemarkøren som standard til et trådkors med en kurve. Den faktiske form afhænger af din indstilling af musemarkørens tilstand. Sørg for, at kurvens Redigeringstilstand i værktøjsindstillingerne er indstillet til Design.
Venstreklik i billedet for at oprette kurvens første punkt. Flyt musen til et nyt punkt og venstreklik for at lave endnu et punkt, der er forbundet med det forrige punkt. Selvom du kan oprette så mange punkter, som du ønsker, behøver du kun to punkter for at lære om kurver.
Når du tilføjer punkter, har musemarkøren en lille “+” ved siden af kurven, som angiver, at et klik vil tilføje et nyt punkt.
Når musemarkøren er tæt på et af kurvepunkterne, ændres “+” til et kryds med pile ligesom flytteværktøjet. Du kan så flytte det eksisterende kurvepunkt.
For at lukke kurven skal du flytte musemarkøren oven på det punkt, du vil forbinde til, og derefter Ctrl-klikke på det punkt. Når du er færdig med at designe din kurve, kan du klikke Enter. Det vil forvandle kurven til en markering. Du kan også fortsætte med at tilføje flere punkter eller begynde at ændre på kurven.
For at redigere kurven skal du flytte musemarkøren tæt på et linjestykke, venstreklikke og trække i linjestykket. Der sker nu to ting:
Linjestykket bøjer og bliver til en bue, når der trækkes i det.
Hvert linjestykke har to begyndelses- og slutpunkter markeret med små firkanter, som kaldes håndtag. En “retningslinje” stikker nu ud fra hvert brgyndelsespunkt på det linjestykke, som blev flyttet. Retninglinjen har typisk end anden farve end kurven.
Det buede linjestykke forlader et slutpunkt i samme retning, som “retningslinjen” forlader begyndelsespunktet i. “Retningslinjens” længde styrer, hvor langt linjestykket følger “retningslinjen”, før den bøjer af mod det andet kurvepunkt.
Håndtaget for enden af hver “retningslinje” kan trækkes for at ændre kurvens retning og længde. Håndtagene i den anden ende, hvor de forbindes til stien, kan bruges til at flytte placeringen af det pågældende kurvepunkt.
Figur 7.11. En kurves udseende mens den manipuleres
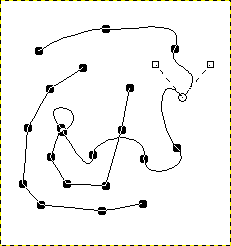
En kurves udseende mens den manipuleres med brug af værktøjet Kurver.
Kurven består af to komponenter med både rette og buede stykker. Sorte kvadrater er ankerpunkter, den åbne cirkel markerer det valgte anker, og de to åbne kvadrater er håndtagene tilhørende det valgte anker.

