| 4.4. Диалог шаблонов | ||
|---|---|---|

|
4. Диалоги управления изображением |  |
| 4.4. Диалог шаблонов | ||
|---|---|---|
|
|
4. Диалоги управления изображением | |
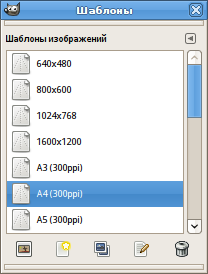
Templates are pre-defined image settings that you can use to quickly create a new image with your preferred dimensions, resolution etc. GIMP comes with a lot of templates installed, but you can also create your own. When you create a new image, you can access the list of existing templates to choose one to be used as base for your new image. The «Templates» dialog allows you to manage these templates.
Диалог «Шаблоны» можно прикрепить на панель. Более подробно об этом написано в разделе Раздел 2.3, «Диалоги и панели».
Его можно открыть следующими способами:
из меню окна изображения: → → ;
через меню вкладки на любой панели, появляющееся при щелчке по значку  c последующим выбором пункта → .
You select a template by clicking on its icon. Right clicking reveals a local menu that offers the same functions as the buttons.
В меню закладки есть возможность выбрать способ отображения шаблонов: и . В первом случае вся информация располагается в прямоугольной таблице одинаковых пиктограмм (если им не дать определённую пиктограмму, об этом ниже). Показано только имя выделенного образца. Во втором случае каждый образец располагается в отдельной строке, в которой также содержится его название; все пиктограммы одинаковы.
С помощью пункта Размер пред.просмотра, находящегося в том же меню закладки, можно изменить размер пиктограммы шаблона.
![[Подсказка]](images/tip.png)
|
Подсказка |
|---|---|
|
Комбинация клавиш Ctrl+F в виде списка открывает поле поиска. Смотри Просмотр в виде списка/Просмотр в виде таблицы |
Кнопки, расположенные внизу диалога, дают доступ к следующим операциям над шаблонами:
 Создать новое изображение из выбранного шаблона
Clicking on this button creates a new image with the settings defined in the selected template.
При нажатии на эту кнопку открывается диалог Новый образец, идентичный диалогу редактирования образца, который мы рассмотрим ниже.
 Копировать выделенный образец
Clicking on this button opens the Edit Template dialog that is documented next.
 Редактировать выбранный образец
Clicking on this button opens the Edit Template dialog where you can adjust the image related settings for the selected template.
This deletes the selected template after asking for confirmation.
|
|
Подсказка |
|---|---|
|
Every template is stored in a |
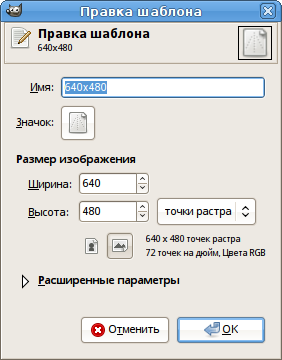
This dialog allows you to change the settings of the selected template.
You can access this dialog by clicking on the button at the bottom of the Templates Dialog
Параметры
In this text box, you can modify the name of the template.
By clicking on this icon, you can select a different icon that will be shown in front of the name of this template. The icon can be picked from a list of pre-defined icons, from a file on your computer, or by pasting from the clipboard.
Here you set the width and height of the new image. The default units are pixels, but you can switch to another unit using the adjoining menu. If you do, note that the resulting pixel size will be determined by the X and Y resolution (which you can change in the Advanced Options), and by the setting of «Dot for Dot», which you can change in the menu.
These buttons toggle between Portrait and Landscape mode. Their effect is to exchange the values for Width and Height. If the X and Y resolutions are different (in Advanced Options), then these values are also exchanged. On the right, image size, image resolution and color space are displayed.
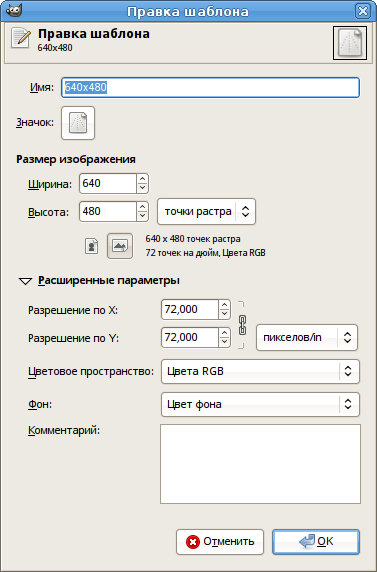
Расширенные параметры
The advanced options let you change several additional image settings.
Эти параметры будут иметь значение при печати файла. Они не влияют на размер изображения в пикселах, но от них зависит размер картинки на бумаге. Кроме того, разрешение может влиять на отображение картинки на мониторе: если функция "Точка за точкой" отключена, и изображение просматривается в размере 1:1, GIMP отображает его реальный физический размер, вычисленный исходя из размера пикселов и разрешения. Если монитор не откалиброван, то отображение картинки может быть некорректным. Калибровку монитора можно произвести в процессе установки GIMP или при помощи закладки Экран диалога настроек.
Создаваемое изображение может быть в режиме RGB или Градации серого. Создать изначально индексированное изображение нельзя, однако никото вам не мешает перевести его в этот режим позже.
You can select the precision that GIMP will use for this image. For more information see the Precision menu documentation.
You can select whether to use Perceptual gamma, or linear light. For more information see also the Precision menu documentation.
When enabled, the image will be color managed. Disabling color management is equivalent to choosing a built-in sRGB profile.
Here you can select the color profile for this image. The default is the built-in sRGB color profile, but you can also select your own color profile from a file on your computer.
You have five choices for filling the new image's background layer:
Foreground color, uses the current foreground color as shown in the Toolbox.
Background color, uses the current background color as shown in the Toolbox.
White, uses white for the background layer.
Transparency. If this option is chosen, then the Background layer in the new image will be created with an alpha channel; otherwise not. The background layer will be transparent.
Pattern, uses the active pattern at the time of creating the image to fill the background layer.
You can add a default comment here that will be attached to the image. When exporting this image, the comment will be added too for file formats that support comments. You will still be able to change this comment in the export dialog.