| 4. Диалоги управления изображением | ||
|---|---|---|

|
Глава 15. Диалоги |  |
| 4. Диалоги управления изображением | ||
|---|---|---|
|
|
Глава 15. Диалоги | |
Buffers are a kind of temporary storage for image data, created when you cut or copy part of a drawable (a layer, layer mask, etc.). The following commands are available from the menu to save an image to a buffer:
→ → This command cuts the selected part from the current drawable (usually a layer) and places it in a buffer. If there is no selection the whole drawable will be used. You will be asked to give the buffer a name. The image will be removed from the selection after this is done.
→ → This command copies the selected part from the current drawable (usually a layer) and places it in a buffer. If there is no selection the whole drawable will be used. You will be asked to give the buffer a name.
→ → This command copies the selected part from all the visible drawables and places it in a buffer. If there is no selection the whole image will be used. You will be asked to give the buffer a name.
→ → This menu command opens the Buffers Dialog. To actually paste a buffer, choose one of the buttons from this dialog, or the context menu. Both of which will be explained below.
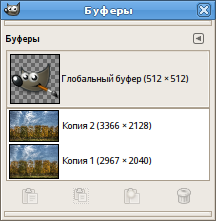
The «Buffers» dialog shows you the contents of all existing named buffers, and allows you to operate on them in several ways. It also shows you, at the top, the contents of the Global Buffer (the contents of the clipboard). This Global Buffer is merely a display: you can't do anything with it. There is no hard limit on the number of named buffers you can create, except that it will consume a share of your available computer memory.
![[Внимание]](images/caution.png)
|
Внимание |
|---|---|
|
Named buffers are not saved across sessions: they will be gone when you close GIMP. The only way to save their contents is to paste them into images. |
Диалог «Буферы» можно прикрепить на панель. Более подробно об этом написано в разделе Раздел 2.3, «Диалоги и панели».
Его можно открыть следующими способами:
from the main menu: → → ;
from the main menu: → → ;
через меню вкладки на любой панели, появляющееся при щелчке по значку  c последующим выбором пункта → .
В меню есть список Откреплённых диалогов, который существует только пока открыт хотя бы один диалог. В этом случае диалог «Буферы» можно вызвать из меню изображения: → .
Clicking on a buffer in the display area makes it the active buffer, i.e., the one that will be used for paste commands executed from the Buffers context menu, or the buttons at the bottom of the dialog. Double-clicking on a buffer causes its contents to be pasted to the active image as a floating selection; this is a quick way of executing the «Paste Buffer» command.
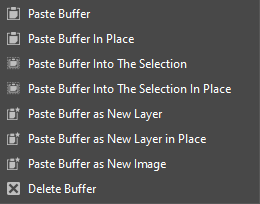
At the bottom of the dialog are five buttons. The operations they perform can also be accessed from the Buffers Menu that you get by right clicking on the active buffer.
В меню вкладки диалога можно выбрать способ отображения буферов — и . В первом случае буферы располагаются в виде прямоугольной таблицы. Во втором случае они выстроены вертикально, в каждой строке показана миниатюра содержимого буфера, его имя и размер в точках.
![[Подсказка]](images/tip.png)
|
Подсказка |
|---|---|
|
Комбинация клавиш Ctrl+F открывает поле поиска. См. Просмотр в виде списка/Просмотр в виде таблицы |
Размер миниатюр буферов можно изменить с помощью вложенного меню «Размер миниатюры» в меню вкладки.
Внизу диалога находятся следующие кнопки:
Эта команда вставляет содержимое выбранного буфера в активное изображение как плавающее выделение. Разница между этой командой и обычным Вставить проявляется только тогда, когда выбранный буфер отличается от глобального.
With the Shift key pressed, it pastes the buffer at its original location.
Эта команда вставляет содержимое выбранного буфера в активное выделение изображения, в качестве плавающего выделения. Единственным отличием этой команды от обычной команды Вставить в выделение является то, что она использует выбранный буфер, а не глобальный буфер обмена.
With the Shift key pressed, it pastes the buffer into the active selection at its original location.
This command creates a new layer in the active image out of the contents of the selected buffer. The only difference between this and the ordinary Paste as New Image command is that it uses the selected buffer rather than the content of the global clipboard buffer.
With the Shift key pressed, it creates the layer at the original location of the buffer.
Эта команда создаёт новое однослойное изображение на базе содержимого выбранного буфера. Единственным отличием этой команды от обычной команды Вставить как новое изображение является то, что она использует выбранный буфер, а не содержимое глобального буфера обмена.
Эта команда удаляет выбранный именованный буфер без подтверждения. Глобальный буфер удалить невозможно.