| 8장. 이미지 합치기 | ||
|---|---|---|

|
부 II. GIMP 마법사가 되려면? |  |
차례
You can think of layers as a stack of slides. Using layers, you can construct an image of several conceptual parts, each of which can be manipulated without affecting any other part of the image. Layers are stacked on top of each other. The bottom layer is the background of the image, and the components in the foreground of the image come above it.
There is no limit to the number of layers an image can have, only the amount of memory available on the system. It is not uncommon for advanced users to work with images containing dozens of layers. You can group layers to make your work easier, and there are many commands to handle layers.
The organization of layers in an image is shown in the Layers dialog, which is the second most important type of dialog window in GIMP, after the Main Toolbox. How it works is described in detail in the Layers Dialog section, but we will touch some aspects of it here, in relation to the layer properties that they display.
Each open image has at any time a single active drawable. A “drawable” is a GIMP concept that includes layers, but also several other items, such as channels, layer masks, and the selection mask. Basically, a “drawable” is anything that can be drawn on with painting tools. If a layer is currently active, it is shown highlighted in the Layers dialog, and its name is shown in the status area of the image window. If not, you can activate it by clicking on it. If none of the layers are highlighted, it means the active drawable is something else than a layer.
In the menu bar, you can find a menu called , containing a number of commands that affect the active layer of the image. The same menu can be accessed by right-clicking in the Layers dialog.
이미지의 각 레이어들은 다음과 같은 주요 속성을 갖습니다. :
Every layer has a name. This is assigned automatically when the layer is created, but you can change it. You can change the name of a layer either by double-clicking on it in the Layers dialog, or by right-clicking there, and then selecting the top entry in the menu that appears, .
An alpha channel encodes information about how transparent a layer is at each pixel. It is visible in the Channel Dialog: white is complete opacity, black is complete transparency and gray levels are partial transparencies.
The background layer is special. If you have just created a new image, it only has one layer, which is the background layer. If the image has been created with an opaque Fill type, this one layer has no Alpha channel. To get a background layer with transparency, either create your new image with a transparent Fill type, or you use the Add an Alpha Channel command.
If you add a new layer, even with an opaque Fill type, an Alpha channel is automatically added to the layer.
Every layer other than the bottom layer of an image automatically has an Alpha channel, but you can't see a grayscale representation of the alpha values. See Alpha in Glossary for more information.
그림 8.2. 알파 채널 예제: 기본 이미지
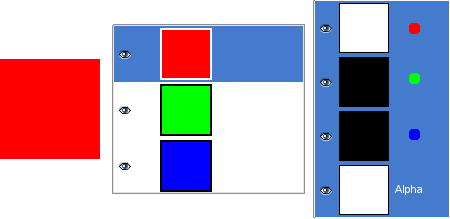
This image has three layers painted with pure 100% opaque Red, Green, and Blue. In the Channel Dialog, you can see that an alpha Channel has been added. It is white because the image is not transparent since there is at least one 100% opaque layer. The current layer is the red one: since it is painted with pure red, there is no green and no blue and the corresponding channels are black.
그림 8.3. 알파 채널 예제 : 한 개의 투명한 레이어가 있는 경우
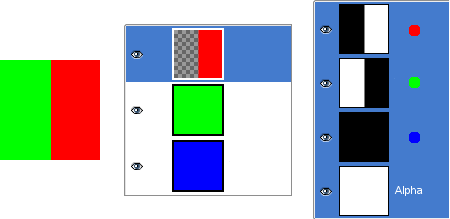
첫번째 레이어의 왼쪽 부분을 투명하게 만들었습니다. (사각 선택, 편집/지우기) 두번째 레이어는 녹색으로 첫번째 레이어의 투명한 부분을 통해 일부가 보입니다. 하지만 이미지에 불투명한 레이어가 있기 때문에 알파 채널은 여전히 흰색입니다.
그림 8.4. 알파 채널 예제: 두 개의 투명한 레이어가 있는 경우
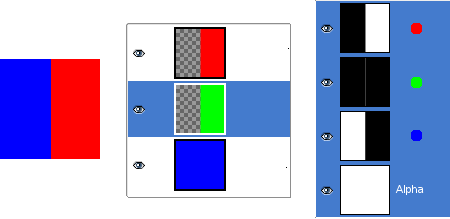
두번째 레이어의 왼쪽 부분도 투명하게 만들었습니다. 따라서 세번째 파랑색 레이어가 첫번째, 두번째 레이어를 봉해 보이게 됩니다. 하지만 이미지에 불투명한 레이어가 있기 때문에 알파 채널은 여전히 흰색입니다.
그림 8.5. 알파 채널 예제 : 세 개의 투명한 레이어가 있는 경우
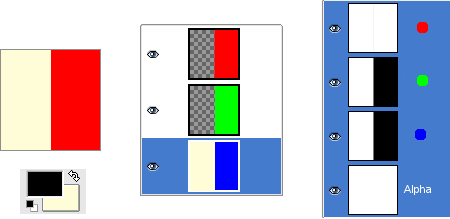
The left part of the third layer has been cleared. The Alpha channel is still white and the left part of the layer is opaque, because the background layer has no Alpha channel. In this case, the Clear command works like the Eraser and uses the Background color of Toolbox.
그림 8.6. 알파 채널 예제 : 배경레이어에 알파 채널을 추가한 경우
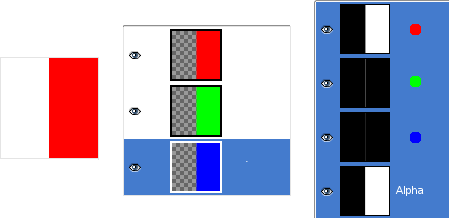
We used the → → command, on the Background layer. Now, the left part of the image is fully transparent and has the color of the page where the image is shown. The left part of the Alpha Channel thumbnail is black (transparent) in the Channel Dialog.
The layer type is determined by the image type (see previous section), and the presence or absence of an alpha channel. These are the possible layer types:
RGB
RGBA
그레이
그레이A
인덱스
인덱스A
The main reason this matters is that some filters (in the menu) only accept a subset of layer types, and appear disabled in the menu if the active layer does not have a supported type. Often you can rectify this either by changing the mode of the image, or by adding or removing an alpha channel.
 Visibility
It is possible to remove a layer from an image, without destroying it, by clicking on the symbol in the Layers dialog. This is called “toggling the visibility” of the layer. Most operations on an image treat toggled-off layers as if they did not exist. When you work with images containing many layers, with varying opacity, you often can get a better picture of the contents of the layer you want to work on by hiding some of the other layers.
![[작은 정보]](images/tip.png)
|
작은 정보 |
|---|---|
|
Shift 버튼을 누른채 눈 모양을 클릭하면, 방금 클릭한 레이어를 제외한 모든 레이어를 숨깁니다. |
Usually, you activate a layer, to work on it, clicking it in the layer list. When you have a lot of layers, finding which layer an element of the image belongs to is not easy: then, press Alt and click with Mouse wheel on this element to activate its layer. The available layers will be looped through (starting from the upper one) while the Alt is held and the picked layer will be temporarily displayed in the status bar.
 Linkage to other layers
눈 모양 아이콘과 레이어 미리보기 사이를 클릭하면, 연결 아이콘이 나타납니다. 이것을 이용해 움직이거나 변형하기 등의 복수 레이어에 적용해야 하는 동작들을 위해 레이어들을 그룹지을 수 있습니다.
In GIMP, the boundaries of a layer do not necessarily match the boundaries of the image that contains it. When you create text, for example, each text item belongs to its own separate layer, and the layer size is automatically adjusted to contain the text and nothing more. Also, when you create a new layer using cut-and-paste, the new layer is sized just large enough to contain the pasted item. In the image window, the boundaries of the currently active layer are shown outlined with a black-and-yellow dashed line.
이 점선 밖의 공간에서는 아무런 작업도 할 수 없는데, 그것은 실제로 거기엔 아무것도 존재하지 않기 때문입니다. 따라서 이런 문제에 부딪힐 경우에는, 메뉴의 하단에 있는 몇 가지 명령들을 통해 레이어의 크기를 조정하면 됩니다.
![[참고]](images/note.png)
|
참고 |
|---|---|
|
레이어가 차지하는 메모리의 총량은 레이어의 내용이 아닌 넓이에 의해 좌우됩니다. 따라서 큰 이미지나 많은 레이어를 가진 이미지로 작업을 한다면 레이어의 크기를 적절하게 조절할 필요가 있습니다. |
레이어의 불투명도는 바로 밑에 위치한 레이어의 색상을 얼마만큼 투과시킬 것인가에 대한 것입니다. 불투명도의 범위는 0부터 100으로, 0은 완전 투명, 100은 완전 불투명입니다.
레이어의 모드는 레이어의 색상을 하위 레이어의 색상과 어떠한 방식으로 혼합시킬 것인가에 대한 것입니다. 이것은 상당히 복잡하나 그만큼 중요하므로 2절. “레이어 모드” 에 따로 설명이 되어 있습니다.
레이어에는 알파 채널외에 투명도를 조절할 수 있는 방법이 하나 더 있습니다. 그것은 레이어 마스크를 추가하는 것으로 레이어 마스크는 레이어와 연동된 추가적인 그레이스케일 drawable 영역입니다. 기본적으로는 레이어에 없으며, 따로 추가를 해주어야 합니다. 레이어 마스크의 동작에 대한 자세한 설명은 레이어 마스크에 있습니다.