| 13.3. ずらしマップ... | ||
|---|---|---|

|
13. マップフィルター |  |
| 13.3. ずらしマップ... | ||
|---|---|---|
|
|
13. マップフィルター | |
図17.290 「ずらしマップ」フィルターの使用例
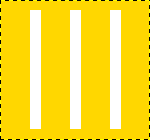
元画像

The displacement map has four gray stripes with values of 210, 160, 110, and 60, respectively.
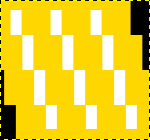
Horizontal displacement coefficient is 30. Vacated pixels are black. The image areas corresponding to light gray (128) were displaced 19 and 8 pixels to the left. The image areas corresponding to dark gray (127) were displaced 4 and 15 pixels to the right.
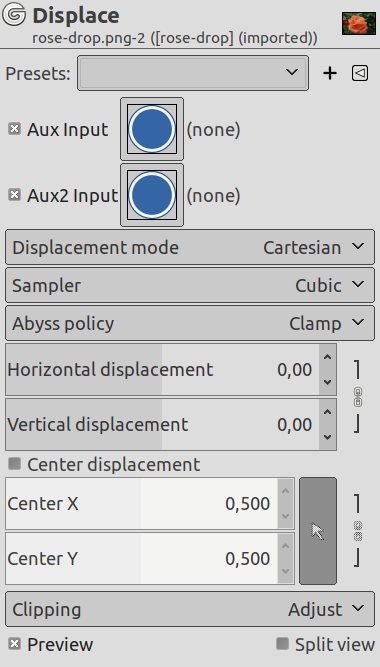
This filter uses a 「displace-map」 to displace corresponding pixels of the image. This filter displaces the content of the specified drawable (active layer or selection) by the amounts specified in Horizontal and vertical Displacement multiplied by the intensity of the corresponding pixel in the 「displace map」 drawables. Both Horizontal and Vertical displace maps should be grayscale images and have the same size as the drawable . This filter allows interesting distortion effects.
![[注記]](images/note.png)
|
注記 |
|---|---|
|
These options are described in 「Common Features」. |
Clicking on a question mark button opens a small file browser with two panels. The left panel shows images present on your screen. The right panel shows the layers of the selected image. Double click on the wanted layer to select the map.
You can select different maps for Horizontal and Vertical displacements.
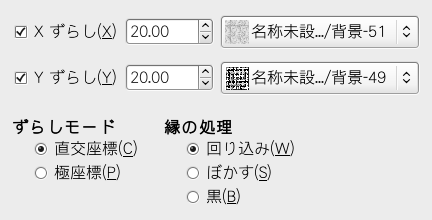
You can choose working in Cartesian coordinates, where pixels are displaced in Horizontal or Vertical direction, or working in Polar coordinates, where the image is pinched and whirled by displacing pixels in radial or tangent direction.
いずれのオプションについても詳しくはこの下の節をご覧ください。
Interpolation methods are described in Transform tools
These options allows you to set displacement behavior on active layer or selection edges. They are described in Abyss policy
どちらのモードもずらし方向やずらし距離はずらしマップの同じ位置の画素の濃さによって決まります。
マップ用画像は 256 階調の灰色濃淡 (0-255) グレースケール画像に変換されてから利用され、 階調の (理論的な) 平均値は 127.5 となるはずです。 フィルターは画像上でどの画素もそれと同じ位置のマップ画素が 127.5 より小さい (0-127) 値の場合に所定の方向へ、 逆に同じ位置のマップ画素が 128 から 255 までの間の値ならばその反対側の方向へずらされます。
If the respective option is activated, image pixels corresponding to pixels from 0 to 127 will be displaced to the right for Horizontal, downwards for Vertical, image pixels corresponding to pixels from 128 to 255 will be displaced to the left for Horizontal, upwards for Vertical.
記入した X ずらし 係数や Y ずらし 係数はそのまま移動距離を示しているのではありません。 移動距離を求める計算式  で係数として使われます。 この式の「
強度」とはマップ上の画素の比例濃度です。 [19] この計算式に強度が関わることが大事な点です。 これがあるおかげで、 徐々に拡がるずれをグラデーションを使ったマップで表現できるのです。 [強度の値は -1.00 から 1.00 までの範囲で変化しますので、 係数はずれの距離 (ピクセル単位) の最大値ということになります。]
この係数の値は正にも負にも設定できます。 負のずれは正と方向が逆になります。 ずれ係数 X の値の範囲は画像の幅のマイナス 2 倍からプラス 2 倍まで、 ずれ係数 Y の値の範囲は画像の高さのマイナス 2 倍からプラス 2 倍までです。
When you click on the drop-down list button, a list appears where you can select a displacement map. To be present in this list, an image must respect two conditions. First, this image must be present on your screen when you call filter. Then, this image must have the same dimensions as the original image. Most often, it will be a duplicate original image, which is transformed to gray scale and modified appropriately, with a gradient. It may be possible to use RGB images, but color luminosity is used making result prevision difficult. Map may be different in horizontal and vertical directions.
このオプションを有効にすると、 対象画像では画素はレイヤーもしくはその選択範囲の中心までの距離が変化します。 レイヤーの画素はそれぞれ同じ位置のマップ上の画素の値が 0 から 127 までの値ならば中心から離れてゆき、 逆にその画素と同じ位置のマップ上の画素の値が 128 から 255 までの値ならば対象レイヤーの画素は中心に近づきます。
For the values and the displacement map see above (「Horizontal/Vertical displacement」).
ずらしの規模は極点からの距離には関係なく、 どの画素も同程度の移動をします。 つまり画像は伸び縮みをせず歪んでしまうこともあります。

ひねりオプションによる画像のひずみ
A 160x120 pixels image, plain white displacement map, and displacement coefficient 20.0: this results in a 20 pixels displacement towards center. This is a horizontal reduction in size by 25%, vertical by 33%, and diagonal by 20%, so the image will be distorted.
このオプションを有効にするとレイヤーもしくはその選択範囲の画素のレイヤー中央からの方角が、 その同じ位置のマップ上の画素の値の大きさに従ってずれます。 平坦な濃度のずらしマップなら画像が丸ごと回転しますが、 マップに多様な濃度があれば画像は渦を巻きます。
対象画像のある画素はその同じ位置のずらしマップの濃度が 0 から 127 までの値の場合は反時計回りに回転し、 位置の同じずらしマップの画素の濃度が 128 から 255 までの値ならば時計回りに回転します。
係数とずらしマップについては上記をご覧ください。
|
|
注記 |
|---|---|
|
For a plain, non neutral map, if displace mode 「Polar」 is enabled, this filter works like Whirl and Pinch. |
つぎの手順を踏んでください。
加工したい画像をまず開いてください。
Duplicate this image. Activate this duplicate and make it grayscale ( → → ). Fill it with the wanted gradient. This image will be your Displacement map, with the dimensions of original image.

対象画像もしくはレイヤーを活性化します。 そこに何かテキストを貼って テキストレイヤー として加えます。 そのレイヤーを画像と同じ大きさにします。 やり方は、 画像ウィンドウのメニューの メニューからもしくはレイヤーダイアログの脈絡メニューを呼び出して コマンドを実行します。 ちなみにテキストレイヤーは文字と透明な背景でできており、 フィルターは完全透過ピクセルを移動しないため文字の画素だけがずらせます。

テキストレイヤーを活性化させます。 ずらしマップフィルターを呼び出し、 プレビュー画面を参考にしながらパラメーター、 とりわけ係数の調節を行います。 ボタンをクリックして実行です。

この方法はテキストレイヤーに限らずどんなレイヤーにも適用できます。

![[ヒント]](images/tip.png)
|
ヒント |
|---|---|
|
グラデーションを望みどおりに描くには先に黒から白へのグラデーションを描いておき、 トーンカーブツール を使ってグラデーション曲線を描くとよいでしょう。 |
つぎの手順を踏んでください。
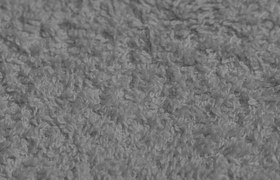
Open the image with an uneven texture.
Create the map: Duplicate the image and desaturate (Colors/Desaturate/Desaturate) this copy.
Create the text in Texture image. Move it if necessary. Make this text layer the same size as the image using Layer to Image Size
Open 「Displace」 filter. Click on the button and double-click on the map image thumbnail in the left panel.

Displace filter applied.
この節ではずれの規模の算出について詳しく知りたい方を対象にそのしくみについて解説しています。 ご興味のない方は無視してくださっても問題ありません。
The overview example showed the horizontal displacement using a coefficient of 30.0: 19, 8, 4, or 15 pixels, depending on the gray level of the displacement map's color.
移動距離はどのように算出されるのでしょう。 これは意外と簡単です。


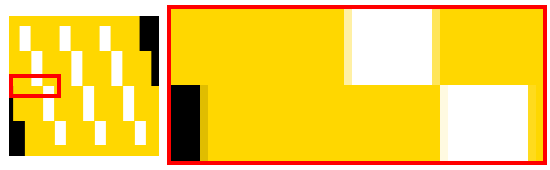
どの等式も得られた値が例で見て知っている結果とまったく同じにはなっていません。 (整数以外の値も使っていますが大したことではありません。) それではここで得られた値は整数値に近似されて画素はきりのいい数だけ移動するということなのでしょうか。 答えはいいえです。 どの画素も小数点以下を含め計算どおりに移動されます。 「分数的なずらし」は補間を使って実施されます。 つぎの近影はその様子を表しています。
単色の領域をずらすとその境界線付近で細い (1 ピクセル幅の) 中間色領域ができます。 上の拡大図では黒い領域は -4.12 ピクセル移動したため中間色は黒が 12% と金が 88% の配分になります。
たとえばもし X ずらし係数を 30.00 ではなく 30.01 と設定したとしたら、 得られる結果は異なるはずですが、 もちろんその違いを見分けるのは難しいでしょう。