| 4. 画像管理に関連するダイアログ | ||
|---|---|---|

|
第15章 ダイアログ |  |
| 4. 画像管理に関連するダイアログ | ||
|---|---|---|
|
|
第15章 ダイアログ | |
Buffers are a kind of temporary storage for image data, created when you cut or copy part of a drawable (a layer, layer mask, etc.). The following commands are available from the menu to save an image to a buffer:
→ → This command cuts the selected part from the current drawable (usually a layer) and places it in a buffer. If there is no selection the whole drawable will be used. You will be asked to give the buffer a name. The image will be removed from the selection after this is done.
→ → This command copies the selected part from the current drawable (usually a layer) and places it in a buffer. If there is no selection the whole drawable will be used. You will be asked to give the buffer a name.
→ → This command copies the selected part from all the visible drawables and places it in a buffer. If there is no selection the whole image will be used. You will be asked to give the buffer a name.
→ → This menu command opens the Buffers Dialog. To actually paste a buffer, choose one of the buttons from this dialog, or the context menu. Both of which will be explained below.
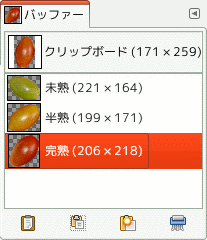
The 「Buffers」 dialog shows you the contents of all existing named buffers, and allows you to operate on them in several ways. It also shows you, at the top, the contents of the Global Buffer (the contents of the clipboard). This Global Buffer is merely a display: you can't do anything with it. There is no hard limit on the number of named buffers you can create, except that it will consume a share of your available computer memory.
![[注意]](images/caution.png)
|
注意 |
|---|---|
|
Named buffers are not saved across sessions: they will be gone when you close GIMP. The only way to save their contents is to paste them into images. |
「バッファー」ダイアログはドッキング可能です。 その扱い方については 「ダイアログとその合体」 の節をご覧ください。
呼び出し方はつぎのとおりです。
from the main menu: → → ;
from the main menu: → → ;
任意のドッキング可能なダイアログのボタンアイコン  をクリックすると出てくるタブメニューより →
ダイアログが少なくともひとつ開かれておれば、 メニューに 切り放したウィンドウ のリストが現れます。 このときは画像メニューより → と進めば「バッファー」ダイアログを浮かび上がらせられます。
Clicking on a buffer in the display area makes it the active buffer, i.e., the one that will be used for paste commands executed from the Buffers context menu, or the buttons at the bottom of the dialog. Double-clicking on a buffer causes its contents to be pasted to the active image as a floating selection; this is a quick way of executing the 「Paste Buffer」 command.
At the bottom of the dialog are five buttons. The operations they perform can also be accessed from the Buffers Menu that you get by right clicking on the active buffer.
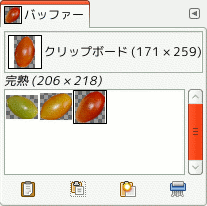
「バッファー」ダイアログのタブメニューで と を切り替えられます。 「並べて表示」の場合はバッファーの見本が升目状に並びます。 「一覧で表示」の場合はバッファーが縦一列に列挙され、 各段にその見本画像と名前とピクセル単位の寸法が表示されます。
![[ヒント]](images/tip.png)
|
ヒント |
|---|---|
|
キーボードショートカット Ctrl+F で検索窓が現れます。 一覧表ダイアログの検索窓 をご覧ください。 |
バッファーの見本画像の大きさはダイアログのタブメニューの サブメニューで調節できます。
ダイアログの底部に 4 つのボタンが並んでいます。
このコマンドは選択されたバッファーの内容を活性画像にフローティング選択範囲として貼り付けます。 この操作は通常の 貼り付け 操作とは異なり通用クリップボードバッファーではなく選ばれたバッファーを使用します。
With the Shift key pressed, it pastes the buffer at its original location.
This command pastes the contents of the selected buffer into the active image's selection, as a floating selection. The only difference between this and the ordinary Paste Into Selection command is that it uses the selected buffer rather than the global clipboard buffer.
With the Shift key pressed, it pastes the buffer into the active selection at its original location.
This command creates a new layer in the active image out of the contents of the selected buffer. The only difference between this and the ordinary Paste as New Image command is that it uses the selected buffer rather than the content of the global clipboard buffer.
With the Shift key pressed, it creates the layer at the original location of the buffer.
This command creates a new single-layer image out of the contents of the selected buffer. The only difference between this and the ordinary Paste as New Image command is that it uses the selected buffer rather than the content of the global clipboard buffer.
このコマンドは選択された名前つきバッファーを削除します。 実行前の確認はありません。 通用バッファーは削除できません。