| 4.4. La fenêtre des Modèles | ||
|---|---|---|

|
4. Fenêtres de dialogue relatives à la gestion de l’image |  |
| 4.4. La fenêtre des Modèles | ||
|---|---|---|
|
|
4. Fenêtres de dialogue relatives à la gestion de l’image | |
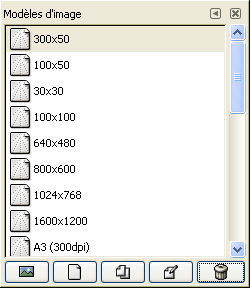
Templates are pre-defined image settings that you can use to quickly create a new image with your preferred dimensions, resolution etc. GIMP comes with a lot of templates installed, but you can also create your own. When you create a new image, you can access the list of existing templates to choose one to be used as base for your new image. The « Templates » dialog allows you to manage these templates.
La fenêtre des modèles est une fenêtre ancrable : voyez la section Dialogues, fenêtres et onglets sur l’utilisation des ancrages.
Vous pouvez y accéder :
depuis le menu de la fenêtre d’image : → → :
à partir d’un autre dialogue en cliquant sur le petit bouton  et en choisissant → .
You select a template by clicking on its icon. Right clicking reveals a local menu that offers the same functions as the buttons.
Dans le menu d’onglet du dialogue « Modèles », vous pouvez choisir entre et . En mode grille, les modèles sont affichés dans une grille d’icônes identiques (à moins que vous leur ayez attribué une icône particulière comme nous le verrons). Seul le nom du modèle sélectionné est affiché. En mode Liste, les modèles sont alignés verticalement ; les icônes sont également identiques : tous les noms sont affichés.
Dans ce menu d’onglet, l’option Taille des aperçus vous permet de changer la taille des icônes.
![[Astuce]](images/tip.png)
|
Astuce |
|---|---|
|
Ctrl+F dans une liste ouvre un champ de recherche. Voir Voir comme une liste ; voir comme une grille. |
Les boutons en bas de la fenêtre vous permettent d’agir sur les modèles de différentes façons :
 Créer une nouvelle image à partir du modèle sélectionné
Clicking on this button creates a new image with the settings defined in the selected template.
En cliquant sur ce bouton, vous ouvrez la fenêtre de dialogue Nouveau modèle ; identique au dialogue Éditer le modèle, que nous verrons plus bas.
 Dupliquer le modèle sélectionné
Clicking on this button opens the Edit Template dialog that is documented next.
 Modifier le modèle sélectionné
Clicking on this button opens the Edit Template dialog where you can adjust the image related settings for the selected template.
This deletes the selected template after asking for confirmation.
|
|
Astuce |
|---|---|
|
Every template is stored in a |
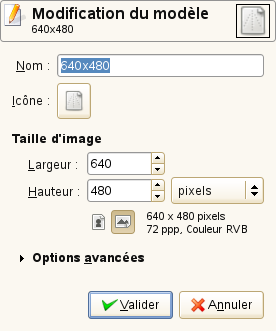
This dialog allows you to change the settings of the selected template.
You can access this dialog by clicking on the button at the bottom of the Templates Dialog
Options
In this text box, you can modify the name of the template.
By clicking on this icon, you can select a different icon that will be shown in front of the name of this template. The icon can be picked from a list of pre-defined icons, from a file on your computer, or by pasting from the clipboard.
Here you set the width and height of the new image. The default units are pixels, but you can switch to another unit using the adjoining menu. If you do, note that the resulting pixel size will be determined by the X and Y resolution (which you can change in the Advanced Options), and by the setting of « Dot for Dot », which you can change in the menu.
These buttons toggle between Portrait and Landscape mode. Their effect is to exchange the values for Width and Height. If the X and Y resolutions are different (in Advanced Options), then these values are also exchanged. On the right, image size, image resolution and color space are displayed.
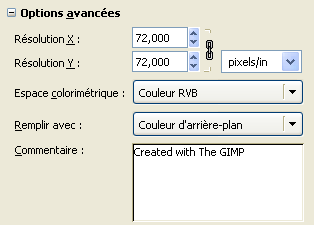
Options avancées
The advanced options let you change several additional image settings.
Ces valeurs n’entrent vraiment en jeu que pour l’impression : elles n’affectent pas la taille de l’image en pixels, mais elles déterminent sa taille sur le papier une fois imprimée. Elles peuvent néanmoins affecter la façon dont l’image est affichée à l’écran : si « point-pour-point » est cochée dans le menu , et si le zoom est à 100%, GIMP essaiera d’afficher l’image à la taille et la résolution ainsi définies. Mais cela peut se révéler impossible si l’écran n’a pas été correctement calibré. La calibration se fait soit lors de l’installation de GIMP, soit en passant par le sous-menu Affichage du menu Préférences.
RVB : l’image sera dans le système de couleurs Rouge, Vert, Bleu, qui est celui de votre moniteur ou de votre écran télé.
You can select the precision that GIMP will use for this image. For more information see the Precision menu documentation.
You can select whether to use Perceptual gamma, or linear light. For more information see also the Precision menu documentation.
When enabled, the image will be color managed. Disabling color management is equivalent to choosing a built-in sRGB profile.
Here you can select the color profile for this image. The default is the built-in sRGB color profile, but you can also select your own color profile from a file on your computer.
You have five choices for filling the new image's background layer:
Foreground color, uses the current foreground color as shown in the Toolbox.
Background color, uses the current background color as shown in the Toolbox.
White, uses white for the background layer.
Transparency. If this option is chosen, then the Background layer in the new image will be created with an alpha channel; otherwise not. The background layer will be transparent.
Pattern, uses the active pattern at the time of creating the image to fill the background layer.
You can add a default comment here that will be attached to the image. When exporting this image, the comment will be added too for file formats that support comments. You will still be able to change this comment in the export dialog.